
Table of Contents
Name of Procedure
- Diagnostic Cervical Medial Branch Block (CMBB)
- Therapeutic Cervical Medial Branch Block (CMBB)
💰 Medicare Data Explorer and Calculator
See payment rates and wRVUs from public CMS data. And use our calculator to model procedures and your practice.
Sample Opnote
The Quick Guide
Watch a quick guide. View as a story or as a video:

The Quiz
Goal
To ablate the medial branch nerves that innervate the facet joints of the cervical spine to provide long term relief for facet arthritis.
Indications
Cervical pain from facet arthritis. Usually non-radicular, over sclerotomal distributions from the affected facet joints.
Contraindications
- Common contraindications
- Blood thinners – See ASRA based guidelines (and an abbreviated protocol) for managing various blood thinners pre and post procedure
- Posterior fusion at the same levels as the target facet joints (ie, avoid C4-C5 facet treatment in a patient with a fusion at C4-C5).
Anatomy
Lumbar innervation is reviewed below (same basics for cervical). And then cervical specific anatomy is reviewed next.
Overview
A “medial branch” technically refers to the medial branch of the dorsal ramus of a spinal nerve. This medial branch also innervates the multifidus muscle, which is of particular importance when performing a medial branch ablation.

The source/path/naming/innervation of the medial branch nerves and their target injection sites can be confusing so keep a few things in mind:
- Each facet joint is innervated by 2 medial branch nerves. In the lumbar spine, a joint is innervated by a branch from its top level and from the level above it. For example, an L4-L5 facet joint is innervated by a branch from the L3 and L4 spinal nerve.

L4-L5 facet in red. L3 and L4 originating branches in green going to innervate that joint.
- The medial branch nerves run over the junction of the transverse process (TP) and superior articulating process (SAP) on the posterior side of the spine, at ONE LEVEL BELOW where it originates.
- See the L3 branch circled in green: to block the medial branch from L3 you target the TP and SAP at L4.
- Note how that branch innervates the L3-L4 joint and continues down to innervate the L4-L5 joint (red). So a block at the L3 level affects two joints.
- Likewise for the branch from L4, you block at L5.
- Now, put together the originating branches and their target sites to determine how to block a specific facet joint:
- To block the medial branch nerves that innervate the L4-L5 facet joint, you would target the junction of the TP and SAP at L4 and again at L5.
- Note this common pattern extends to multiple levels. To block 3 joints (L2-L3, L3-L4, L4-L5), your target sites will be at L2, L3, L4, L5. Note that at L3 and L4, you are getting two half joints at once, which simplifies our procedure.
Naming Notes
The images below use numbering based on the vertebral BODY that is being treated. Ie, a needle on the L4 transverse process is referred to as a L4 MBB target, which is different than the way the nerves would be labeled. This is done to make it easy to follow along with which vertebral bodies are leveled off and targeted.
Cervical Notes
- The shorthand for the cervical spine generally works also: To block the C3-C4 joint you would block nerves on the C3 and C4 vertebrae.
- One exception is that the C2-C3 joint is innervated only by the medial branch from C3, which is called the third occipital nerve and can be blocked around C2.
- In practice you’ll often block multiple facets like C2-C3 and C3-C4, which means you end up blocking C2, C3, C4 anyway.
In the cervical spine, medial branch nerves run along the articular pillar, roughly near the midpoint. At the higher levels the branches may sit more towards the superior part of the pillar:

Equipment/Skills/Setup
Core Equipment/Disposables: See our disposables/equipment article for “core” items that are common to all procedures.
Core Skills: See our guides to obtain images of the cervical, thoracic, or lumbar spine. Then steer a needle to direct it under the skin.
Special items and suggested setup for this procedure:
- 25g x 1.5″ hypodermic needle as your primary needle
- 5cc local anesthetic (1% lidocaine or 0.5% bupivacaine) in 10cc syringe as primary injectate
Landmarks and Patient Positioning
- Unilateral
- Place the patient in a lateral decubitus position with the treatment side up.
- Bilateral
- Place the patient in a prone position with the face down in a face cradle and the arms down at the sides. Alternatively you could have the patient in a supine position if you enter from a lateral position.
Cervical positioning is particularly difficult and important for a smooth procedure. Please see many important notes in our overview guide.
Technique
For the sake of this tutorial we will assume we are treating the C2-C3, C3-C4, C4-C5 facet joints on one side, which means we have targets at C2, C3, C4, C5 (marked below with red dots)
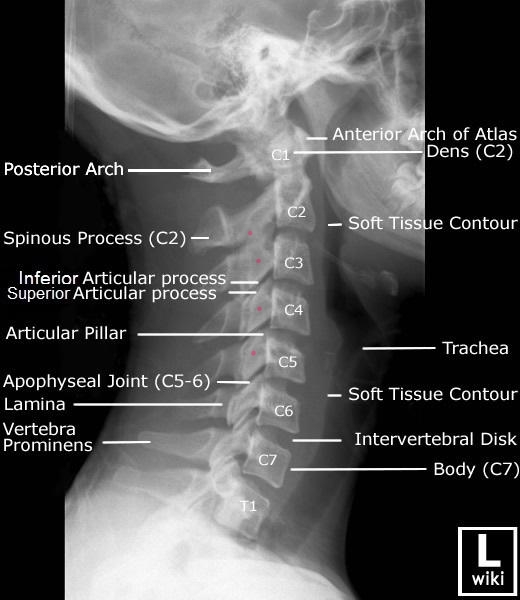
radiology-cervical-labeled-anatomy-lateral-cspine-xray
Technique 1 – Multiple injection sites
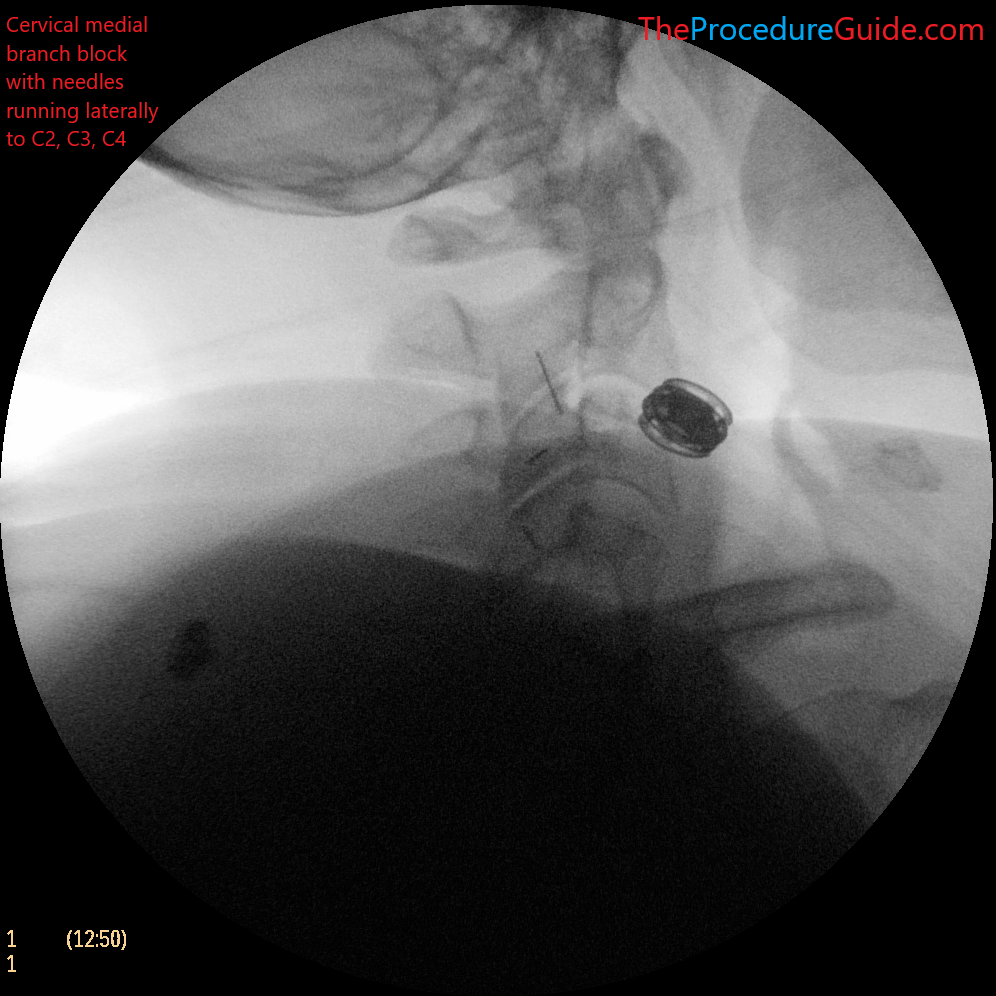
- Obtain a lateral view
- Place a pointer over the first target, C2
- Advance the target down until coming in contact with the bone at the first target in a “down the barrel” approach, which just means straight down/inline with the c-arm/x-ray
- Inject desired medication.
- Repeat the above steps for each subsequent level, which means putting a pointer at the next level, removing the needle and then inserting above the next level (or inserting another needle all together).
Technique 2 – Single injection site
This approach has the benefit of having only one skin puncture site which might be slightly faster and more comfortable for the patient.
Here is your target and entry point [See our general guide about basics for using targets and entry points to start a procedure]:
- Targets: same targets as technique 1 above
- Entry point: The skin above the C3-C4 joint (this is approximately in the middle of all 4 targets)
- Advance the needle down until coming in contact with the bone at the first target (we can start at C3).
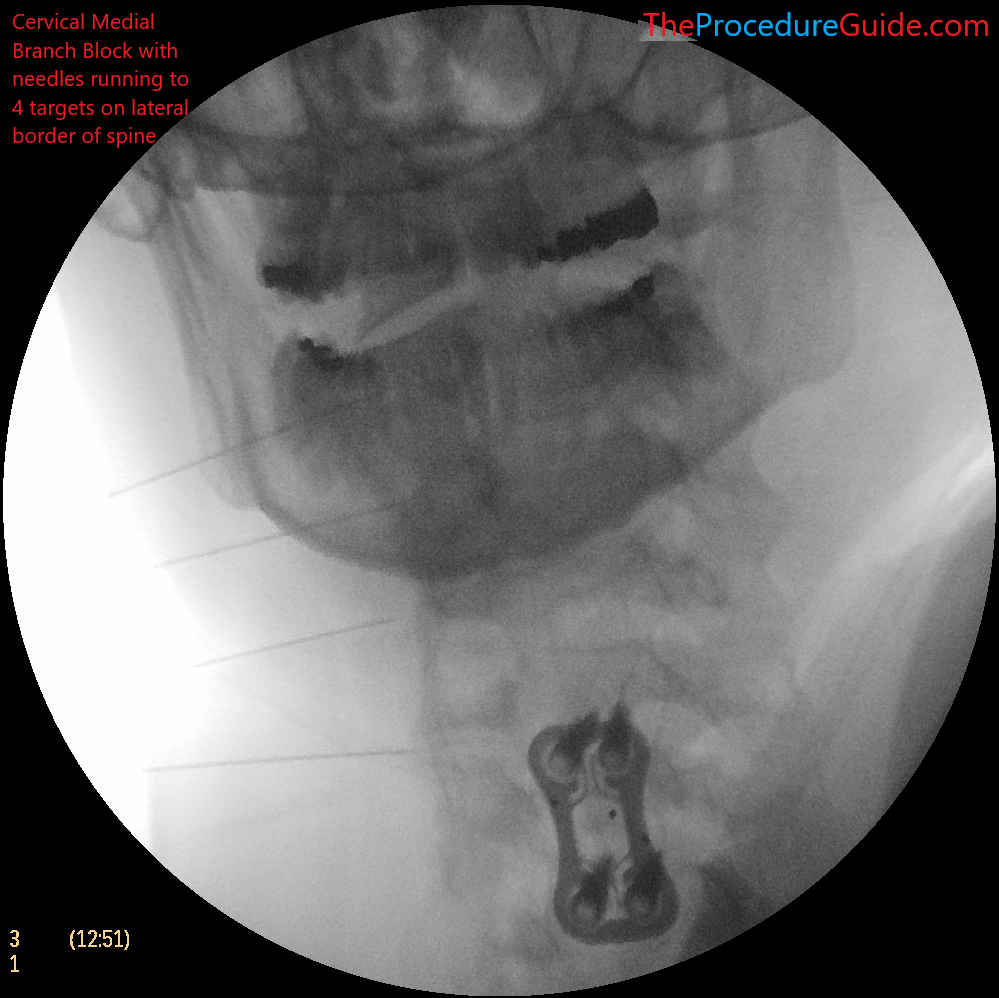
- Confirm your depth positioning on an AP view
- Confirm that you do not appear to be beyond the lateral border of the spine (as seen in the AP view above)
- Repeat steps 1-4 for each level being treated by simply retracting the needle (but leaving it in the skin) and re-directing it to each subsequent level).
- Note that you have a straight/short needle. As seen in the needle techniques article you’ll pull back far and redirect to your new target since the needle isn’t bent.
Technique 3 – Posterior to anterior trajectory
- The above two techniques use a lateral to medial trajectory. Sometimes accessing from the side is hard (such as larger patients with a lot of neck fat).
- You can instead use a posterior to anterior approach which is similar to the cervical radiofrequency ablation needle placement.
- Basically just follow the RF technique but with a bent quincke needle.
- You can usually use one needle/insertion point to get to all 4 targets (as described in technique 2 above).
Tips
- For thinner patients techniques 1 & 2 can simply be done with a straight 25g x 1.5″ hypodermic needle (rather than using normal bent and steering techniques and a quincke needle)
- Because the cervical spine is superficial and easy to reach, normal bending/steering isn’t as helpful.
- With technique 2, this means you can simply use a single thin needle and one puncture for the entire procedure, improving speed and patient comfort.
- With larger patients you can use a bent needle for the extra travel. Because of the longer travel length the bending helps with steering.
- For a bilateral procedure you might want to have the patient positioned prone or supine so you can access both sides of the neck without repositioning
- You proceed as noted in the techniques above, but the c-arm is simply turned 90 degrees to still give you lateral images as a starting point.
- If performing technique 3 you’ll want the patient prone so that you can take a posterior-to-anterior trajectory.
References
Technique Related References
- Percutaneous Radio-Frequency Neurotomy for Chronic Cervical Zygapophyseal-Joint Pain
- Controlled study where a specific two needle technique was used for cervical RF and is described with limited images
- Cervical Medial Branch Radiofrequency Neurotomy in New Zealand
- Some discussion of a two needle technique for cervical RF and is described with limited images.
- Incidence of neuropathic pain after radiofrequency denervation of the third occipital nerve
- Detailed review of variability of third occipital nerve and technique used to ablate it along with some sample images.
General References
- The provocative lumbar facet joint
- Broad and long overview of many clinical aspects of facet anatomy, pathology, treatment studies
- Diagnostic and therapeutic spinal interventions
- Broad overview of medial branch blocks and radiofrequency ablation and discussion of other literature on the topic
- Single needle approach for multiple medial branch blocks: a new technique
- A prospective crossover comparison study of the single-needle and multiple-needle techniques for facet-joint medial branch block
- Radiofrequency lumbar facet denervation: a comparative study of the reproducibility of lesion size after 2 current radiofrequency techniques