
Most interventionalists will use fluoro to find a “target’ and “steer” a needle to that target. There are a few ways to go about this. These techniques could apply to any needle, but are commonly used for quincke needles which are spinal needles that can serve as all purpose needles.
Table of Contents
Straight Needle
- This simple approach is just using a straight needle as-is out of the packaging. To move in a new direction, just pull the needle back a ways, pull the hub in the opposite direction as the target (so as to point the needle in the desired direction) and re-insert the needle.
- This is a basic, intuitive approach.
- However, it requires a lot of motion back and forth. Ie, you have to pull back a lot before advancing in the new direction.
- If you’ve picked a wrong trajectory you have to keep making back and forth movements to slowly get closer to you desired trajectory.
Angled/Bent Needle
- Make a sharp/angled bend of about 10-20 degrees near the tip of the needle
- On thinner needles: pinch the needle between your thumb and forefinger:
- In the image below the thumb is on top of the needle, the forefinger is underneath and hidden with the nail at the bend point.
- Now just push the back of the tip of the needle against a hard surface (like your mayo stand) and the needle will bend inward where your thumbnail is.
- On thicker needles (or alternatively), you can do the same thing by sticking a needle into a syringe tip and using it to provide the pivot point to create the bend.
- On thinner needles: pinch the needle between your thumb and forefinger:


- The bend occurs about 1cm from the tip.
- When trying to steer the needle you simple turn (at the hub) so the bend is pointing to where you want the needle to go.
- With small changes in direction you DON’T have to pull the needle back before advancing since the bend will advance it in the direction you want.
- If you want to make larger changes in direction, you just pull the needle back a bit and then advance. The larger travel distance will allow it to “turn” more.
- Hence this technique can be faster/slicker than a straight needle.
Curved Needle
- Very similar to the bent needle but instead of a sharp bend, a curve is applied.
- An example of a curved RF needle/cannula:

Tips
- Bend Direction
- In the curved RF needle (above) note how the needle is bent in the same direction as the black dot on the hub (circled red bottom of image). This allows you to know what direction the curve is in after the needle is inserted through the skin. Just turn the dot towards the direction you want to move.
- For other needles there is usually a notch (where the stylet latches in), which can act as your marker. See this example quincke bend. At the top you can barely see the notch and the bend is in that direction.
- Shorter (like a 3.5″) and medium gauge (like a 22g) needles tend to be easier to maneuver
- Different gauges either turn too much or too little
- For long needles it’s hard to control the tip travel/direction from the hub.
- When using long needles
- Rather than turning the hub and advancing, try grabbing the needle near the skin. That way your turn and traction on the needle are closer to the tip. If you grab at the hub you’re more likely to just bend the long part of the needle that’s outside the body.
Lining up targets and and choosing entry points
Throughout the procedure guides on this site we’ll reference targets and entry points. You should know these basics to know what to do with a target and entry point:
- A target is where you want the needle tip to land and you’ll want to start by getting a proper image of that target as described in the imaging guide. (In this image, the red dot is an example target)

- An entry point is where you insert the needle at the skin. The optimal entry point depends on the procedure: (In the image above, the green dot is an example entry point)
- Sometimes a target is easily accessible so almost any entry point around the target works (ie, a one level lumbar medial branch block).
- Sometimes you want to hit multiple targets from the same entry point (so as to avoid multiple skin pokes), so your entry point might be from a central point that can reach each target (ie, a multiple level lumbar medial branch block)
- Sometimes the target is behind bony structures so you need a trajectory that gives you a clear path from the entry point. (ie, a lumbar sympathetic block).
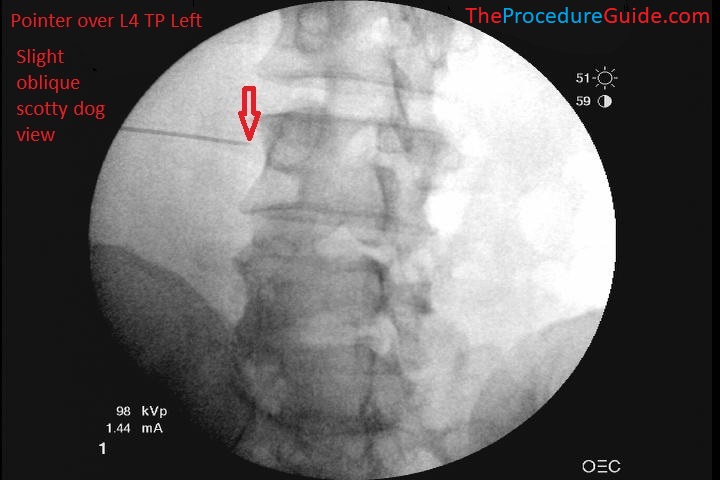
- You’ll start by using a pointer to find your entry point.
- Any long, radiopaque object works, but a large syringe attached to a needle in it’s cap works. This keeps your hands away from the xrays.(SEE IMAGE BELOW)
- Place the pointer about where you think you’ll enter. Then use serial fluoro images to move it closer to your entry point. It usually doesn’t have to be exact so don’t overdo the fluoro images just trying to get the pointer in the exact right spot.
- Now simply anesthetize the skin at the entry point.
- Also be sure to anesthetize in a wide area that generally points towards your target.
- You can’t know the exact direction of your target without fluoro so it’s best to just anesthetize in a cone like shape towards any targets from that that entry point so a wide area is covered.
- Now, based on your specific procedure you insert your main needle towards your trajectory, and continue the procedure as indicated.
- Most procedures will make use of the bend/steering techniques mentioned above but the basic idea is always the same: move from entry point to target, sometimes steering around obstacles to get there.