
Table of Contents
Name of Procedure
- Sacroiliac Joint (SIJ) Radiofrequency Ablation (RFA)
- L4 and L5 dorsal ramus/medial branch and S1, S2, S3 lateral branch radiofrequency ablation
Sample Opnote
Goal
To ablate nerves that innervate the sacroiliac joint (SIJ).
Indications
Pain in the low back, gluteal, groin area that is caused by the sacroiliac joint. Commonly this is from osteoarthritis.
Contraindications
Anatomy
First, see our lumbar common spine anatomy overview to understand anatomy and fluoroscopy basics.
SIJ innervation comes from several nerves and there is variability. Some that are involved include:
- The L4 and L5 dorsal ramus
- S1-S3 (or S1-S4) dorsal ramus lateral branches
So, to understand the procedure we must simply understand the anatomy of those nerves.
A spinal nerve splits into a ventral and dorsal ramus. The dorsal ramus in turn has medial and lateral branches, which are the relevant structures for this procedure.

The source/path/naming/innervation of the medial branch nerves and their target injection sites can be confusing. You can see more details in our lumbar medial branch block guide, but some highlights are noted here:
- The medial branch nerves run over the junction of the transverse process (TP) and superior articulating process (SAP), at one level below where it originates.
- EXAMPLE: See the L3 medial branch circled in green: to block the medial branch from the L3 dorsal ramus, you target the TP/SAP junction at L4.

L4-L5 facet in red. L3 and L4 originating branches in green going to innervate that joint.
- This means that the L4 dorsal ramus/medial branch sits at the L5 TP/SAP.
- The L5 dorsal ramus/medial branch sits at the sacral ala.
- This leaves the lateral branches from S1-3 which sit variably lateral to the S1-S3 neuroforamen.
- Below in figure A you’ll see the X over the L5 and sacral ala targets. And #s 1-3 for S1-S3 targets.

L4 and L5 dorsal ramus and S1-S3 lateral branch block and radiofrequency ablation targets for sacroiliac joint pain. Source: https://www.ncbi.nlm.nih.gov/pmc/articles/PMC2666931/
- There is variability in where exactly the sacral branches sit and per some references The L5 and sometimes lower S4 targets may or may not be included.
Equipment/Skills/Setup
Core Equipment/Disposables: See our disposables/equipment article for “core” items that are common to all procedures.
Core Skills: See our guides to obtain images of the cervical, thoracic, or lumbar spine. Then steer a needle to direct it under the skin.
Special items and suggested setup for this procedure: The technique outlined below will assume standard radiofrequency ablation instead of cooled RF (See tips/notes below)
- RF cannula and probe with RF machine. (2 cannulas and 1 probe will allow for placement of a second cannula, while the prior one is ablating)
- 3cc 1% lidocaine in 3cc syringe
- 10cc 1% lidocaine in 10cc syringe with 25g x 1.5″ hypodermic needle for subcutaneous anesthetic
Landmarks and Patient Positioning
Position the patient in a basic prone position so that the bottom of the c-arm can go under the table below the sacrum and lower lumbar spine.
Technique
Overview
For the purposes of this guide, we’ll show sample images from a bilateral procedure, but we’ll walk through the basics of needle placement at just a few levels.
A radiofrequency ablation is targeting nerves just like a corresponding diagnostic block. But, the key difference is what trajectory the cannula/needle takes to get to the target:
- For a diagnostic block (such as a medial branch block), medication is just being injected, so the tip just has to be close to the target
- The needle can get to the target from anywhere (even at a 90 degree angle to the plane of the target)
- However, a radiofrequency cannula ablates in an oval shaped area parallel to the needle.
- So, if we place the cannula the same as a diagnostic block, the ablation zone may not come in contact with the target as well as if the cannula were lying “flat” over the target area.
- In this diagram, imagine the target is a flat paper at the bottom of the image. If we turned the cannual 90 degrees, then the ablation zone would cover that paper better:
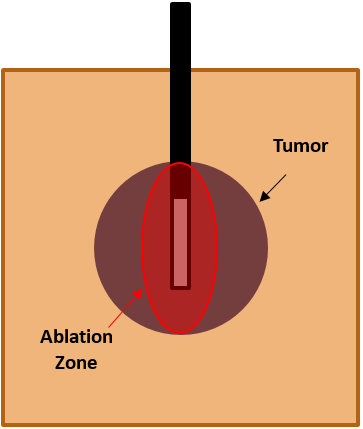
- So, our general approach to RFs is to choose a trajectory that’s as “parallel” to the plane of the target as possible.
Steps
- Obtain an oblique/scotty dog view of L4, which will be the first target. (L3 is shown below, but the same technique/principles apply)
- Note that the skin entry point is anywhere roughly about 1-1.5 vertebral body heights inferior to the target.
- Advance the needle superior and medial till contacting the bone at the inferior border of the L4 transverse process (L3 is shown here but the same applies at L4):
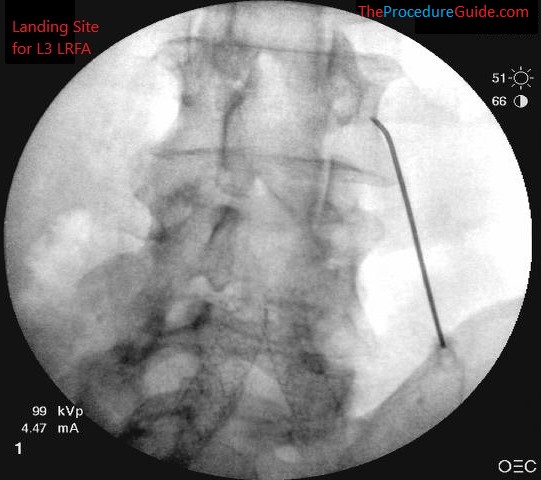
L3 LRFA target landing site
- From here, “slide” the needle along the TP to “lay it flat” over the target site for better RF coverage.
- During this last step of advancing the cannula, inject about 2-3cc of 1% lidocaine to anesthetize the MB nerve so the RF is better tolerated. (L3 shown here, but you’ll look for a similar placement at L5)
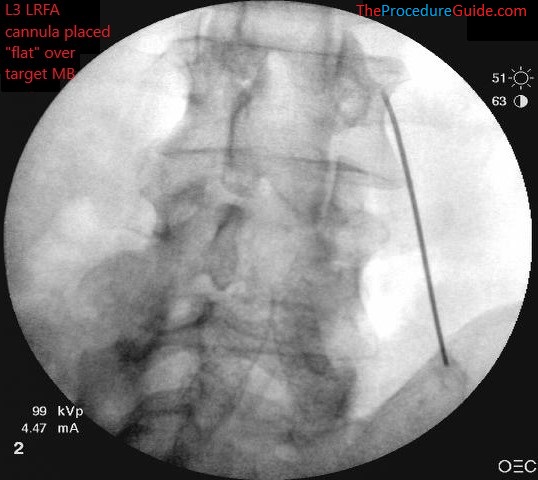
Needle advanced along TP to final position where ablation can be done.
- Confirm your depth positioning on a lateral view
- Confirm that you do not appear to be beyond the transverse process or at the depth of a neuroforamina (not past the blue line below)
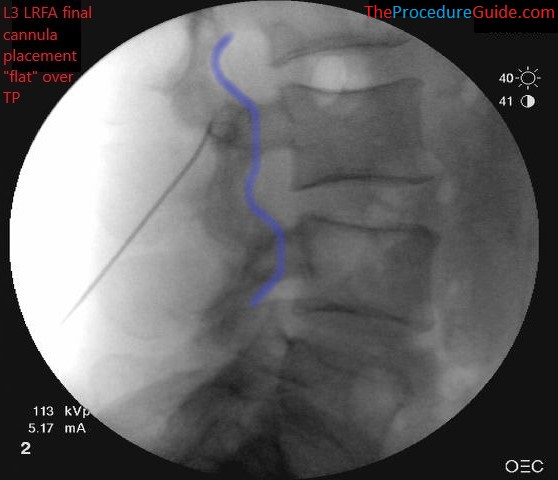
lumbar radiofrequency ablation. Needle placed at L3 LMB with a “flat” approach and posterior to the line that outlines the neuroforamina (blue)
- Perform motor testing after inserting the probe.
- Once negative, ablate.
- You now simply repeat the above process several times to cover all the targets outlined above.
- Even at the sacral levels, your skin entry point is below the target to get the same “flat” trajectory described above.
- See the images below for examples of placement at various bilateral levels.
- See the tips section below for more details on RF modality, and organizing treatment for multiple levels.

Fluoroscopic Guided Sacroiliac Joint dorsal ramus and lateral branch radiofrequency ablation – AP Sacral ala bilateral needle placement 
Fluoroscopic Guided Sacroiliac Joint dorsal ramus and lateral branch radiofrequency ablation – AP S1 bilateral needle placement 
Fluoroscopic Guided Sacroiliac Joint dorsal ramus and lateral branch radiofrequency ablation – AP S2 bilateral needle placement
Tips
- Efficiency
- Once one needle is placed and is ablating you can place a second needle. Then, once the first ablation finishes, you move the probe to the second needle.
- This way the RF machine/ablation are always the rate limiting step and allows for a short procedure time.
- RF Modality
- As seen in the references below cooled RF is often referenced for this procedure. One main reason is that it can theoretically provide a larger ablation zone which may help better cover the variable path of the sacral targets.
- The technique described above merely outlines the important steps to establishing needle placement.
- You can choose either RF modality.
References
- Lateral branch blocks as a treatment for sacroiliac joint pain: A pilot study
- Small study of of people undergoing blocks.
- Randomized Placebo-Controlled Study Evaluating Lateral Branch Radiofrequency Denervation for Sacroiliac Joint Pain
- Good anatomy, technique review and diagram of cooled vs standard RF lesion.
- Comparison of Efficacy of Lateral Branch Pulsed Radiofrequency Denervation and Intraarticular Depot Methylprednisolone Injection for Sacroiliac Joint Pain
See references regarding other RF technique and lower lumbar anatomy