
Table of Contents
Name of Procedure
- Diagnostic Sacroiliac (SI) Joint Injection (SIJ injection)
- Therapeutic Sacroiliac (SI) Joint Steroid Injection (SIJ injection)
Sample Opnote
Goal
To inject medication into the sacroiliac joint.
Indications
Arthritic pain from the sacroiliac joints. To inject medication to either temporarily anesthetize the joint for diagnostic purposes or to inject anti inflammatory medication (such as steroid) to ameliorate arthritic pain.
Contraindications
Anatomy
The sacroiliac joints are large joints between the sacrum and ilium:

Keep in mind that the joint runs from postero-medial to antero-lateral. So, to get a fluoro image that looks down the joint line you oblique the c-arm in the opposite direction of the side you’re working on.
For example, if you are treating a left joint, then start in an AP view. Then move the top of the c-arm to the patient’s right. You’ll adjust tilt to get an optimal view for individual patients by picking whichever angle appears to “open up the joint” the best.
Equipment/Skills/Setup
Core Equipment/Disposables: See our disposables/equipment article for “core” items that are common to all procedures.
- Core Skills
Special items and suggested setup for this procedure (see quick guide video above for example tray prep):
- 22g x 3.5” quincke needle (straight and not bent)
- 3cc local anesthetic (1% lidocaine or 0.5% bupivacaine) (per joint) in 10cc syringe as primary injectate
- 3-5cc 1% lidocaine in 5cc syringe with 25g x 1.5″ hypodermic needle for subcutaneous anesthetic
- 3cc contrast in 3cc syringe
Landmarks and Patient Positioning
Position the patient in a basic prone position so that the bottom of the c-arm can go under the table below the SI joints.
Technique
Here is your target and entry point [See our general guide about basics for using targets and entry points to start a procedure]:
- Targets: Anywhere along a radiolucent part of the SIJ, preferably near the inferior end of the joint.
- Entry point: Just a bit medial and inferior to the target.
In this technique we’ll use a straight needle instead of a bent/curved needle for a couple reasons:
- The SIJ is usually superficial so it doesn’t require a lot of steering
- Entry into the SIJ can be difficult and a straight needle can sometimes make it easier.
- Obtain an oblique view as noted above
- Anesthetize the skin at the entry point and then insert your quincke needle aiming for your target
- Usually you’ll contact bone even if you appear to be right over a radiolucent part of the joint. From here you’ll make small adjustments (kind of bouncing the needle in various directions) and use feel to get the needle into the joint.
- If you feel slight entry into the joint, inject about .25-.5cc of contrast to check for intra-articular spread:
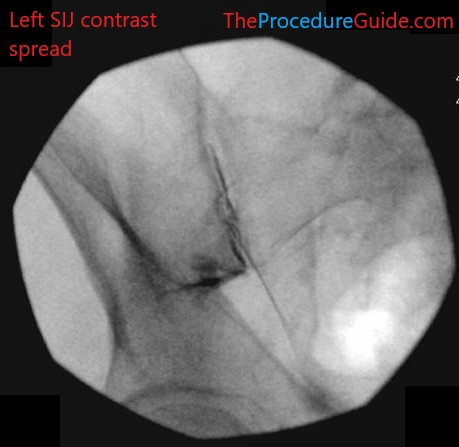
Sacroiliac joint injection AP fluoroscopy with contrast left
- Inject your injectate
Tips
- Entry to the SIJ is much harder than it looks. Usually trying for entry at various points is necessary.
- Sometimes spread isn’t ideal or is faintly seen. As with most injections you want to avoid vascular uptake.
- Additionally, depending on where exactly you place the needle, you might get spread across the piriformis muscle which you’ll want to avoid.
Sample Images
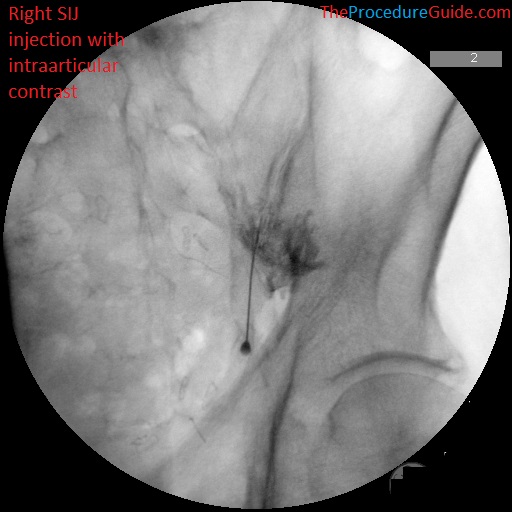
Sacroiliac joint injection AP fluoroscopy with contrast right (faint line showing intra-articular spread) 
Sacroiliac joint injection AP fluoroscopy with contrast right 
Sacroiliac joint injection AP fluoroscopy with contrast left (faint line showing intra-articular spread) 

Sacroiliac joint injection AP fluoroscopy with contrast left 
Sacroiliac joint injection AP fluoroscopy with contrast left
References
coming soon…