
This guide outlines a contralateral oblique approach to accessing the cervical epidural space. For an interspinous/midline approach, see our separate guide.
The contralateral approach offers some advantages: A stable prone patient position, usually good imaging even for larger patients, good safety markers on imaging, and little c-arm movement.
Table of Contents
Name of Procedure
- CESI – Cervical interlaminar epidural steroid injection
Sample Opnote
Goal
To access and then administer steroid to the cervical epidural space.
Indications
Usually to treat degenerative disc disease or central or neural foraminal stenosis that is causing radicular symptoms into the arms.
Contraindications
Anatomy
General Anatomy and Imaging
A contralateral approach is best understood by looking at an axial diagram:
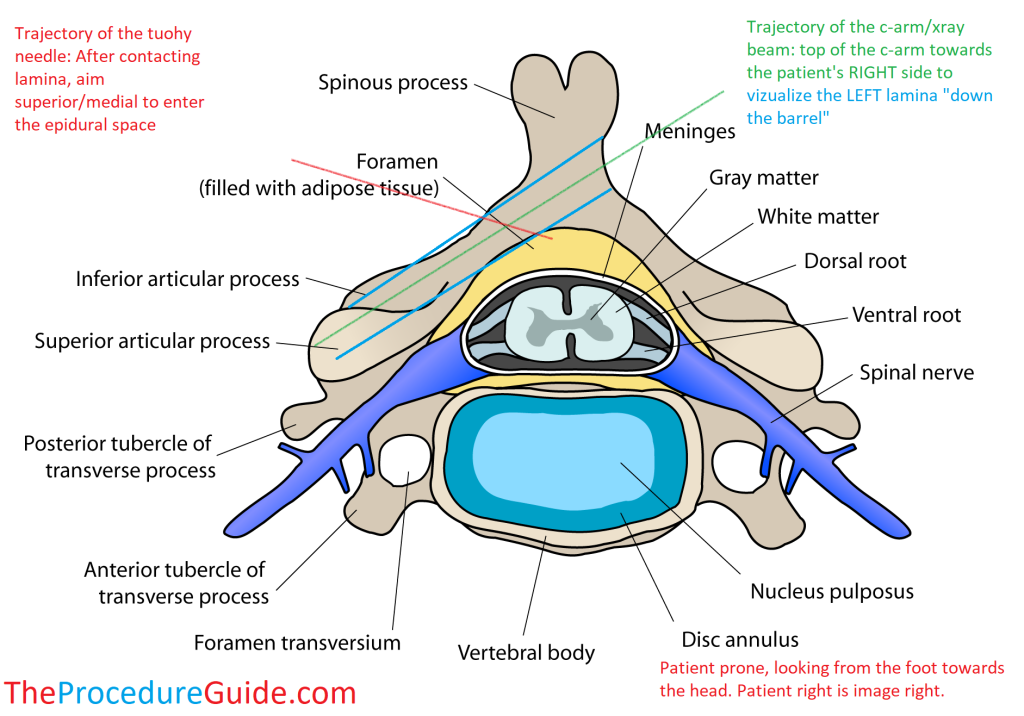
The patient here is laying face down (prone), and we are looking from the feet to the head. Image right is patient right.
If the needle enters from the left, then a CONTRAlateral image is one that is obliqued to the RIGHT (the top of the c-arm moves to the right of the patient at an angle of about 50O):
- This gives you an xray beam trajectory that is “down the barrel” of the LEFT lamina
- This gives a view of the lamina that the needle is passing between
- This “down the barrel” view will cause each lamina to appear like footballs
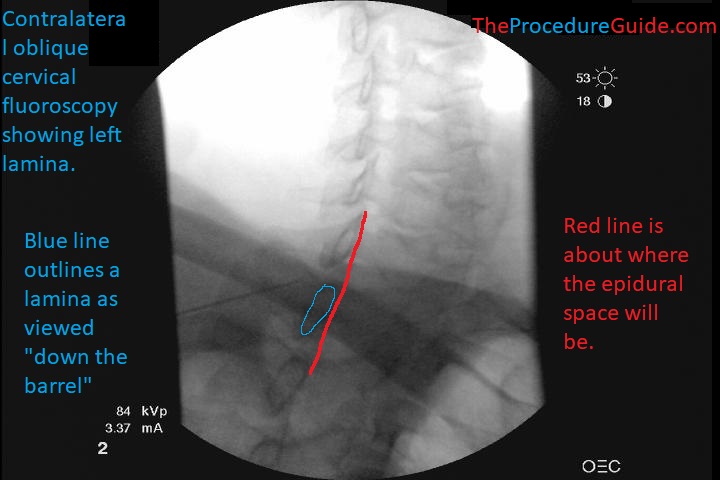
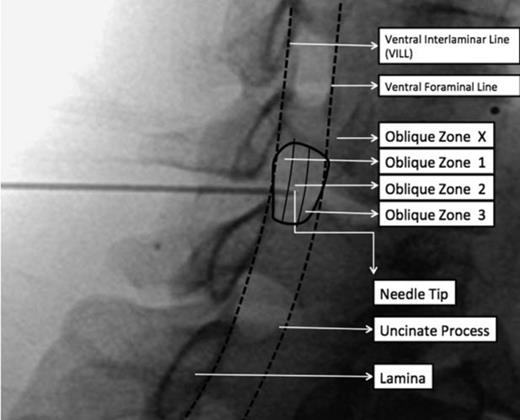
This is the view under fluoroscopy. Note in both images the blue lines showing the outline of the lamina.
Epidural Space and Needle Position
In the diagram above you see the tip of the red line (tip of the needle) enters the epidural space just past the lamina (blue lines).
- This is important because you have to have an idea of where your needle tip will land on imaging to have some safety markers in mind.
The needle tip’s position on fluoro can vary a bit depending on:
- The exact angle of your c-arm
- How far lateral or midline you access the epidural space
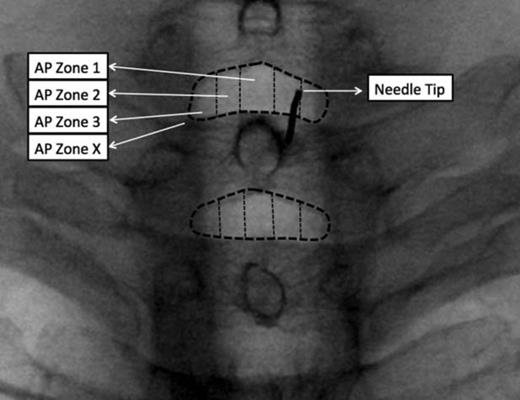
The above two images are from the reference cited below. They demonstrate final needle tip placement on AP and how that appears on an oblique view. See article for more detailed discussion.
Equipment/Skills/Setup
Special items and suggested setup for this procedure:
- 20g x 3.5″ Tuohy epidural needle
- LOR syringe
- 3cc 1% lidocaine in 3cc syringe with 25g x 1.5″ hypodermic needle for subcutaneous local anesthetic
- 2cc saline + 1cc steroid in 3cc syringe to hold injectate
- 2cc contrast in 3cc syringe
Landmarks and Patient Positioning
- Have the patient lay in a prone position with the neck in a neutral position, and arms at their sides.
- Start with the C-arm in an AP view
Technique
For this guide we’ll assume we’re accessing C7-T1, from a left lateral interlaminar approach as diagrammed above.
- Use your pointer needle to find your entry point
- Once the patient is positioned as above, obtain an AP view.
- Find a spot just superficial (posterior) to the left T1 lamina
- Anesthetize the skin, insert your tuohy needle “down the barrel”
- With intermittent images advance straight anterior till you contact bone.
As long as you are down the barrel and the entire needle is right over the lamina then you know that you will eventually contact bone, which is a safe, quick way to assess depth without requiring other fluoro views.
- After contacting bone, redirect superior and medial and just barely walk off bone.
- Switch to a contralateral oblique view (top of c-arm tilted to the patient’s right to about 50O)
- As seen in this image your needle will be posterior to the lamina, with a good view of the left lamina.
- Advance the tuohy needle to the posterior margin of the lamina, attach your LOR syringe.
- Advance under continuous LOR for standard epidural access.
- Check intermittent images to ensure your needle tip isn’t going to go past the safety makers (as discussed above).
You must keep in mind what your likely trajectory is. Remember that you aimed superior and medial before switching to an oblique view. If you aren’t sure if your needle tip is landing near midline then switch back to an AP view to confirm before advancing any further
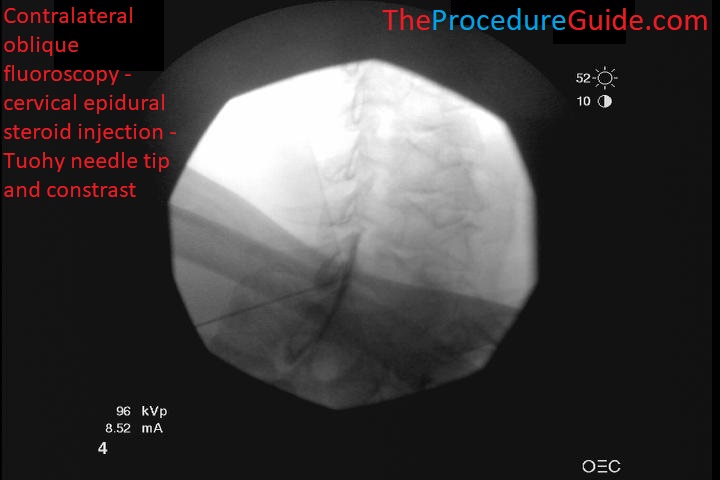
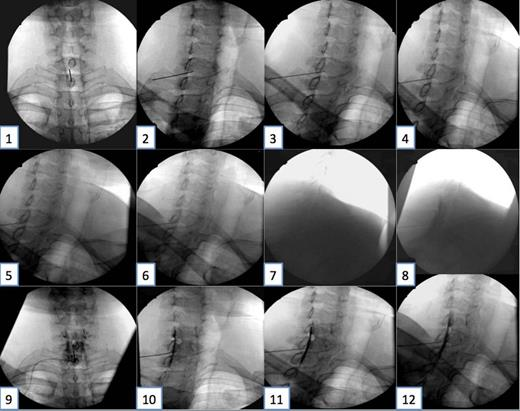
- Once you have LOR, injection contrast: Live injection can help you see superior/inferior epidural spread and rule out vascular uptake. Lateral spread is shown below:
- Inject the saline and steroid medication.
- Remove the needle smoothly.
Tips
- To move quickly through the procedure and still prevent dangerous mistakes (like injecting local anesthetic into the epidural space) a few tray setup techniques can help:
- Have someone inject saline while you are looking at the tray to confirm that you know for sure only saline is being drawn up into your syringes.
- Have only one syringe for lidocaine for subcutaneous anesthetic. It can be a different syringe like a 5 cc syringe.
- Safety markers
- In the images above you can see where the epidural needle tip should land. If your needle were to go past that point you may have missed the loss of resistance which is dangerous.
- Therefore you can use that line as a safety barrier, never advance your needle past that point.
- As discussed under anatomy, final needle tip position can vary based on c-arm position and needle trajectory. USE THESE MARKERS AS A GENERAL, BUT NOT EXACT, GUIDE.
References
- Contralateral oblique view is superior to lateral view for interlaminar cervical and cervicothoracic epidural access
- Very detailed study of aP, contralateral, and lateral cervical imaging and needle placement for epidural access.
- See samples images of different C-arm angles and needle positions and how that affects where the final needle tip will appear to be on oblique.