
Table of Contents
Name of Procedure
- TFESI – Lumbar or thoracic transforaminal (TF) epidural steroid injection (ESI) (diagnostic or therapeutic)
- Selective nerve root block (SNRB)
For a SACRAL transforaminal epidural injection, see our related article.
Sample Opnote
The Quick Guide
Watch a quick guide. View as a story or as a video:

The Quiz
Goal
To access and then administer medication (such as local anesthetic or steroid) to the epidural space via a transforaminal approach to target specific nerve roots.
Indications
Usually to treat degenerative disc disease or neural foraminal stenosis that is causing radicular symptoms into the torso (thoracic) or legs (lumbar and sacral).
Contraindications
Anatomy
Numbering
In the thoracic and lumbar spine, spinal nerves exit below their corresponding vertebral bodies. Example: The L4 spinal nerve exists from the L4/L5 neuroforamen, below the L4 transverse process. See the general lumbar anatomy section for numbering.
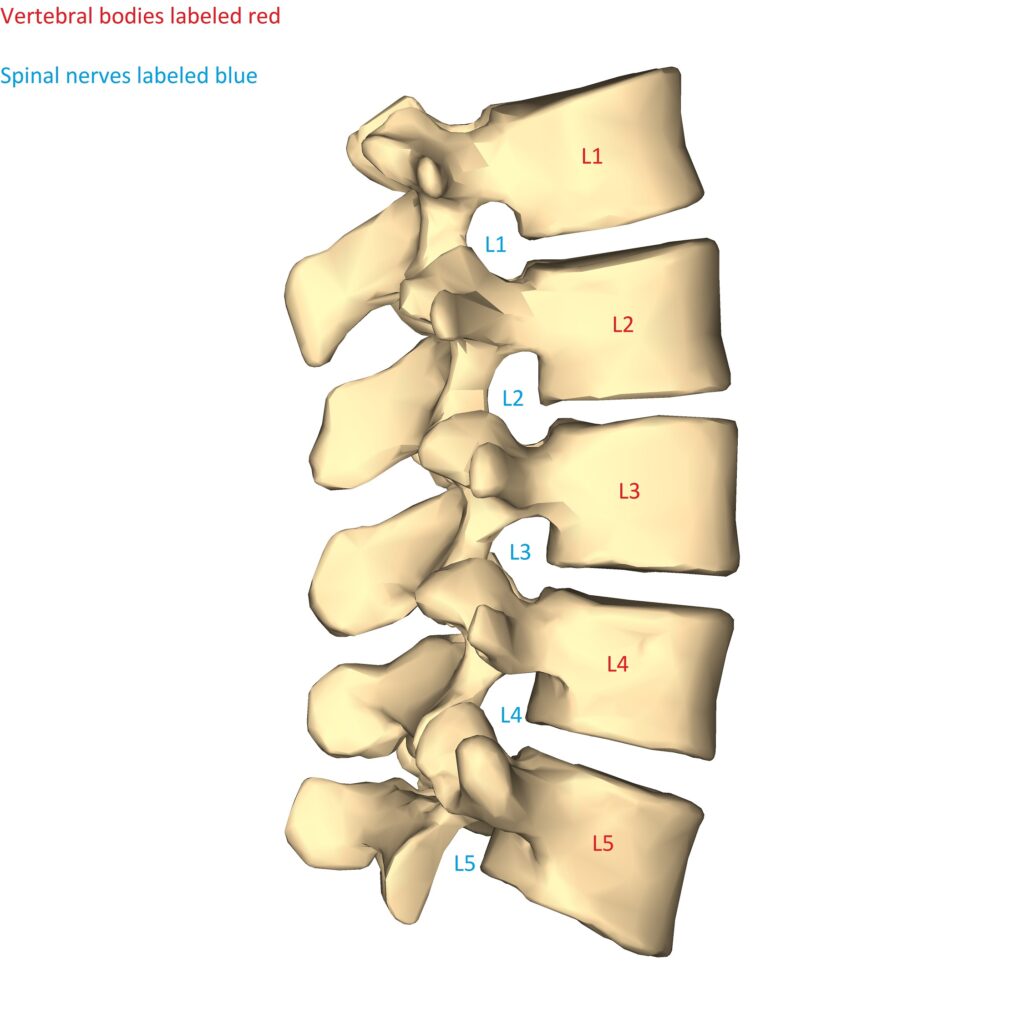
Lumbar spine diagram lateral. Bodies and spinal nerve numbering shown. [Modified of an original from Wikimedia by Anatmography (https://commons.wikimedia.org/wiki/File:Lumbar_vertebrae_-_close-up_-_lateral_view.png). Originally licensed under https://creativecommons.org/licenses/by-sa/2.1/jp/deed.en]
Vasculature
Arteries are of particular importance in this procedure.

In the thoracolumbar region:
- There are anterior segmental arteries that enter through the neuroforamen along the nerve roots (See anterior radicular artery in the image above)
- Out of all the segmental arteries, most people have one that is of more significance than the other segmental arteries:
- This major artery is larger and can feed into the anterior spinal artery providing a lot of the blood supply to the cord.
- It is like the other arteries in that in runs through the neuroforamen to reach the cord.
- This artery is known by several names:
- Artery of Adamkiewicz
- great radicular artery of Adamkiewicz
- major anterior segmental medullary artery
- artery of the lumbar enlargement
- great anterior radiculomedullary artery
- great anterior segmental medullary artery
- This artery varies in level but typically enters somewhere in the mid thoracic down to upper lumbar levels on the left side.
- Whether it’s a regular segmental artery or one that is the artery of adamkiewicz, the location in the neuroforamen is of particular importance. That location is variable, but most of the time the segmental artery is in the anterior/superior quadrant of the neuroforamen (when viewed laterally).

Traumatic damage to (with the needle) or occlusion of (with particulate steroid) a segmental artery can cause infarction of neural components. In the case of the Artery of Adamkiewicz, the infarction can be particularly catastrophic.
Neuroforamen
Keep these quadrants in mind and we’ll look at the neuroforaminal anatomy. There are two triangles that are formed from structures in the neuroforamen:
- Typically these triangles refer to an AP view, but it is important to understand them from and AP and lateral view.
- These triangles are used to define targets for your needle tip.
- We’ll review the triangles and how they relate to the quadrants above so you understand how it effects the target needle placement.
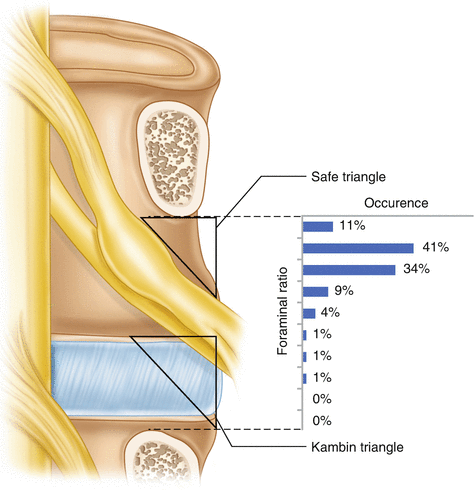
- The “safe” triangle (Anterior/Superior Quadrant)
- AP view: The triangle is in the superior part of the foramen.
- Lateral: Although not pictured above, it would be in the anterior part of the foramen.
- This means a needle target in the superior/anterior quadrant of the neuroforamen. See the scatterplot above and you’ll see this is the quadrant where the anterior segmental artery is most likely to sit.
- Based on this, the term “safe” is a misnomer. Originally named “safe” in that it is meant to keep away from the nerve root. But it’s the highest likelihood of being near the artery.
- Kambin triangle (Posterior/Inferior Quadrant)
- AP view: The triangle is in the inferior part of the foramen.
- Lateral: Although not pictured above, it would be in the posterior part of the foramen.
- This means a needle target in the inferior/posterior quadrant of the neuroforamen. See the scatterplot above and you’ll see this quadrant is unlikely to have the anterior segmental artery.
- (Posterior/Superior) Quadrant
- The technique described below targets the superior aspect (just below the transverse process) but keeps the needle in the posterior aspect.
- As seen in the scatterplot there is low likelihood of vasculature in this quadrant.
Equipment/Skills/Setup
Core Equipment/Disposables: See our disposables/equipment article for “core” items that are common to all procedures.
Core Skills: See our guides to obtain images of the cervical, thoracic, or lumbar spine. Then steer a needle to direct it under the skin.
Special items and suggested setup for this procedure (see quick guide video above for example tray prep):
- 22g x 3.5″ (or 5″) quincke needle
- 2cc 0.125% bupivacaine + 1cc steroid in 3cc syringe (about 1.5cc injectate per nerve root) (dexamethasone is low particulate and usually a good choice)
- contrast in 3cc syringe
- 5cc 1% lidocaine in 5cc syringe with 25g x 1.5″ hypodermic needle for subcutaneous local anesthetic
Landmarks and Patient Positioning
Position the patient in a basic prone position so that the bottom of the c-arm can go under the table below the area of the spine that is being treated.
Technique
Note that this technique does not place the needle in the anterior part of the neuroforamen (in the classic "safe" triangle). But it DOES place the needle in the superior part of the foramen. See anatomy and references for alternative approaches to place the needle in the posterior AND inferior part of the foramen.
- Get a basic scotty dog view of the target level (An AP view can also work).
- Line up and anesthetize an entry point about 2cm lateral and 2cm inferior to the infero-lateral tip of the transverse process (green).
- This gives you a trajectory that aims superior/medial/anterior, which helps get into the transforaminal space nicely.
- Insert a bent quincke needle targeting a landing at the inferior border of the transverse process, just lateral to where it joins the pedicle (red) [in this image the needle is already in it’s final position, but the red dot is your first target so that you start with a bony landmark].

L3 transforaminal epidural steroid injection fluoroscopy AP (6) – Initial landing target (red) and insertion point (green)
- From here, aim inferior and medial, and “walk” the needle off the bone.
- As soon as it walks off you should be medial and anterior enough to be in the transforaminal space.
- Sometimes it will need to be advanced slightly, but be careful to advance in very slight increments to avoid a paresthesia and to avoid entering the anterior quadrant of the neuroforamen.
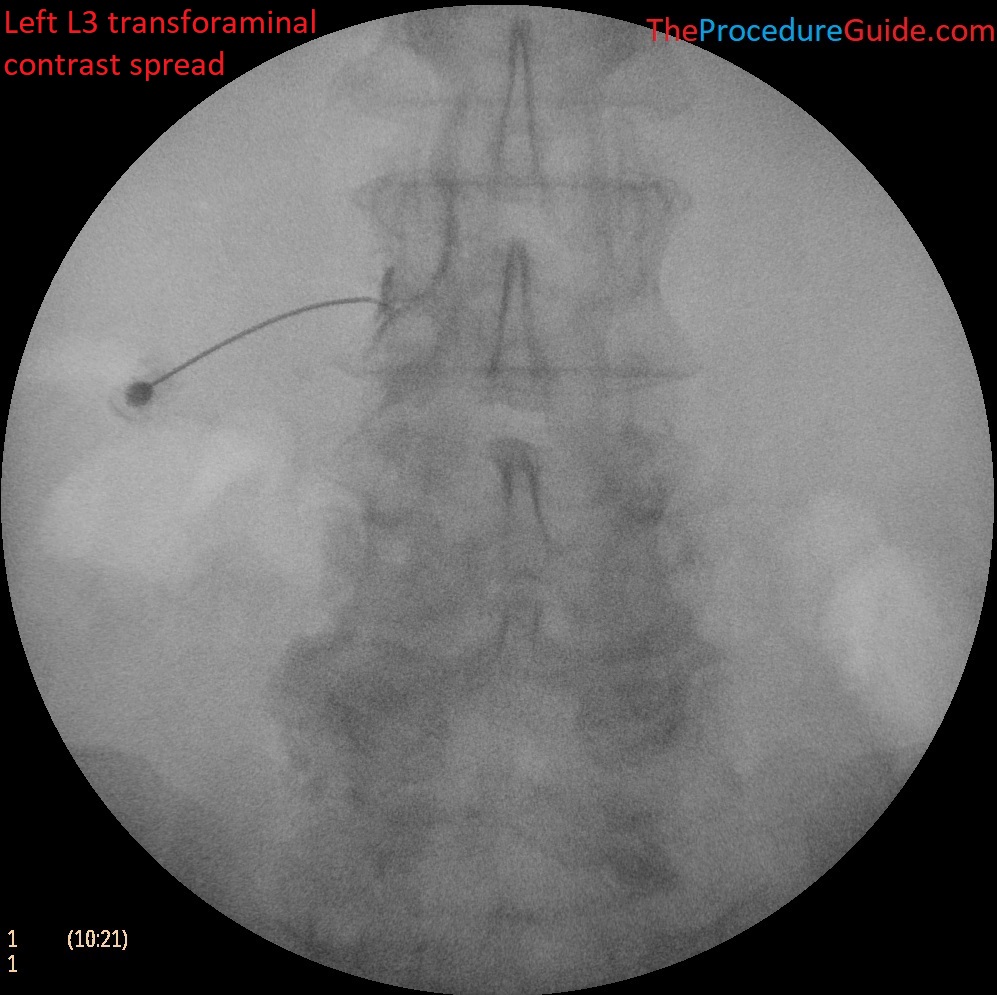
- Inject a small amount of contrast to confirm spread:
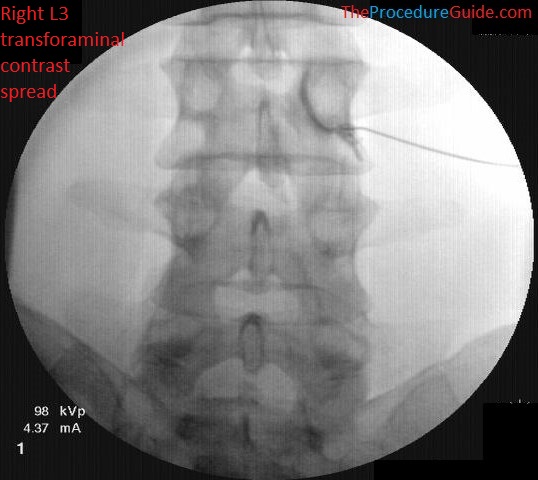
L3 transforaminal epidural steroid injection – AP fluoroscopy
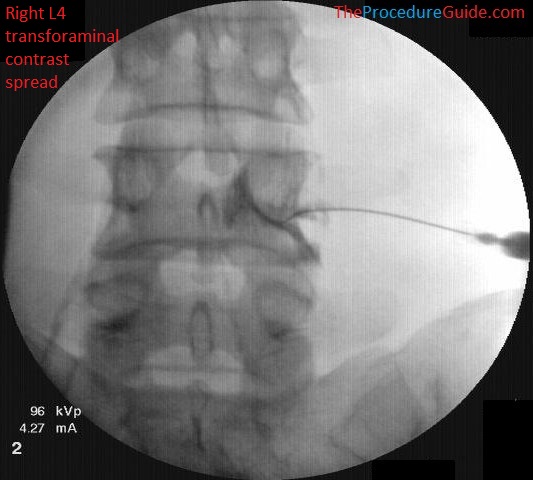
L4 transforaminal epidural steroid injection – AP fluoroscopy view
- Note the spread rounded under the pedicle, outlining the nerve root. This is typical spread but sometimes it doesn’t outline perfectly and instead you’ll just see medial spread over a wide area like with an interlaminar injection
- Injection under live fluoro or use of digital subtraction can help to make sure that you don’t see contrast uptake
- Inject the desired injectate based on the specific procedure (ie, local anesthetic only, or steroid, or both).
Tips
- A combination of experience, patient size and trajectory help you to determine depth. With the approaches mentioned above you usually don’t need a lateral to determine depth.
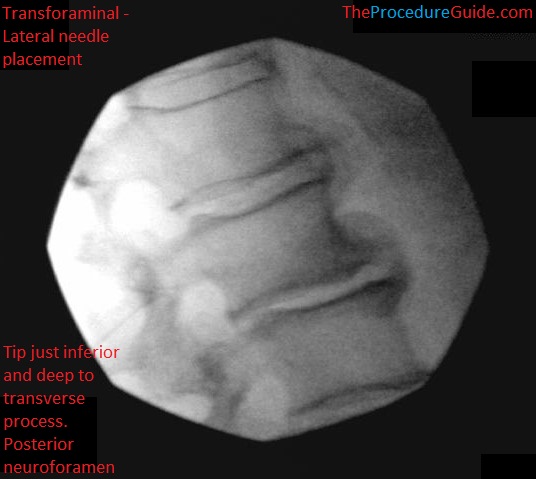
lateral view: needle tip just inferior and deep to transverse process in the posterior neuroforamen 
lateral view: needle tip just inferior and deep to transverse process in the posterior neuroforamen with contrast spread
- While several steering techniques can usually be used, a sharp needle bend is useful here:
- As noted above, after contacting the TP initially, you’ll walk off and under the TP to get into the transforaminal space.
- This is often a short travel distance and so you want the needle to be easily steerable and to steer a lot over a short distance.
- The anatomy section describes a lot of detail but it’s important to remember the highest likelihood of danger:
- Segmental arteries sit in the anterior/superior quadrant of the neuroforamen (when viewed laterally). Keeping the needle in the posterior aspect helps reduce the likelihood of vascular involvement.
- The artery of Adamkiewicz is most likely to enter in the mid thoracic to upper lumbar levels on the left. Be particularly vigilant in these areas.
Sample Images
L3 transforaminal epidural steroid injection fluoroscopy AP 
L2 transforaminal epidural steroid injection fluoroscopy AP 
L2 transforaminal epidural steroid injection fluoroscopy AP 
L4 transforaminal epidural steroid injection fluoroscopy AP 
L5 transforaminal epidural steroid injection fluoroscopy oblique 
L4 transforaminal epidural steroid injection fluoroscopy oblique 
L4 transforaminal epidural steroid injection fluoroscopy AP
Troubleshooting
With the above technique you could pass under the transverse process and might hit the vertebral body. Always watch for cues that don’t look right and check other views to confirm.
References
- Artery of Adamkiewicz
- Intraforaminal location of the great anterior radiculomedullary artery (artery of Adamkiewicz): a retrospective review
- Intraforaminal Location of Thoracolumbar Radicular Arteries Providing an Anterior Radiculomedullary Artery Using Flat Panel Catheter Angiotomography
- Study of the location of the anterior segmental arteries in most people
- Time to Understand “Safe Triangle Technique” for Transforaminal Epidural Steroid Injections
- Alternative Approach for Lumbar Transforaminal Epidural Steroid Injections
- Excellent review of:
- The anatomy of the neuroforamen.
- A specific approach to avoid vasculature.
- Sample photos of models and of MRI images showing relevant structures, approaches, technique.
- Excellent review of:
- The Lumbar Neural Foramen and Transforaminal Epidural Steroid Injections: An Anatomic Review With Key Safety Considerations in Planning the Percutaneous Approach
- Good description of:
- Approaches that place the needle in different quadrants
- Neuroforaminal anatomy
- Sample images
- Good description of: