
Table of Contents
Name of Procedure
Provocative Lumbar/Thoracic/Cervical Discography/Discogram (For the purpose of this guide we’ll walk through sample lumbar levels)
Sample Opnote
Goal
Inject contrast and/or medication into an intervertebral disc, assess if it causes concordant pain, and obtain advanced imaging of the injected contrast.
Indications
Spinal pain and/or radicular pain without a clear etiology and suspicion of disc mediated pain that needs further diagnostic confirmation. The diagnostic information can then be used in guiding intervention such as surgery.
Contraindications
- Common contraindications
- Severe spinal canal compromise at disc level to be investigated
Anatomy
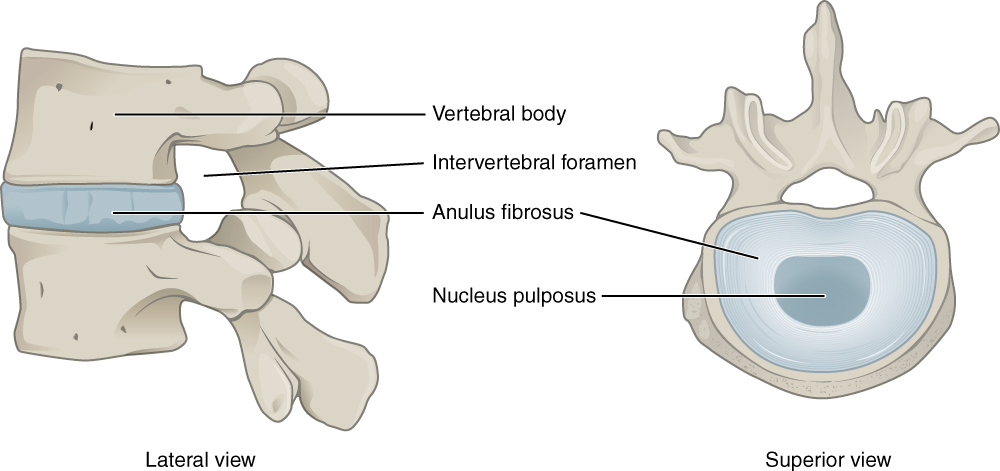
An intervertebral disc contains two primary structures: the nucleus pulposus and annulus fibrosus. The goal for the procedure is to place a needle in the middle of the disc in all 3 axes, right in the middle of the nucleus pulposus.
Intervertebral Disk Anatomy Source: https://commons.wikimedia.org/wiki/File:716_Intervertebral_Disk.svg#/media/File:716_Intervertebral_Disk.jpg
As seen in the diagram the disc is directly adjacent to the spinal canal, neuroforamen and adjacent to the vertebral endplates, hence disc bulge or degeneration there can lead to compression or inflammation around many structures and hence lead to pain.
The idea of the procedure is to pressurize the disc and thereby illicit pain if it is directly the source of pain or causing pain by aggravation or adjacent structures.
Equipment/Skills/Setup
Core Skills: See our guides to obtain images of the cervical, thoracic, or lumbar spine. Then steer a needle to direct it under the skin.
Core Equipment/Disposables: See our disposables/equipment article for “core” items that are common to all procedures.
Special items and suggested setup for this procedure:
- Full sterile prep and drape (as you might do for a SCS trial)
- 22g x 7″ quincke needle (one for each level being tested)
- 3-10cc contrast in 10cc syringe (depending on how many discs you are injecting (~2cc/disc)
- 10cc 1% lidocaine in 10cc syringe with 25g x 1.5″ hypodermic needle for subcutaneous local anesthesia
Landmarks and Patient Positioning
Position the patient in a basic prone position so that the bottom of the c-arm can go under the table below the intervertebral discs being tested.
Technique
- Obtain an oblique view at the first level being injected:
- Square off the endplates at the top and bottom of the target disc (blue lines)
- The ideal oblique view puts the SAP (red line) over the middle of the disc (green line is about middle of the disc)
- Your target is the surface of the disc that appears just lateral to the superior articulating process of the bottom level (yellow dot)
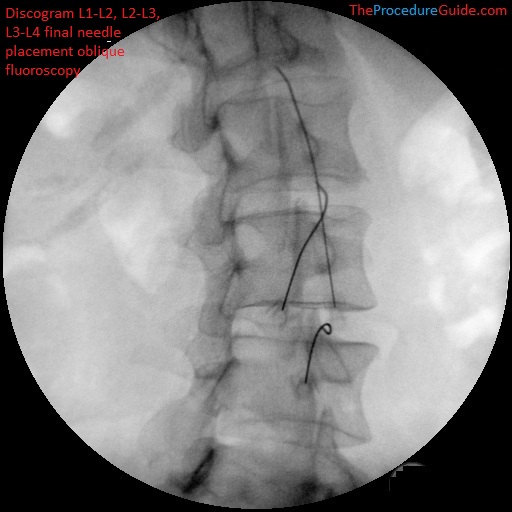
Lumbar discography L1-L2, L2-L3, L3-L4 oblique fluoroscopy final needle placement 
Lumbar discography L1-L2, L2-L3, L3-L4 oblique fluoroscopy final needle placement diagram
- Anesthetize the skin just above the target and insert your quincke needle down the barrel aiming for your target as described above.
- Once you contact the disc you should feel a change in resistance as you advance into the disc.
- You will switch between AP and lateral views to ensure that you are landing the needle tip at the center of the disc in both directions.
- Repeat this for all targeted discs and confirm correct placement in AP and lateral views.
- (The image below shows placement on lateral after contrast injection, but don’t inject just yet).
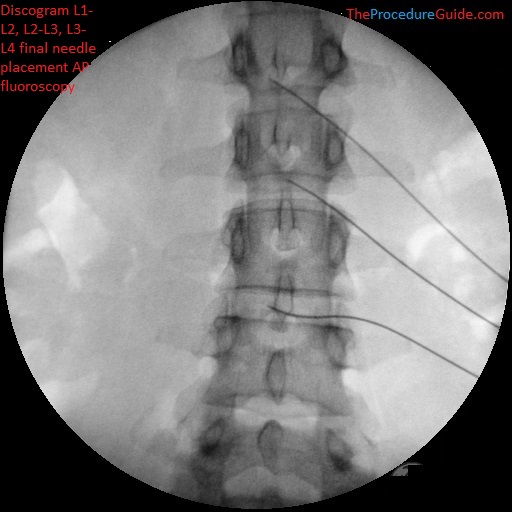
Lumbar discography L1-L2, L2-L3, L3-L4 AP fluoroscopy final needle placement without contrast 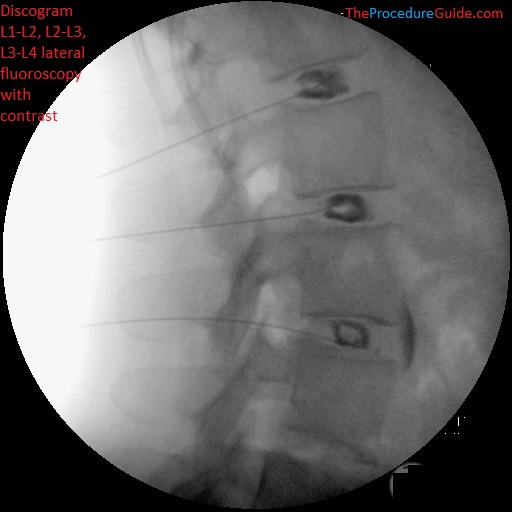
Lumbar discography L1-L2, L2-L3, L3-L4 lateral fluoroscopy with contrast final needle placement
- From here you can inject contrast in one disc at a time, slowly, to evaluate the patient’s response.
- Inject ~2-3 ccs as a max.
- As you inject medication you will keep track of these items:
- Concordant pain – is this producing pain that is concordant or discordant with the patient’s primary pain?
- Pain score
- Volume of medication injected
- Disc morphology including presence or a tear [ref]
Lumbar discography L1-L2, L2-L3, L3-L4 lateral fluoroscopy with contrast final needle placement 
Lumbar discography L1-L2, L2-L3, L3-L4 AP fluoroscopy with contrast
Tips
As a somewhat uncommon procedure, there is considerable variation and opinion regarding small details. Here are some things to keep in mind:
- Total volume injected and injection technique
- The total volume injected per disc is probably <3cc (and maybe less for thoracic or cervical procedures) [ref]
- Classically this is performed with a manometer to measure pressure and pressure readings can be used to help determine if the concordant pain is clinically relevant. [ref]
- Oftentimes these pressure readings aren’t done and instead you might look for concordant pain on injection based on subjective feedback
- Approach
- Walk above the superior articulating process to avoid going by a nerve root. You can see this in the sample images above.
- Sterility and infection risk. Discitis is a common concern and several things can be done to minimize the risk:
- Preoperative antibiotic
- 1g cefazolin IV within 1 hour of the procedure or clindamycin 600mg if allergic to cephalosporin or penicillin
- Use only one time use medication vials
- Full sterile prep and drape
- Antibiotic mixed in with contrast as injectate
- A small volume of cefazolin can also be included with contrast with injection. This is again something that is not consistently done by all providers.
- Double needle technique [ref]
- Use an 18g tuohy needle to start. Once the tip is placed just outside of the disc, insert the quincke needle through. The quincke needle alone will be advanced into the disc.
- Preoperative antibiotic
- Level choice
- Classically there are suspected levels to test but additional “control” discs are also injected/tested.
- If one level causes concordant pain you should see no pain or discordant pain at the control disc, showing that the concordant disc is truly and uniquely correlating with the pain that you are trying to isolate.
- Anesthesia/patient comfort
- It can be an uncomfortable procedure.
- One option is to use sedation to start the procedure and minimize discomfort until the needles are placed. Allow the patient to wake up before injection of contrast so that you can test for concordant pain.
References
- Discography in practice: a clinical and historical review
- Extremely thorough review for the entire topic. Also contains a brief procedure description and some sample images.
- Discography interpretation and techniques in the lumbar spine
- Description of technique in the lumbar level and differences between different levels.