
The indications/contraindications/anatomy sections are not exhaustive reviews. There are even exceptions to what’s presented.
This article isn’t a review of how to choose between different types of venous access, rather it’s about executing successful access once you choose a peripheral catheter.
Table of Contents
Name of Procedure
- Peripheral intravenous (PIV) catheter placement
- Peripheral IV insertion
(for general ultrasound guided seldinger vascular access, see our article)
The Quick Guide

The Quiz
This procedure doesn’t require a lot of technical knowledge so these questions don’t have exact right answers. Instead, it’s designed to get you thinking about common minor issues that you’ll encounter.
Feedback
Goal
To obtain peripheral venous access
Indications
Need for venous access to administer fluids, medications and blood products or for repeated blood collection.
Contraindications
- Local skin infection, inflammation, trauma or burns.
- Need for long-term IV access; consider central venous access in this situation
- Lymphedema or DVT in the extremity of the IV (choose another extremity)
- Coagulopathy (relative contraindication)
- AV graft or fistula in the same extremity
Anatomy
This isn’t an exhaustive review of anatomy. There are many places to start an IV/obtain IV access and a lot of variability in superficial venous anatomy, so no anatomical review will be complete.
Usually for adults, you just need to know if you’ve found a good target, rather than the details of the anatomy. For children, however, some specific anatomic knowledge is helpful as you may not be able to feel for veins well.
The antecubital fossa and dorsum of the hand are very common sites for IV/venous access and so some basic knowledge here might help (although there is variability):

Equipment/Skills/Setup
- Beginning
- Tourniquet
- Antiseptic wipe such as a basic alcohol pad
- Possibly a warm pack if the vein is difficult to find
- Procedure
- IV catheter and needle
- One way valve, i.e. clave connector
- Primed IV tubing (if hooking the IV tubing up directly to the IV catheter, otherwise you can get this ready later)
- Finish
- Saline flush/syringe or IV tubing to test IV
- Dressing – This can vary depending on use, insertions site and institution.
- Clear dressing such as a tegaderm
- Small piece of tape to hold base of IV catheter against the skin
- Gauze
Landmarks and Patient Positioning
This will vary greatly with the insertion site, but there are a few basics to keep in mind:
- Treat this like any other complicated procedure: a little time during setup and patient positioning is very important.
- During insertion, keep the insertion site below the level of the heart to allow blood to pool into the veins
- The patient should be in a comfortable position while keeping the insertion site exposed. Odd angles, poor site access, etc. will reduce your chances of success.
- You want to be in a comfortable position yourself to improve your chances of success (use a stool, chair, etc.).
- You often need to do tasks one-handed. Have supplies easily accessible and on a surface where items can be picked up/put down and kept secure/clean/organized.
Technique
Preparation
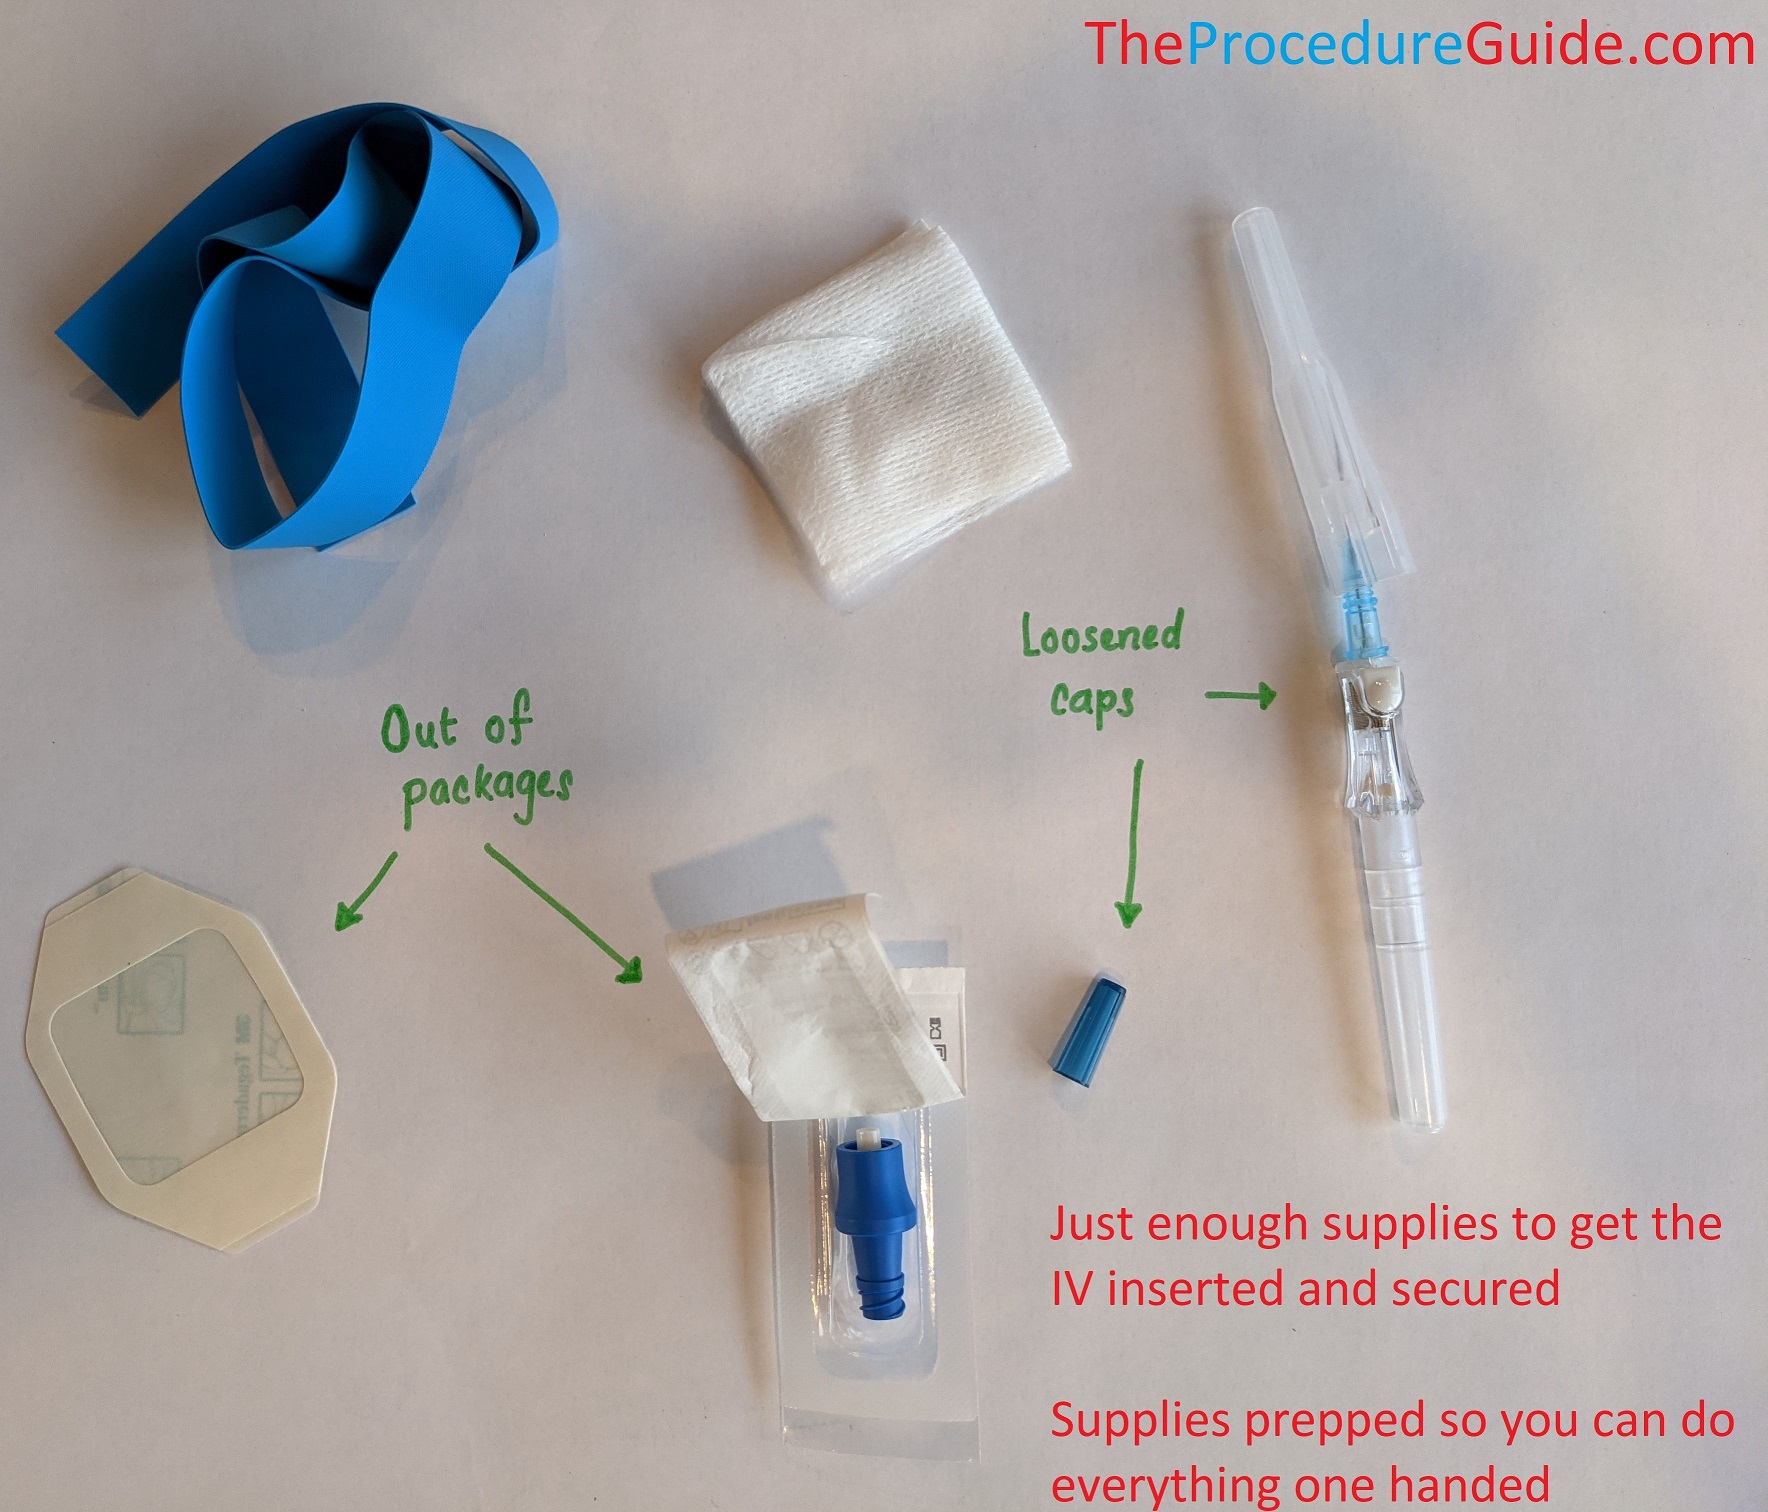
- Collect the immediate supplies that you’ll need right before and after the catheter is inserted:
- Tourniquet
- Alcohol to clean the skin
- IV catheter
- Valve or IV tubing to hook to the catheter hub
- Must have something ready so your catheter doesn’t start leaking blood
- Remember, if hooking up IV tubing directly, have it primed BEFORE you start.
- 1 piece of tape or tegaderm to secure the IV in place
- Gauze (just in case)
- Have everything opened up and ready to grab for ONE HAND use (i.e. caps off, out of packages, piece of tape cut, etc.)
- All the other items (IV bag, more tape, etc) can be collected later.
Find an IV target and insertion point
This is the most important step and takes time and experience.
- These are guidelines, not rules, and there are always exceptions:
- AVOID using the flexor portion of the wrist as this site tends to have smaller veins and might be slightly more uncomfortable for patients.
- AVOID spots where the catheter is easily obstructed (such as points of flexion that can kink the catheter).
- DO use a spot that’s easy to keep clean and is accessible for its intended use.
- I.e., if a patient will be having a procedure with the elbow bent the entire time, the dorsum of the hand might be a better spot.
- DO use a location that can minimize movement and has low risk of getting caught on objects like patient clothes.
- I.e., anticipate that tubing/adapters that are attached to the catheter hub will protrude several centimeters. If your skin entry is near the knuckles, for example, then these adapters will stick out and can easily catch on items.
- DO use a segment of vein that is fairly straight for the length of the IV catheter and large enough to cannulate.
- Often you need a vein that is clearly visible and/or one that you can palpate with a rubbery/bouncy feedback.
- After choosing, you also need to pick the specific skin insertion point. There might be multiple veins or a long vein and your insertion could be at several points.
It quickly becomes obvious that no one site will perfectly fit all these criteria. The dorsum of the hand and the forearm or antecubital fossa tend to be the best options for most people and in most situations.

Apply the Tourniquet
- Before applying:
- Keep the insertion site at or below the level of the heart for a few minutes
- Try having the patient make/relax a fist several times if inserting in the hand/arm (unless you are drawing a potassium diagnostic test since fist pumping can falsely elevate the values).
- Try warming the insertion site to improve blood flow to the area
- Apply the tourniquet anywhere proximal to the insertion site but not too far from the site.
- It may be mildly uncomfortable for the patient as the tourniquet should be tight.
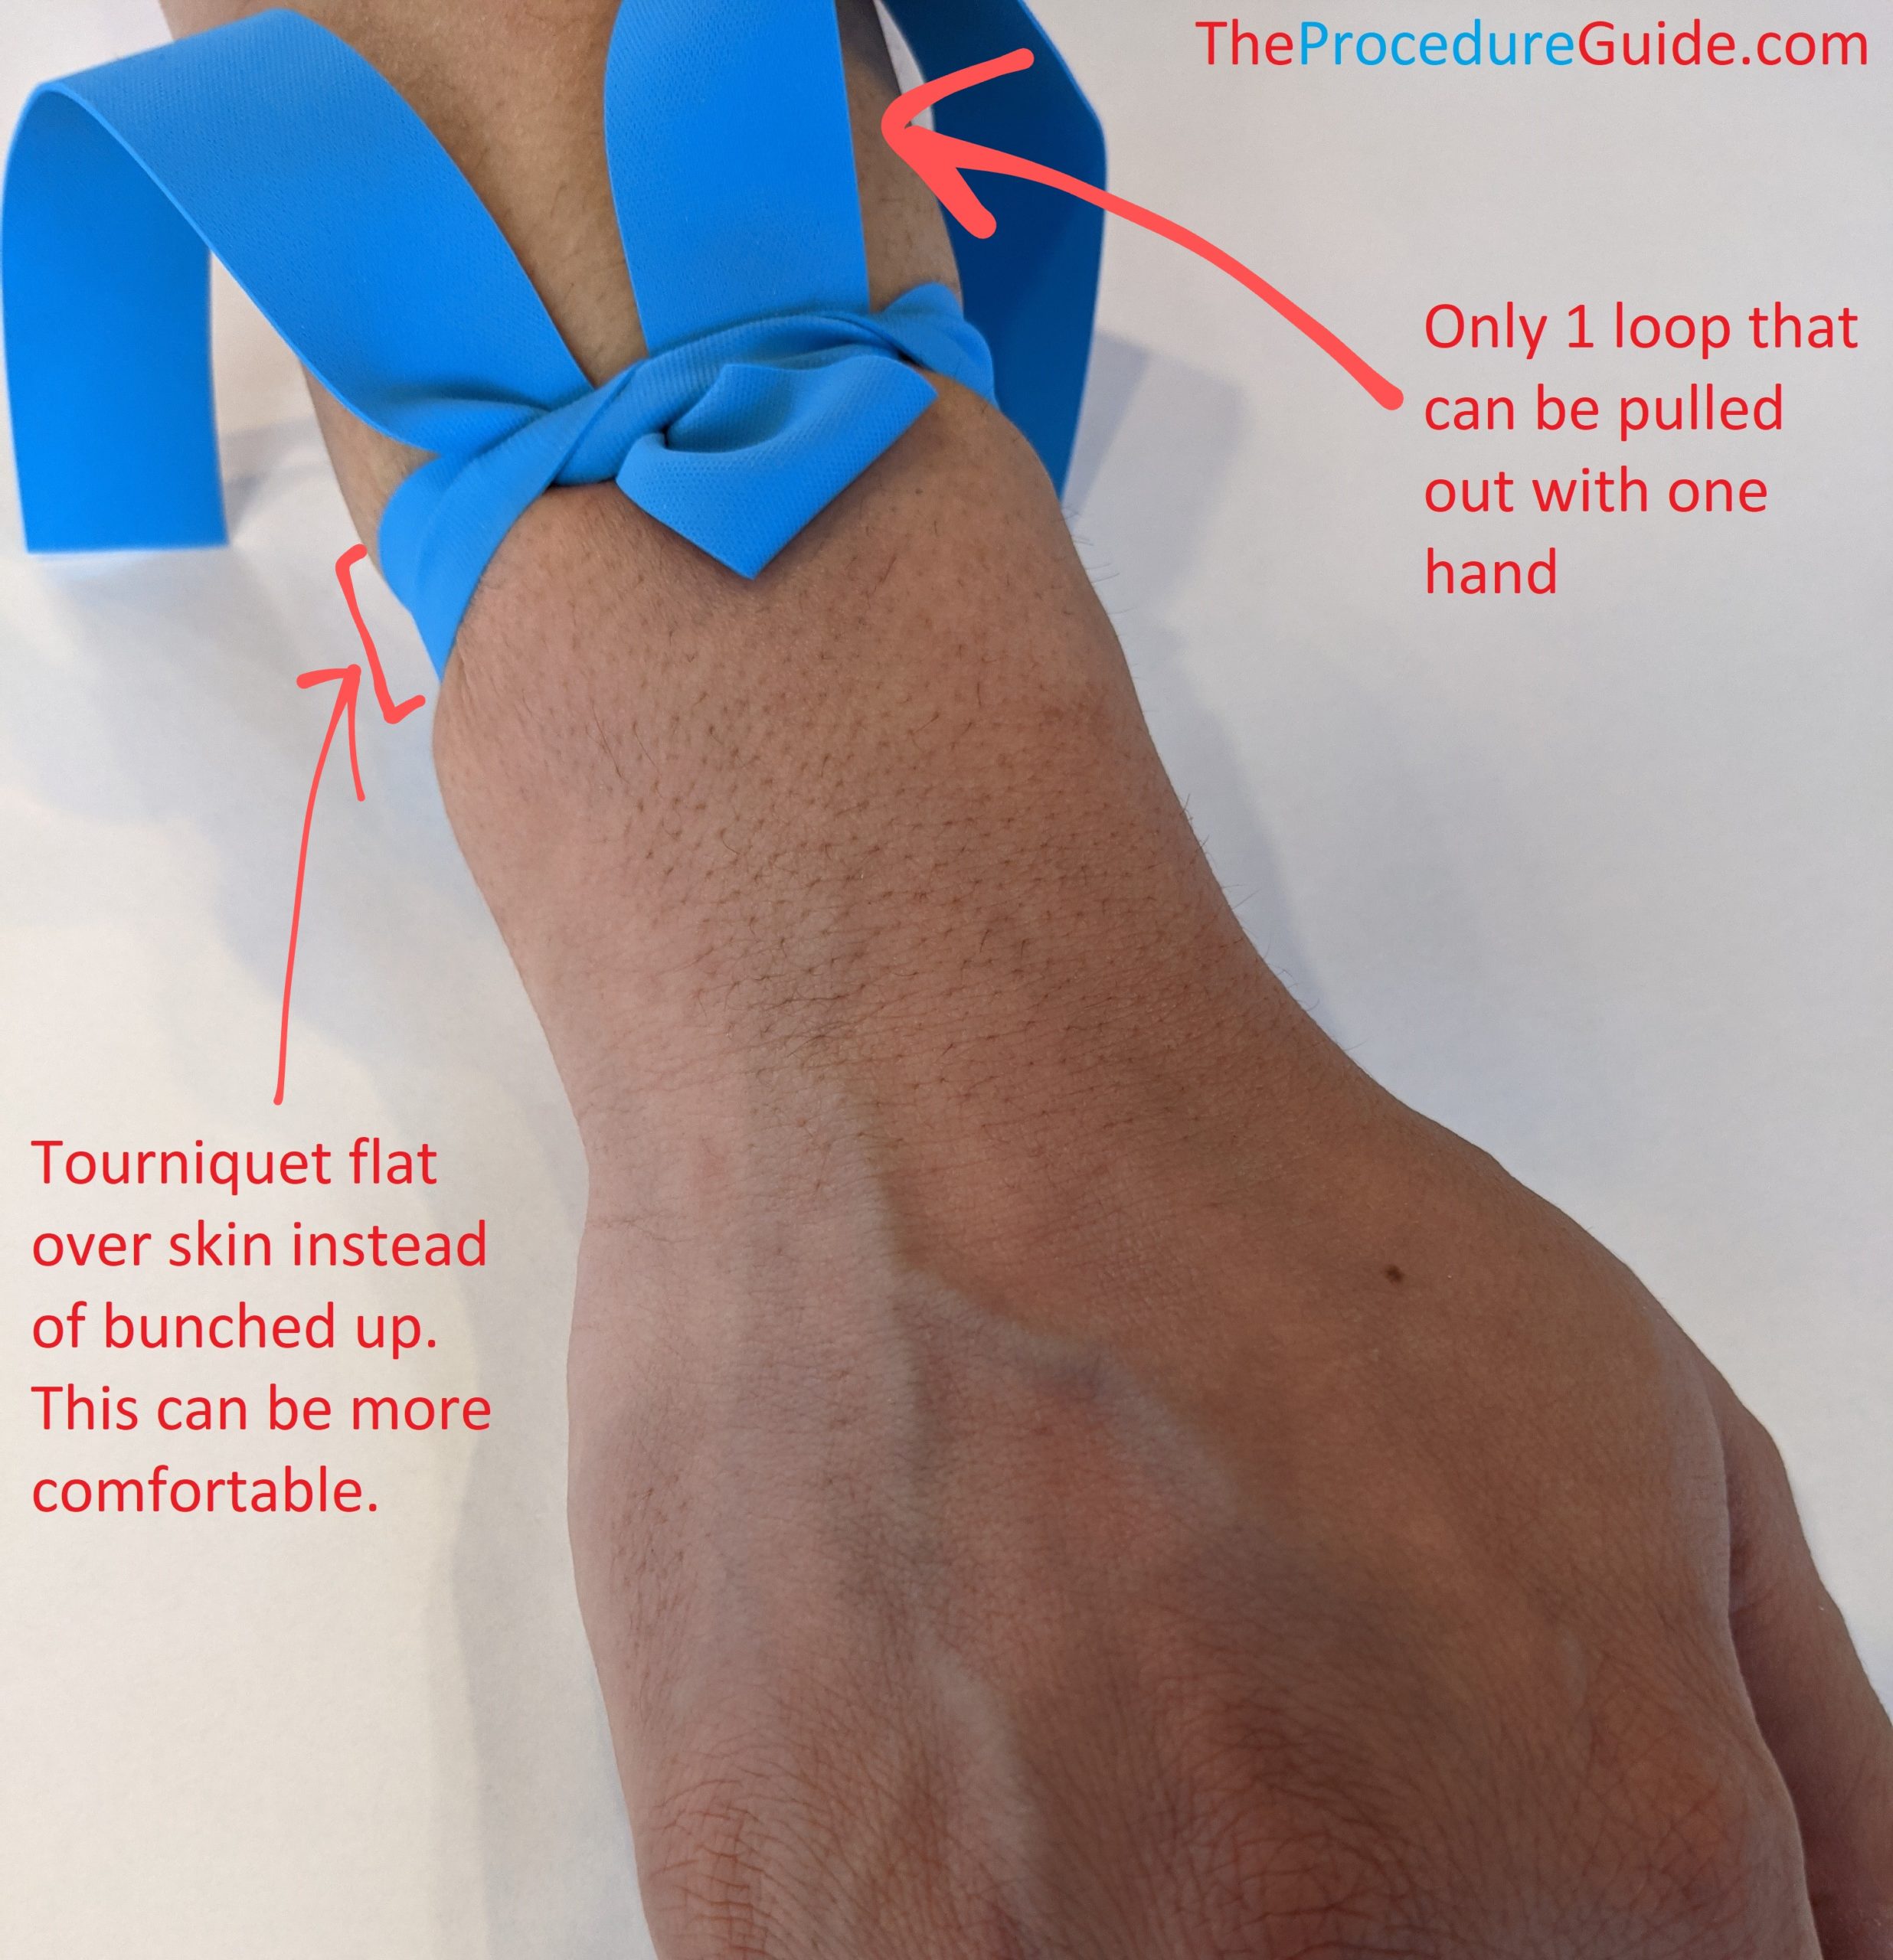
- The tying technique is important: you want to be able to release a tourniquet with one hand.
- Tying it like a shoelace does not allow you to do this.
- Note that it’s just like the first step of tying a shoe, but instead of threading the loose end all the way under, you only do it partly:
Insert your catheter
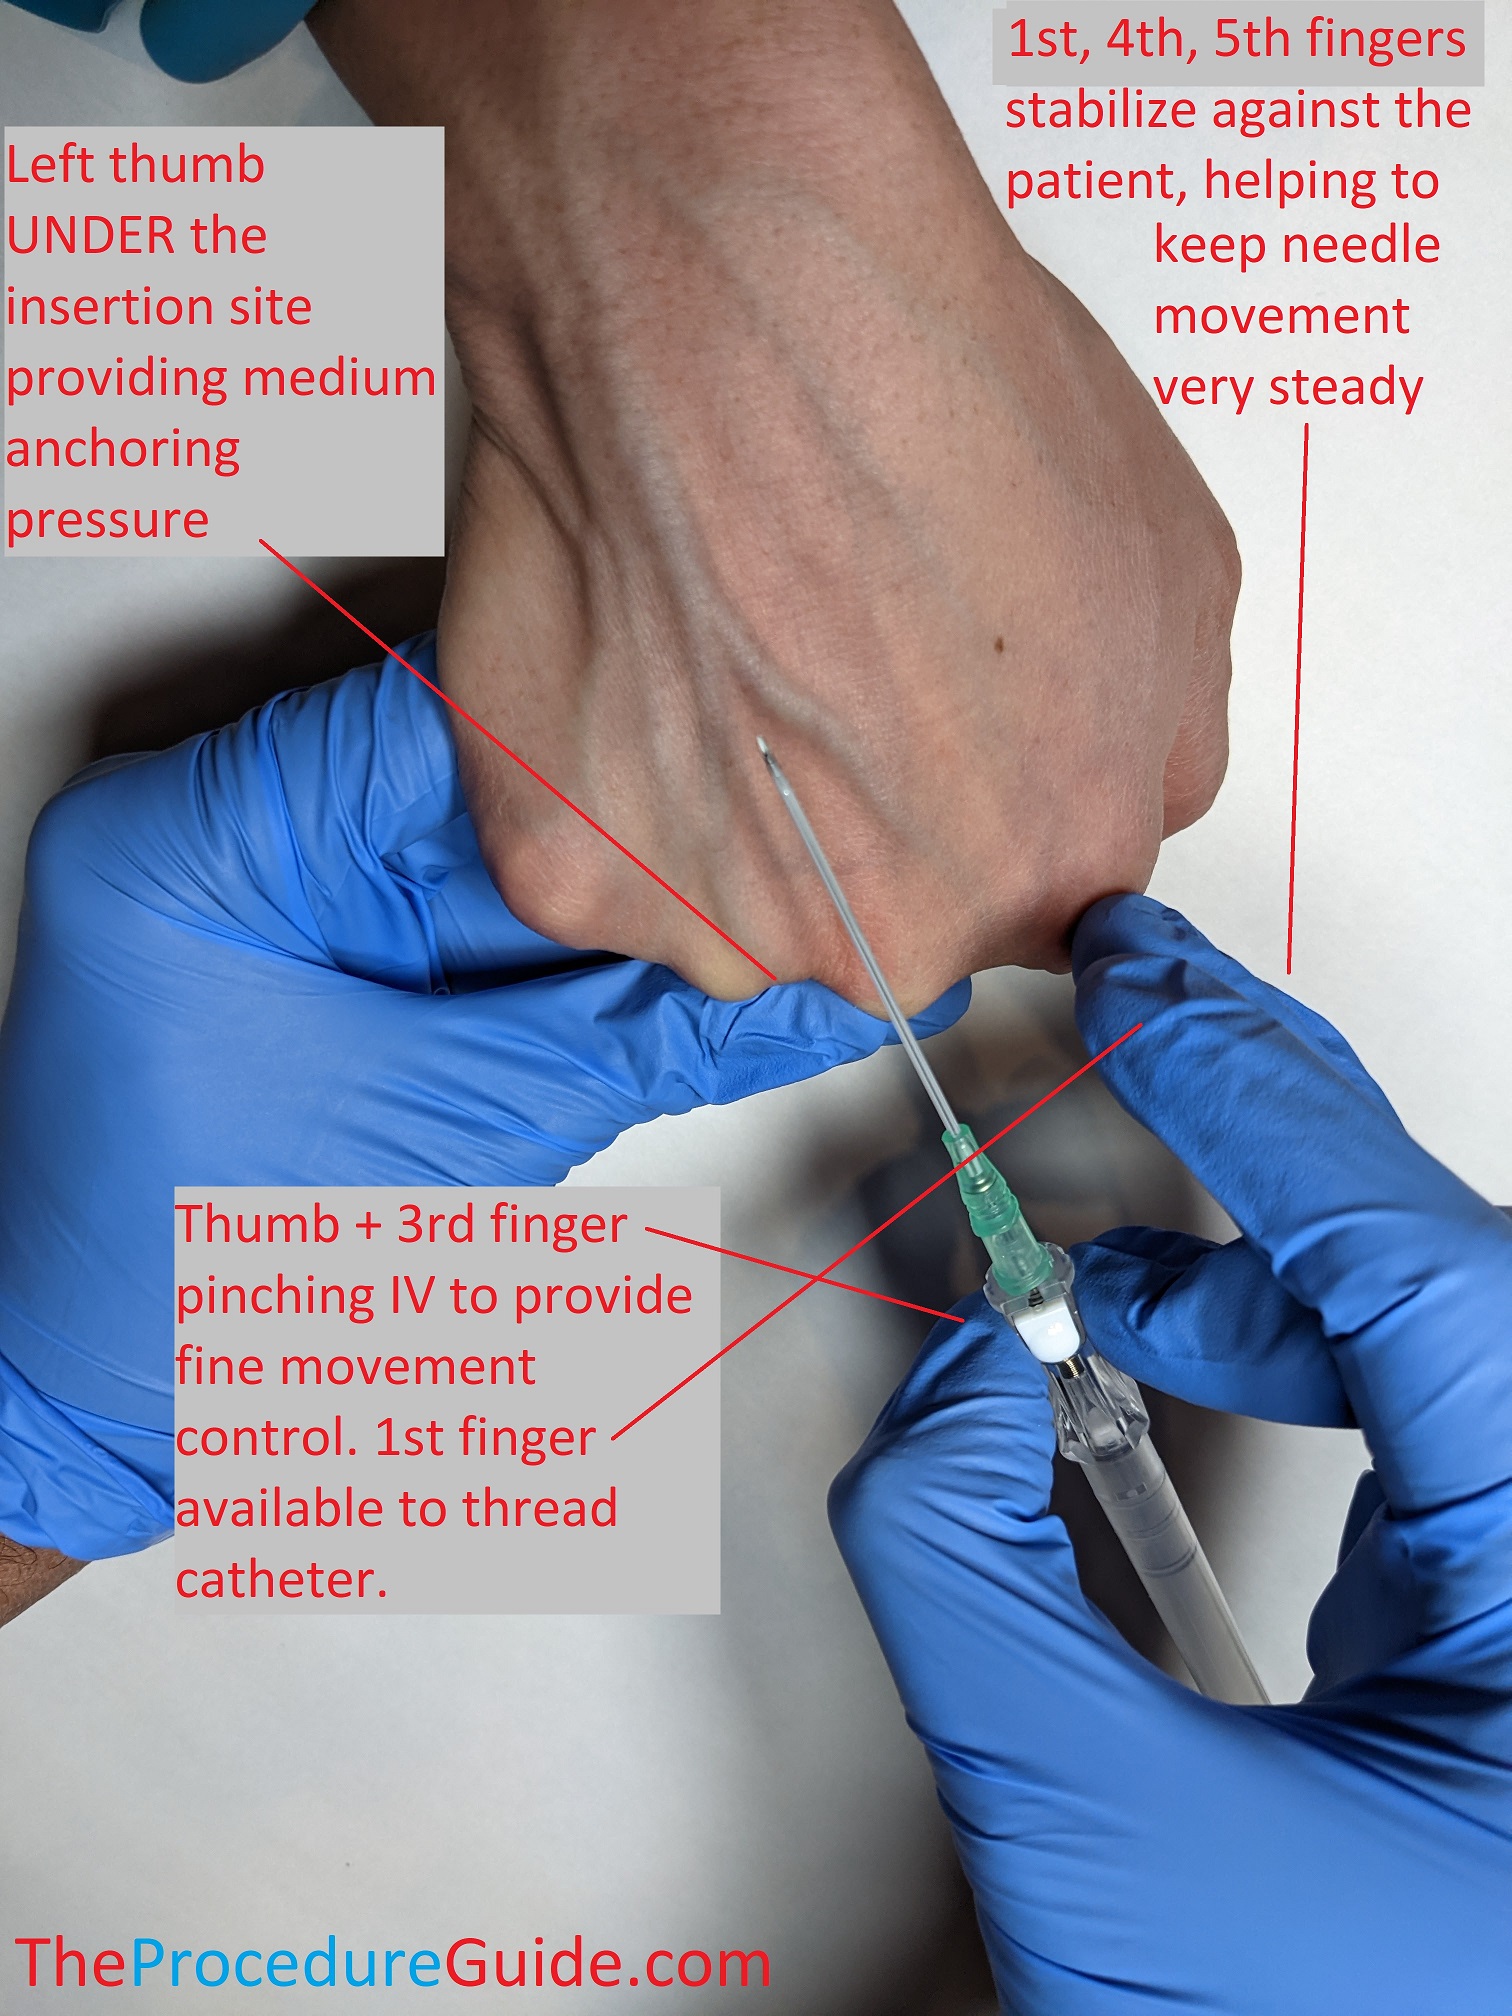
- We’ll assume you’re holding the needle/catheter in your right hand. Do what’s comfortable but usually putting your thumb and middle finger on the side of the device, just below the catheter hub, in a pinching fashion offers good control and one handed operation.
- Prep the site, usually with alcohol swabs
- Anchor the vein/extremity
- Grip the extremity like holding a can, just below the insertion site. This secures the patient’s limb to minimize movement and make for a more steady procedure.
- Now just put your left thumb below/distal to the insertion site
- Push with your thumb and pull down with medium pressure
- This anchoring helps prevent “rolling” of the vein while inserting the needle/catheter.
- Veins are also highly compressible, so you want to avoid too much pressure or the vein will compress and it will be harder to cannulate.
- You can anchor from above. But if you anchor from below then the needle is pointing in the opposite direction of your thumb, minimizing the risk of a needle stick.
- Push with your thumb and pull down with medium pressure
- Insert your needle/catheter
- Angle
- Usually a constant shallow angle the entire way should work well
- If you’re starting just distal to the vein, this shallow angle works
- If you’re right on top of the vein at your insertion site and have less distance to travel, you might start with a sharper angle just to get into the vein quickly, and then flatten out your angle
- NEEDLE tip
- Most catheters now have a flash chamber to show when you get blood return but it isn’t always a guarantee.
- The chamber and feel/experience will help you to determine when your NEEDLE tip is in the vein.
- Once this happens you now have to focus on steps that will allow you to get the actual catheter into the vein…
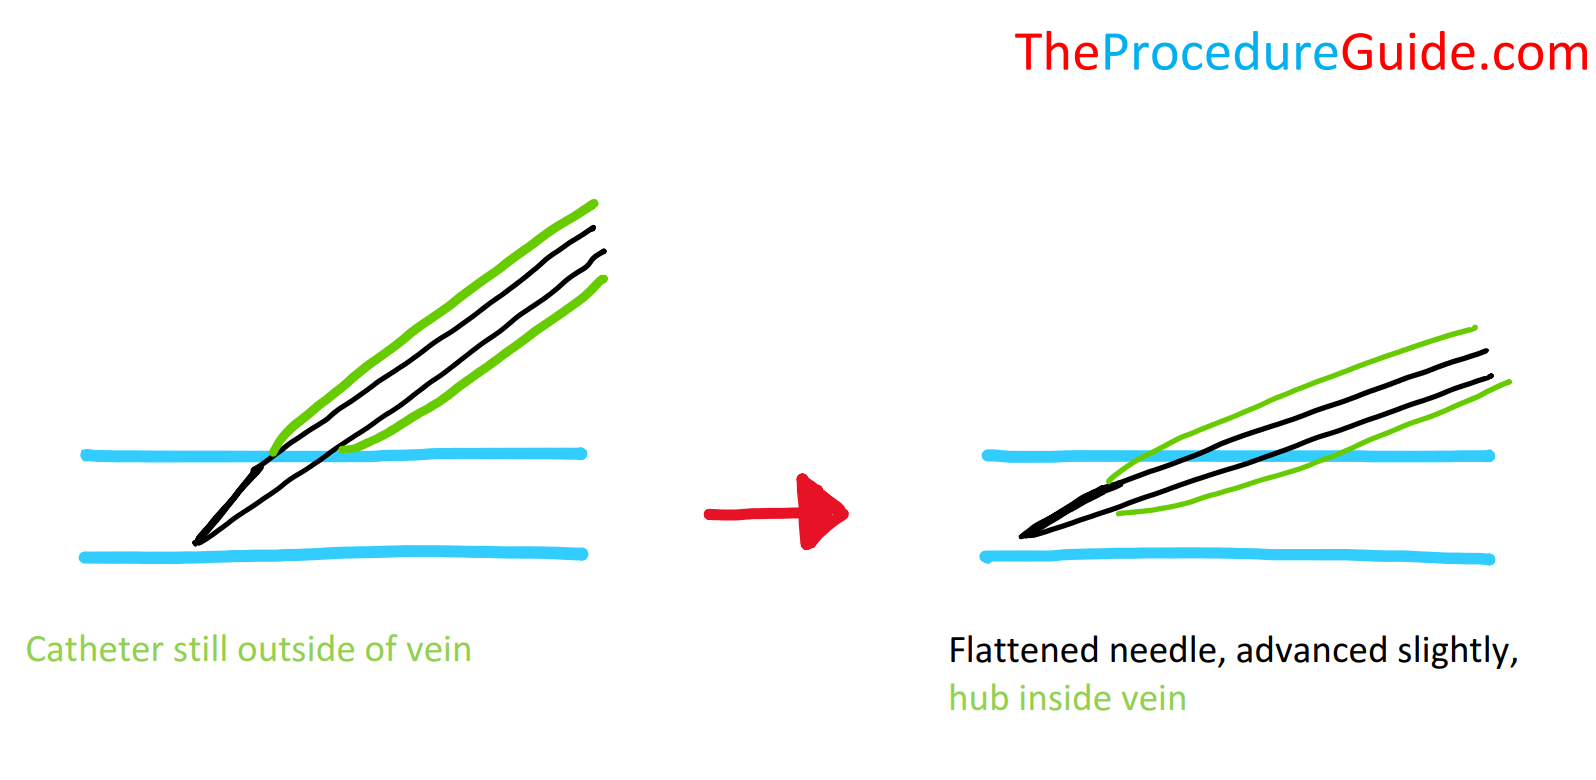
- CATHETER tip
- This is when a lot of people have problems: getting the CATHETER tip into the vein
- Remember these steps: Needle tip in vein, flatten needle angle, advance SLIGHTLY, hold everything steady and advance catheter into vein.
- Once you’ve determined that your needle tip is in the vein, you might flatten the angle so the catheter is parallel with the vein.
- Advance it slightly so the catheter tip is securely in the lumen
- Use your index finger to push the catheter into the vein.
- The tip of the needle will be sitting right at the hub, preventing bleeding.
- Angle
Withdraw your needle
- Remove the needle
- Use your left hand to remove the tourniquet.
- Put your left thumb a bit above the cannulation site, just above where the tip of the catheter should be and push down to occlude the vein.
- With your right hand, withdraw the needle (IV catheters often times have a retract mechanism that you can activate)
- As long as your left hand stays in place, there won’t be bleeding and your right hand can collect supplies.
- Finish up
- Attach any chosen adapters, such as a one way valve or IV tubing.
- Tape up the IV catheter
- You want secure taping but not too much
- Apply tape that prevents it from pulling out but is also easily removable in case you need access to the catheter.
- This is a good time to open up the IV drip or flush with a saline syringe to ensure that the catheter is truly patent after insertion/positioning/taping/etc.
- Sometimes the IV works right up until you tape it and that causes it to push up against a wall or valve and occlude.
Tips
A number of small things can cause difficulties with PIVs:
- Tourniquet
- If you learn to keep it flat over the patient’s skin it might be more comfortable.
- Careful around hair: the rubber can pull out hair which is more painful than the IV insertion. You can simply tie it over a thin piece of clothing/gown to still apply pressure but avoid the hair.
- Veins have valves:
- When advancing catheters you might get mild resistance at one point.
- Usually a little wiggling lets you gently push the catheter past the valve.
- Sometimes the catheter tip, when fully inserted, just happens to sit up against a valve.
- This can be enough to occlude the tip and stop flow of fluids through the cather. Since you have most of the catheter in place, withdrawing the catheter just a few millimeters and securing it in place will solve the problem.
- When advancing catheters you might get mild resistance at one point.
- Infiltrated IVs
- If the catheter was advanced into tissue (outside the lumen of the vein), you’ll have resistance with injection and infiltration of medication into the soft tissue, and you should see swelling right around your insertion site.
- Positional IVs
- Valves near the catheter tip and kinking of the vein/catheter can all cause the IV to work in some positions and not others.
- While you can compensate for this in various ways (pulling the catheter back slightly, holding it at a different angle, etc.) you should consider the intended use of the IV.
EXAMPLE: Will it likely stop working when it’s used in the OR after the patient is positioned?
- Floating a catheter
- People sometimes refer to “floating a catheter” to recover it.
- While inserting, you might pass your needle and catheter tip through the back wall.
- You can pull your needle out in this case and you shouldn’t get blood return.
- Pull the catheter back slowly until you get blood return (the catheter tip has moved back into the lumen of the vein)
- Quickly attach a saline syringe to the hub
- Slowly inject saline to distend the vein
- If it injects smoothly and looks appropriate then you can try to slowly advance the catheter while injecting.
- The idea is that the distended vein will allow you to advance the catheter even though it isn’t over a needle.
- If the catheter kinks, you may not be able to advance/salvage it.
- You can also try this technique if the catheter is in but up against a valve. The saline can open the valve and allow the catheter to pass through.
References
- Peripheral intravenous (IV) device management
- Highlights and video on pediatric IV placement
- Peripheral Line Placement
- Good overview on indications, contraindications, technique, etc
- Ultrasound-guided peripheral intravenous cannulation
- Another procedure oriented guide with some details specific to using ultrasound
- Peripheral venous cannulation
- Presentation style overview of considerations for IV placement along with some images
- Initiating A Peripheral Intravenous (PIV)
- Special consideration for PIVs in kids
- Insertion & Removal of a Peripheral Intravenous Cannula
- One institutions procedural recommendations for IV insertion and removal