
Table of Contents
Name of Procedure
- Intrathecal Injection
- Intrathecal Anesthetic/Analgesia
- Spinal Injection
- Spinal Anesthetic/Analgesia
Sample Opnote
Goal
To deliver medications into the cerebrospinal fluid (CSF)/intrathecal space.
Indications
Generally for an anesthetic block for surgery below the umbilicus. Commonly for obstetric (caesarean section) and orthopedic lower extremity surgeries. See this excellent review from NYSORA.
However, this technique would apply to non-anesthetic drug delivery as well.
Contraindications
- Common contraindications
- Intracranial lesion with mass effect (or other intracranial hypertension). This may exclude pseudo–tumor cerebri (idiopathic intracranial hypertension)
- Possibly Arnold-Chiari malformation
- Coagulopathy
- Low platelet count
- Blood thinners – See ASRA based guidelines (and an abbreviated protocol) for managing various blood thinners pre and post procedure
See references below for detailed reviews of contraindications
Severe hypovolemia, or expected blood loss/hypovolemia during the procedure (if administering local anesthetic). See this excellent review from NYSORA for more details.
Anatomy
Overview
- The spinal cord runs down the middle of the spinal canal
- The cord itself ends around L1-L2 and only the cauda equina continues
- Hence, below L1-L2 is a good place to stick a needle as it’s below the cord and less likely to cause injury.
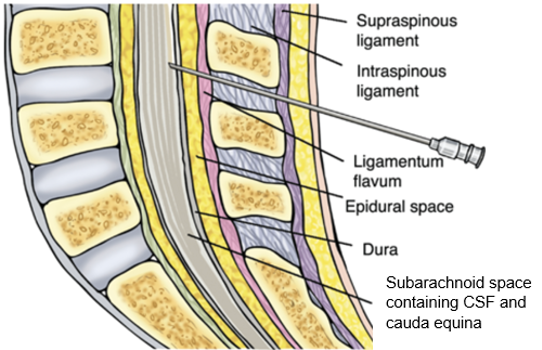
- Immediately surrounding the cauda equina is the intrathecal space (subarachnoid space) which contains the CSF (cerebrospinal fluid)
- Moving posteriorly/superficially through the layers you have the:
- Arachnoid mater
- Dura mater
- Epidural space
- Ligamentum flavum
- Interspinous space/ligament
- Supraspinous ligament
- Skin/subcutaneous fat
Sagittal plane, which shows a needle trajectory that would get access to the epidural or intrathecal space (in this picture the tip is in the intrathecal space):
Equipment/Skills/Setup
Setup
- You’re often doing this procedure with a patient that’s already feeling unwell.
- Set everything up before positioning the patient and cleaning. This can keep the procedure time to a minimum.
- If you have someone to help they can then help the patient into position while you’re in sterile gloves.
Events progress quickly after intrathecal injection, so it’s important to set up everything else prior to injection, even things unrelated to the procedure: eg, vascular access, IV fluids, required monitoring, backup airway/anesthesia/etc. The choice of anesthetic, backup plans, emergency management, etc are beyond the scope of this article, but the best time to prepare these is usually pre-procedure/pre-gloving.
Equipment
Often times you’ll have an intrathecal kit that will contain necessary supplies:
- Prep
- Betadine or chlorhexidine
- Sterile drapes
- Procedure
- ~ 3-5mL of 1% lidocaine with a 25G or smaller hypodermic needle for subcutaneous local anesthetic
- Pencil point spinal needle with stylet inserted
- Possibly an introducer (short metal needle through which you place the spinal needle)
- Anesthetic drawn up in a syringe
Landmarks and Patient Positioning
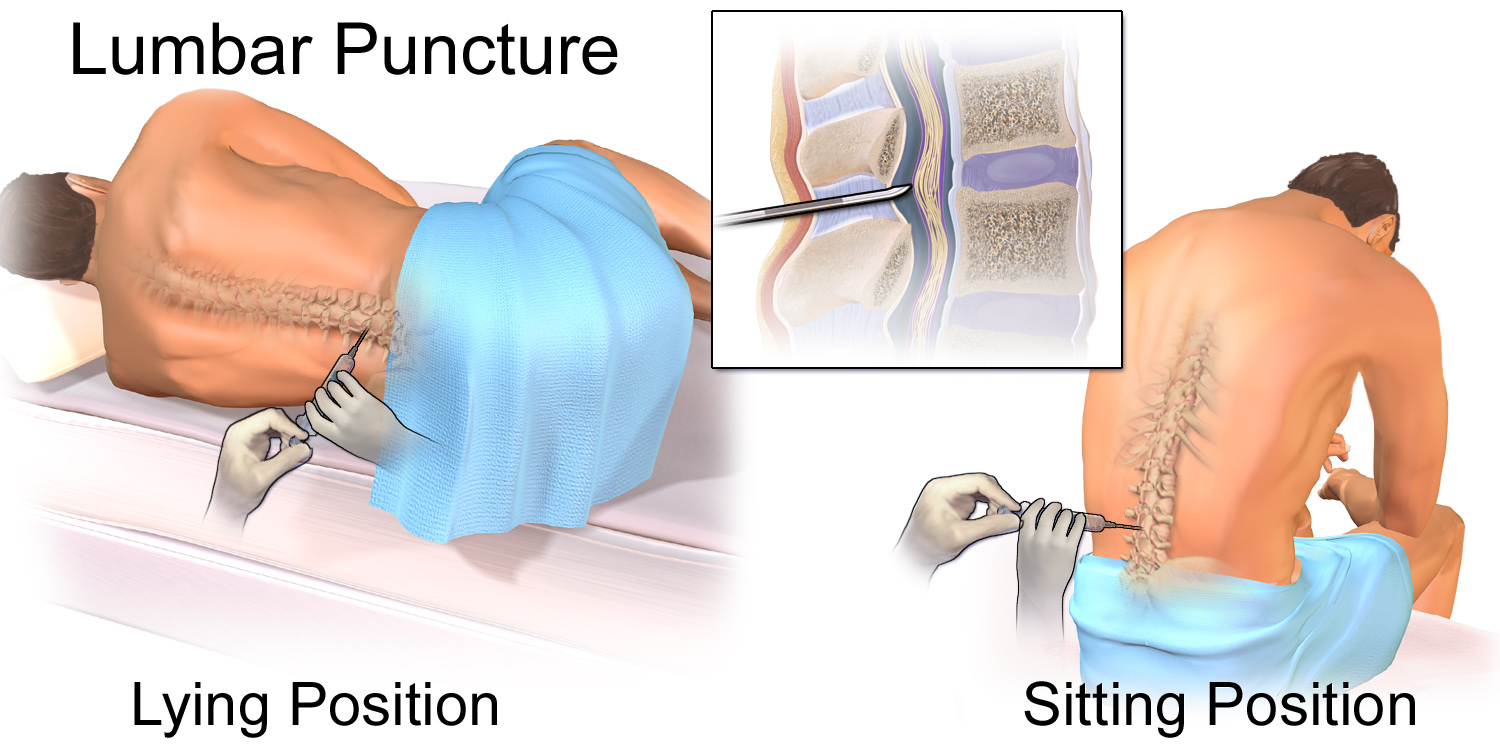
Positioning
The patient can be in a sitting or lateral position
- In either position the key is to have the patient arch their low back like a cat (you don’t want the patient to bend forward at the waist and away from you).
- This opens up the interspinous spaces allowing a larger path for your needle.
- A useful instruction is to put your finger on their low back and tell the patient to push back on your finger by arching their back.
Landmarks
The top of the iliac crest tends to be around L3-L4. As described under Anatomy, this level, or a lower level, is a good entry point as it is below the end of the spinal cord.
- Feel the top of the iliac crests
- Move medial to midline and find an interspinous space (see image above)
- Push up and down along midline and you’ll feel the bumpy protrusions, which are your spinous processes
- In between you’ll feel divots which are your interspinous spaces
- Within the divot, find the inferior most spot as an entry point to give you a good trajectory between the spinous processes.
Technique
Access the Intrathecal Space
The entire procedure is about mapping out the patient’s anatomy with every pass of a needle so that you can re-adjust the needle as it bounces off bone until you get a straight shot to the intrathecal space.
- Anesthetize just barely above the bottom spinous process of the space that you chose.
- You want to take an inferior to superior trajectory with your needle so you want to start at the bottom of the interspinous space. (See diagram below)
- You can use the subcutaneous needle as a finder. It should hit a spinous process to help you map out the space.
- Unless it’s a very thin patient most 1.5” needles won’t go past the interspinous ligament
- If you have an introducer insert it along the expected trajectory
- Remember, if you use an introducer and you need to adjust your needle trajectory at some point, pull the spinal needle back into the introducer, then adjust your introducer trajectory before re-inserting the needle.
- Now insert your spinal needle (with the stylet still inside) through the introducer (or without the introducer) and continue towards the intrathecal space
- Make small adjustments as you hit bone (see diagram below)

- You’ll usually feel a small pop as you enter the intrathecal space.
- Remove your stylet and wait to see if you see CSF/clear fluid flow out (might need to wait a few seconds)
- If you don’t get CSF re-insert your stylet, and reposition as necessary
Inject Medication
- Attach your prepared syringe and inject medication at a moderate pace.
- If you move the needle even slightly during this step it can cause the needle tip to leave the intrathecal space while injecting, in which case you will get a partial or no block, complicating your anesthetic:
- Before attaching the syringe, hold the needle and brace it against the patient to keep it’s position constant.
- Midway through injection you could aspirate a bit to see if you get CSF and ensure that you are still in the intrathecal space.
Tips
- The “pop” through the intrathecal space takes time and experience to learn.
- The hardest part of the procedure is mapping out the anatomy in your head quickly as you keep adjusting your trajectory
- For example:
- You hit bone with your needle, so you redirect inferior, but then still hit bone. This might mean you are hitting the inferior spinous process.
- Redirect superior and continue in this fashion till you get to your target
- If you are struggling, take a step back and consider a few basics:
- Is the patient maintaining the right curvature?
- Patients will frequently withdraw due to discomfort and arch away from you creating the exact opposite of what you need.
- This closes off the interspinous spaces and space for your needle
- Reference the positioning section again to see the correct arch in the sitting position.
- What is your overall trajectory?
- You may actually be off midline and need to re-insert the needle from a new starting point
- Are you anticipating the correct angle?
- Remember that a small adjustment in angle near the skin will have a big impact on where the needle tip lands.
- You might need smaller changes with the needle.
- Is the patient maintaining the right curvature?
- For example:
- Some levels don’t have a good trajectory to the intrathecal space.
- If you can’t get to your target at one level, consider restarting at another level.
- Passing through the intrathecal space
- Since you’re going based on feel, you may pass through the intrathecal space and end up past the anterior border.
- In this case you may actually hit bone on the anterior border of the spinal canal
- If you remove your stylet here you won’t get any CSF return, but you’ve actually passed through the space.
- In you suspect this, keep your stylelet out and slowly withdraw the needle until you get CSF return
- Remember the CSF needs time to travel through the needle and drip out, so don’t withdraw too quickly; or withdraw in small/short movements with pauses in between.
References
General
- Comparison of cutting and pencil-point spinal needle in spinal anesthesia regarding postdural puncture headache
- Review suggesting use of non-cutting needles
- Atraumatic (pencil-point) versus conventional needles for lumbar puncture: a clinical practice guideline
- Discussion about the recommendation for non-cutting needles
- Tintinalli JE, Stapczynski JS, Ma OJ, Cline D, Meckler GD, Yealy DM. Tintinalli’s Emergency Medicine: A Comprehensive Study Guide. 8th ed. New York: McGraw-Hill Medical; 2015.
Intrathecal Injection
- Obstetric Regional Anesthesia – NYSORA
- Very thorough NYSORA review of various obstetric regional anesthesia considerations
- Spinal Anesthesia – NYSORA
- Very thorough NYSORA review of many considerations regarding spinal anesthesia
- Mechanisms and Management of Failed Spinal Anesthesia
- Thorough review for troubleshooting or avoiding failed spinal anesthetics
- Spinal Injection – Intrathecal Baclofen Trial Injection
- Real life video of spinal access. This video is a baclofen injection but the overall process is the same as described above.
- Some notes about the technique in this video:
- Note the patient starts to arch her back away from the practitioner. It’s helpful to keep reminding the patient to try and push her back towards (flex) to provide optimal anatomy
- Snapshot: What are Intrathecal Injections?
- Patient focused page and explanation
Lumbar Puncture
- Diagnostic Lumbar Puncture
- Thorough review and procedure description with images
- Evidence Based Consult – Procedure: Lumbar Puncture
- Description of procedure and clinical background
- Consensus guidelines for lumbar puncture in patients with neurological diseases
- Thorough review of lumbar puncture literature with consensus guidelines on various issues like needle choice, position, pre-procedure workup, etc.
- Difficult Lumbar Puncture: Pitfalls and Tips from the Trenches
- Tips for unusual or advanced situations along with various image guided samples