
Table of Contents
Name of procedure
Nexplanon/Implanon (etonogestrel) implant/insertion
Sample Opnote
Serum HCG on this date was Negative. The patient was placed in a supine position with the [left/right] arm flexed at the elbow and externally rotated. A spot 8-10cm from the medial epicondyle was selected as the insertion site. The insertion site and guiding site were marked using a sterile marker. The site was then cleaned with betadine and draped in a sterile fashion. The skin over the insertion site was then anesthetized with 2ml of 1% lidocaine without epinephrine. The Nexplanon trocar was inserted subcutaneously and the Nexplanon capsule was delivered subcutaneously. The trocar was removed from the insertion site.
Placement was verified by myself and the patient via palpation. A band aid/steri-strips and pressure dressing were applied to the insertion site. The patient tolerated the procedure well.
The patient was instructed on wound care. She is to leave the pressure dressing in place for 24 hours. After 24 hours, she may remove the pressure dressing but not the band aid. That should stay in place for 3-5 days. She was also instructed that she needs to continue to use condoms for the first week. She was instructed to make a 3 month follow up visit.
Goal
Placement of a Nexplanon contraceptive implant in the arm.
Indications
- To provide long term reversible contraception (effective up to 3 years)
- Review pre-procedure planning to determine ideal time of nexplanon insertion based on patient’s menstrual cycle, previous history of contraceptive use, and post-procedure contraception use.
Contraindications
- Known or suspected pregnancy
- Known or suspected history of breast cancer or other progestin-sensitive cancer
- Current or past history of thrombosis or thromboembolic disorder (relative contraindication)
- Hepatic tumor or active liver disease
- Undiagnosed genital bleeding
Anatomy
See landmarks and patient positioning below.
Equipment/skills/Setup
Non-sterile
- Skin marker if desired
- Adhesive dressing: bandaid or steri-strips
- Pressure dressing: Kerlix or ace wrap
Sterile
- Betadine
- Sterile drape
- 2-5 ml syringe with 18 gauge needle to draw up lidocaine
- Lidocaine 1% for subcutaneous local anesthetic
- 25 gauge x 1.5 cm needle to inject anesthetic
- Sterile gloves
- Nexplanon implant device
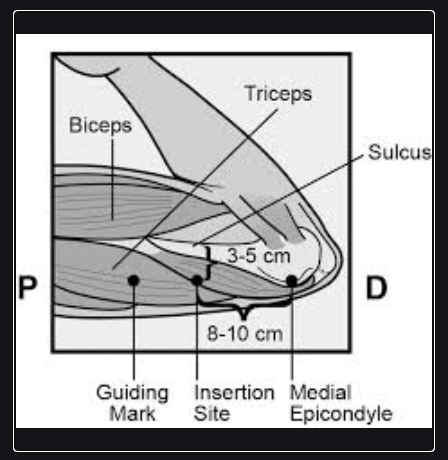
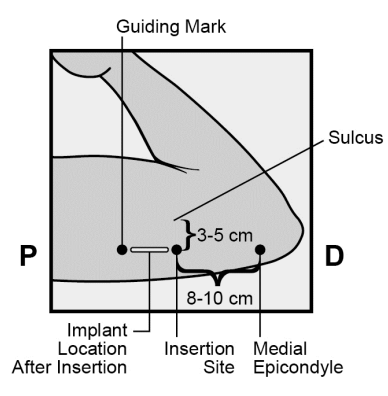
Landmarks and patient positioning
- Place the patient in a supine position with the non-dominant arm bent at the elbow, with her hand placed near the head and palm facing up.

- Insertion site and guiding mark:
- The insertion site should be 8-10 cm proximal to the medial epicondyle and overlying the triceps muscle.
- Avoid insertion into the sulcus between the biceps and triceps muscle that contains a large neurovascular bundle.

Technique
- After positioning and identifying landmarks as noted above, prep and drape the area.
- Anesthetize the skin over the insertion site with lidocaine.
- Remove the transparent protective cap/needle cover.
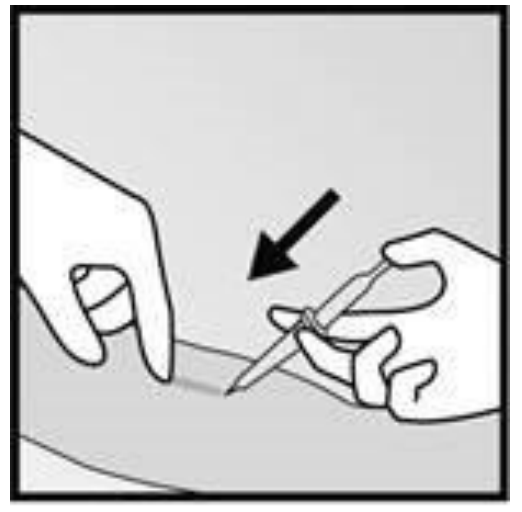
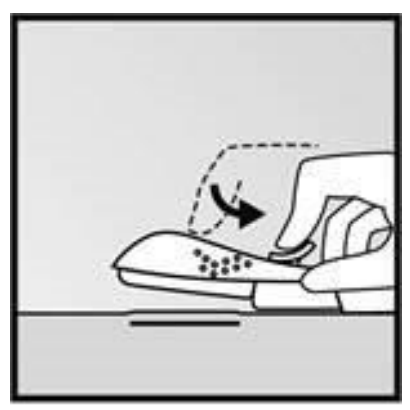
- Place the needle tip/applicator at a 30 degree angle to the skin at the insertion site.
- While applying counter traction to the skin around the insertion site, puncture the skin with the needle tip.

- Lower the applicator so it is parallel to the skin and aim towards the guiding mark.
- Advance the needle/applicator to its full length subdermally while lifting the skin with the tip of the needle to avoid muscle or deep tissue penetration.
- While advancing the needle, make sure the needle tip doesn’t come back out of the skin. If this occurs, retract the needle and then redirect it under the skin.

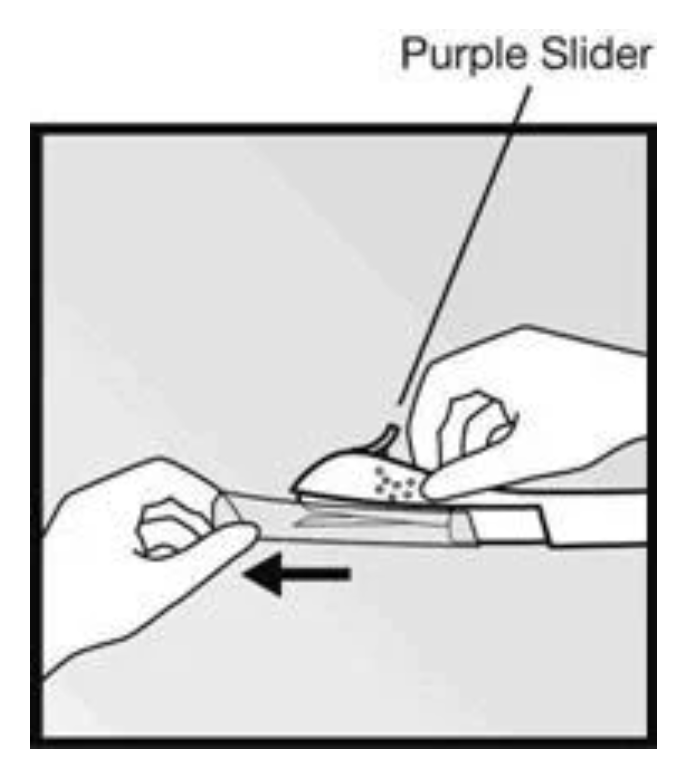
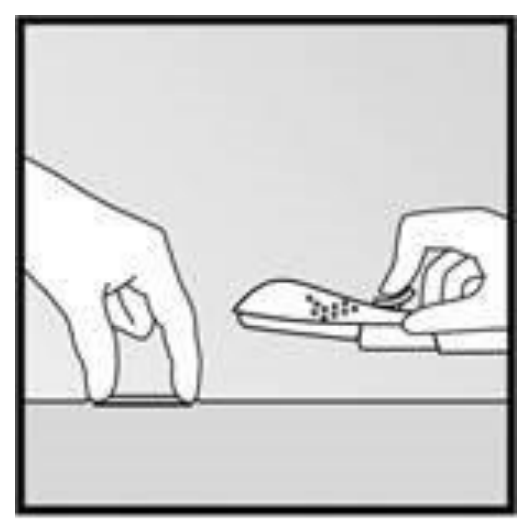
- Unlock the slider by pushing down on the lever with your index finger, and then move the slider fully backward (distally).
- The applicator stays stationary against the skin while you are pulling back the purple slider. Do not move the applicator while moving the purple slider.
- Palpate the device to confirm insertion.
- Apply adhesive dressing such as steri strips at the needle insertion site and then apply pressure dressing with kerlix/ace wrap.
Tips
- The manufacturer requires official in-person training by a Merck representative
- https://www.nexplanontraining.com/
- Or call 877-467-5266
- Counsel the patient well on potential side effects, especially irregular bleeding.
- Counsel the patient on using a back-up method of contraception for 7 days after the Nexplanon placement procedure.
- Educate the patient on how to palpate or confirm device location.
References
General references:
- Etonogestrel contraceptive implant
- Detailed overview on patient selection, indications, contraindications, procedure technique, side effects, risk factors and post-procedure counseling.
- Contraceptive Implant Placement Periprocedural Care
- For pre-procedure planning
Image references:
- Nexplanon Highlights Of Prescribing Information
- Insert for the device with sample images for the procedure