
Table of Contents
Name of Procedure
- Lumbar Sympathetic Block
💰 Medicare Data Explorer and Calculator
See payment rates and wRVUs from public CMS data. And use our calculator to model procedures and your practice.
Sample Opnote
The Quick Guide
Goal
To block and/or administer medications to lumbar sympathetic nerves
Indications
coming soon…
Contraindications
Anatomy
coming soon…
Equipment/Skills/Setup
Core Equipment/Disposables: See our disposables/equipment article for “core” items that are common to all procedures.
Core Skills: See our guides to obtain images of the cervical, thoracic, or lumbar spine. Then steer a needle to direct it under the skin.
Special items and suggested setup for this lumbar sympathetic block technique (see quick guide video above for example tray prep):
- 22g x 7″ quincke needle as your primary needle (2 if you plan to inject at L2 and L3)
- 2-3cc contrast in a 3cc syringe
- 10cc 0.25% bupivacaine in a 10cc syringe for injectate
- 3cc 1% lidocaine in a 5cc syringe attached to a 25g x 1.5″ hypodermic needle for subcutaneous local anesthetic
Landmarks and Patient Positioning
Position the patient in a basic prone position so that the bottom of the c-arm can go under the table below the area of the spine that is being treated (L2 and L3).
Technique
Here is your target and entry point [See our general guide about basics for using targets and entry points to start a procedure]:
- Initial Target: inferolateral corner of the L2 vertebral body
- Final Target: just anterior to the vertebral body (on lateral) and halfway between the lateral and midline of the vertebral body (on AP)
- Entry: Straight lateral to the Initial Target, by a few cm.
- Obtain a scotty-dog view on the side being treated. From here, further oblique rotation might be useful.
- Anesthetize the skin and insert a 22g x 7″ quincke needle to contact your initial target.
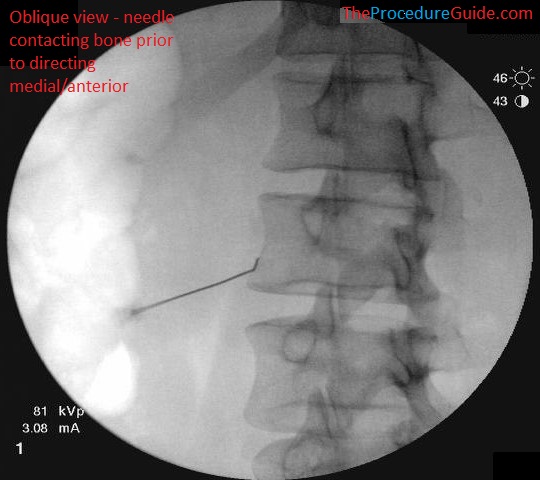
Oblique fluoroscopy lumbar sympathetic block
- From there, “walk” off laterally till you can feel/see the needle advance slightly anterior.
- Then change to a lateral view
- Continue to advance the needle with a lateral to medial trajectory (Imaging you’re trying to wrap the needle around the vertebral body so we can get to our final target).
- Keep advancing till the needle tip is just a few millimeters past the anterior border of the vertebral body.
- Once in position, aspirate to ensure that no blood returns
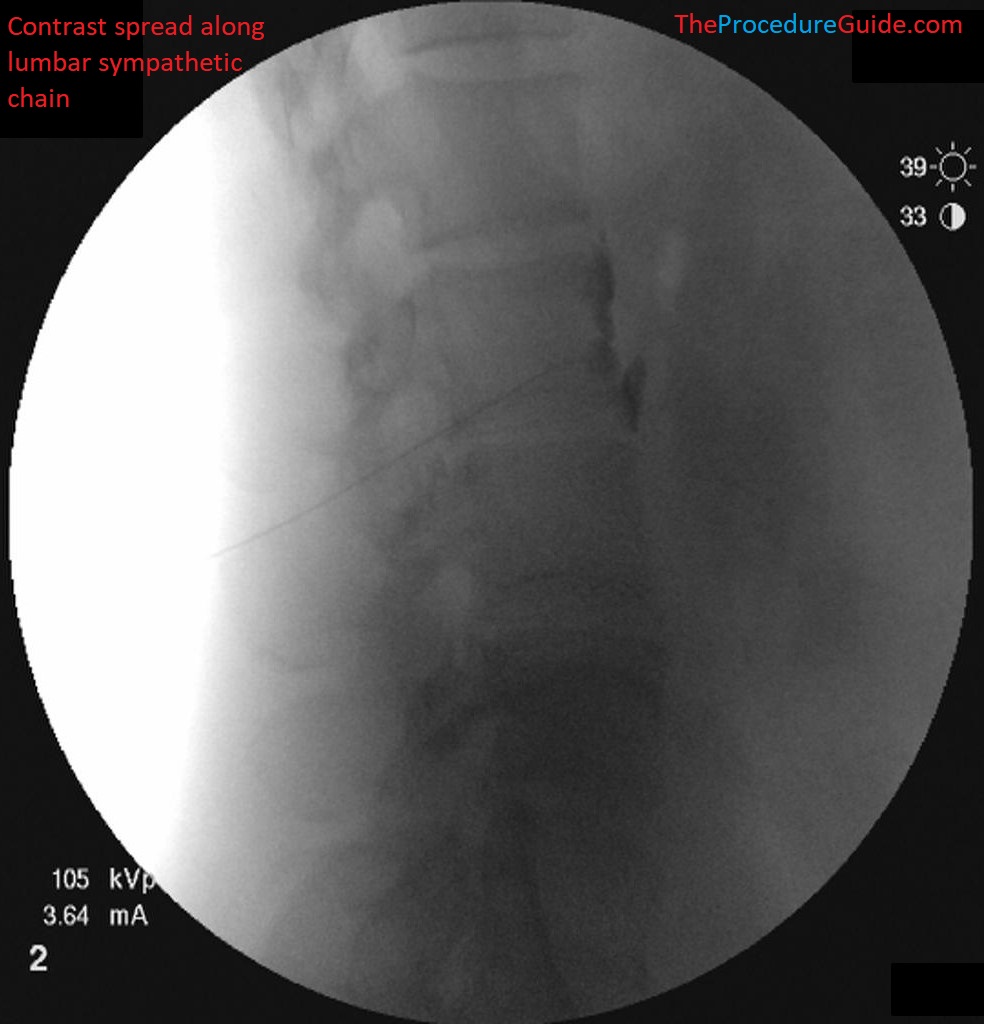
- Inject contrast under live fluoroscopy. This is to look for superior-inferior spread and to also evaluate if you can see vascular uptake.
- Once you confirm appropriate spread, you can inject your primary medication (we often use ~7mL of 0.25% bupivacaine).
- This can be done slowly and with with frequent aspiration.
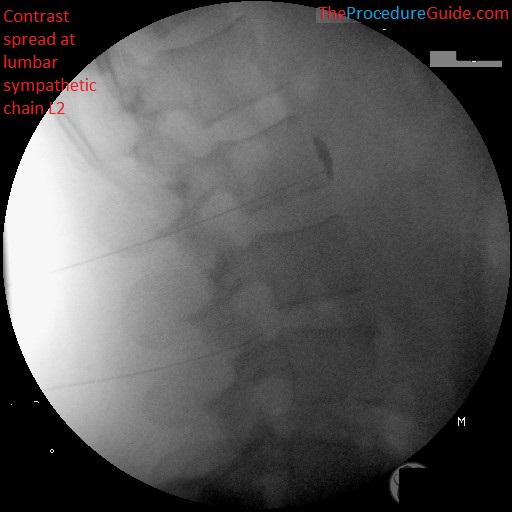
lateral fluoroscopy with contrast lumbar sympathetic block
- The procedure is sometimes repeated at L3, but often times a single injection at L2 is sufficient.
Sample Images
Oblique and one AP fluoro view showing a far lateral starting point and an anterior/medial trajectory.
Oblique fluoroscopy lumbar sympathetic block 
Oblique fluoroscopy lumbar sympathetic block 
Oblique fluoroscopy lumbar sympathetic block 
AP fluoroscopy lumbar sympathetic block at L2 and L3. Note that the L2 needle is slightly too far medial.
Lateral fluoro views showing needle placement and contrast spread
lateral fluoroscopy with contrast lumbar sympathetic block 
lateral fluoroscopy with contrast lumbar sympathetic block lateral fluoroscopy with contrast lumbar sympathetic block with L2 needle placement and L3 not yet placed. 
lateral fluoroscopy with contrast lumbar sympathetic block 
lateral fluoroscopy with contrast lumbar sympathetic block
Tips
- Starting with a far lateral needle entry point helps by giving you a more lateral to medial needle direction. So that by the time the needle is sufficiently anterior, it will also be sufficiently medial.
- Once the needle is past the anterior border of the vertebral body, make small changes since you will be close to the aorta.
- Note that this technique presented above shows the needle tip just anterior to the vertebral body, but if you look at a diagram of where the sympathetic chain runs, these don’t match up exactly: the needle is off the body and slightly anterior to the plexus.
- In our experience, the needle placement above works for a few reasons:
- We don’t often get vascular update (either from anterior vascular structures or vasculature around the vertebral body).
- We don’t often get spread along a muscle.
- Alternatively you can target to have the needle tip just posterior to the anterior border of the vertebral body.
- # of needles and targets:
- As noted above some people will place at L2 and L3. Alternatively you can place a needle at the top of L3 and you might get sufficient spread along the sympathetic chain.
- Additionally, targeting near the top or bottom of the vertebral body can avoid the waist of the body, which might avoid venous vasculature.
References
- Lumbar Sympathetic Block
- Good review of anatomy/indications/procedure technique. Final needle placement in this link differs slightly (as described in the tips section above).
- (more coming soon…)