Table of Contents
Name of Procedure
Venous Radiofrequency (thermal) Ablation (RFA)
See separate guides for mechanochemical ablation with cyanoacrylate and laser thermal radiofrequency ablation
Sample Opnote
Goal
To ablate and close superficial refluxing veins:
- Usually the great saphenous vein (GSV) and small saphenous vein (SSV) in the lower extremity
- Possibly accessory saphenous veins or varicosities.
Indications
Venous insufficiency/reflux causing symptoms or other pathologic venous/skin changes. The full pathology of venous insufficiency is beyond the scope of this article but some common issues include:
- Swelling
- Cramping
- Aching
- Heaviness
- Restlessness
- Varicosities and telangiectasias fed by the target superficial veins
- Ulcers
- Changes in skin color, thickness, and healing
Contraindications
- Infection overlying the access site
- Of note, it is usually fine to keep patients on their blood thinners during this procedure and they may just require more pressure at the access site post procedure to stop bleeding.
Anatomy
Overview
There are superficial veins (relatively close to the skin) that feed into deep veins. As a general rule of thumb, treatments for insufficiency can target refluxing superficial veins and should avoid deep veins.
Venous anatomy in the legs is variable from person to person. The great saphenous vein (GSV) and small saphenous vein (SSV) are large superficial veins that are fairly consistent in their presence and location.
GSV
Runs along the anteromedial part of the leg from as low as the ankle and feeds into the common femoral vein (CFV) (deep vein) at the saphenofemoral junction (SFJ) in the groin. The superficial inferior epigastric vein (SIEV) also joins the GSV just before the GSV joins the common femoral vein. (CFV, GSV, and SIEV are all visualized below).

SSV
Runs along the middle posterior calf, from as low as the ankle and runs up and joins the popliteal vein in the popliteal fossa, forming the saphenopopliteal junction (SPJ).
- The sural nerve runs close to the small saphenous vein
Equipment/Skills/Setup
Machines
- Radiofrequency
- Tumescent pump (optional but makes the tumescent step significantly easier and faster)
Disposables
- Basics:
- Oftentimes kits are available from the RF machine manufacturer. This usually includes generic supplies. Here is a sample which includes basic supplies for gowning, draping, places to put meds, basic needles and syringes:

- Access:
- Micro introducer kit:
- Access needle
- Guide wire
- Sheath with dilator
- There are different kits, which can all be used for standard seldinger access but the size of the sheath is important since you need to be able to feed your RF catheter through this sheath.
- For this guide we’ll assume a 7 Fr sheath set to match the size of the RF catheter that we’ll use.
- Prime the sheath/dilator/ports/wire with saline
- Keep the injection port closed to the patient so blood doesn’t leak out.
- Wet the guide wire for easier threading
- Micro introducer kit:
- Tumescent:
- 22g x 5” quincke needle
- Infiltration tubing – Tumescent machines use specialized tubing that allows them to pump medication through the tubing from a spiked bag.
- Prime the tubing and needle with tumescent
Medications
- 3-5cc 1% lidocaine for skin infiltration in a 3-5cc syringe
- Tumescent can be mixed according to the table below. Keep a few additional things in mind:
- The tumescent bags can be refrigerated. This amplifies the heat sync effect after injection to further protect surrounding soft tissue from thermal injury. It may also help with the analgesic effect.
- A 500mL bag is probably adequate volume for most cases
- Sodium bicarb (8.4%) just helps to reduce some of the initial pain of local anesthetic, but isn’t necessary
- Lidocaine (1% lidocaine with epinephrine 1:100,000)
- The epinephrine helps increase the total amount of local anesthetic you can inject before getting to toxic levels
- With epinephrine the toxic dose of lidocaine is 7mg/kg body weight (max of 500mg).
- The 500mL bags described below help to stay below the toxic ranges.
Landmarks and Patient Positioning
GSV
- Supine
- Leg bent slightly and rotated outwards so the medial portion of the leg is accessible
- Prep/drape the entire medial portion of the leg up to and including the groin, down to about the ankle, over to the anteromedial part of the leg/thigh and posterior/medial part of the leg/thigh
- Keep the space just above the inguinal crease accessible so you can easily scan high enough to view the SFJ.
SSV
- Prone
- Prep/drape from above the bend of the knee to the ankle and around to the lateral portions of the calf
- Keep the space just above the knee accessible so you can easily scan the SPJ.
The proceduralist can be either sitting or standing for the procedure and the bed/tray room etc should be adjusted accordingly.
Technique
Preparation
Mapping the vein pre-procedure or in pre-op can be helpful. In particular you want to:
- Confirm which vein is the GSV/SSV
- Identify any major branch points. Ensuring closure here might be particularly important or they could represent areas where the RF catheter might go astray.
Procedure
- Access the Vein
- Place the patient in a reverse Trendelenburg position (head up)
- This helps pool blood into the veins and provides a larger access target.
- Access the vein with the sheath that is used to insert the RF catheter.
- See our seldinger technique guide to use ultrasound guidance to insert the sheath from the micro introducer kit.
- Place the patient in a reverse Trendelenburg position (head up)
- Thread RF catheter
- RF catheter selection
- Pick a catheter length
- Each company will have slightly different catheters but we’ll assume you have a “short” and “long” option for your RF catheters.
- You can roughly measure the expected treatment length (SFJ to the access point) to pick an appropriate catheter length. Add about 5-10cm to your expected treatment length to figure out what catheter length you’ll need.
- Pick a tip length
- The RF catheter has a segment at the tip that is the active ablation zone. Some companies have different catheters with ablation zones of different length
- A longer ablation zone allows you to treat more vein with each RF cycle and complete the procedure faster.
- But a shorter ablation zone might be useful if treating shorter segments where you have more fine control over how much is treated with each cycle.
- Pick a catheter length
- Insert the RF catheter and thread it to the appropriate junction (SFJ or SPJ).
- It should usually go smoothly and usually doesn’t require you to follow it by ultrasound.
- See tips for troubleshooting notes.
- RF catheter selection
- Confirm placement
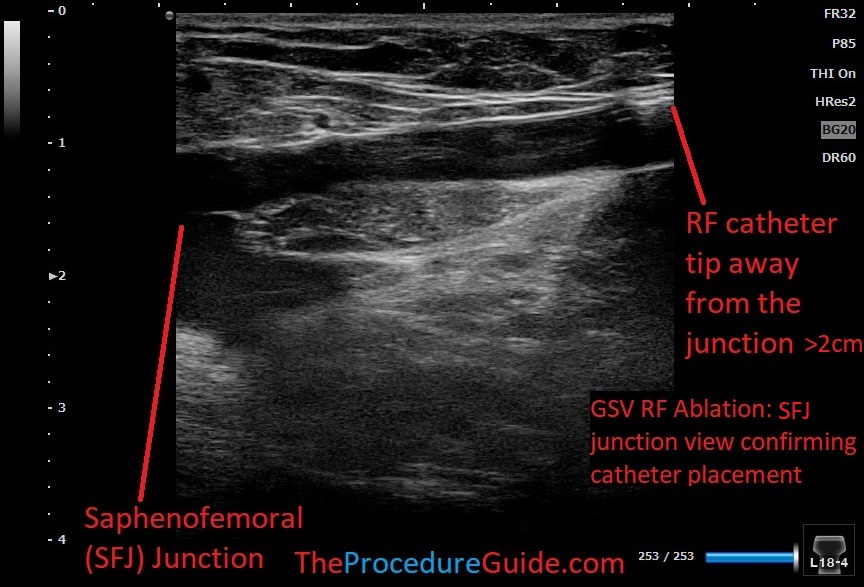
- Get a view of the SFJ or SPJ as appropriate.
- Ideally a long view will show you the tip of the catheter and junction so that you can measure the distance from the junction:
- GSV: 2cm from the SFJ to the catheter tip. And 1.5cm from the SIEV to the catheter tip.
- SSV: 3cm from the SPJ to the catheter tip.
- Be sure to visualize a long enough segment of the catheter to ensure that you are seeing the tip and not just a cross section of the catheter.
- Note the marker at the hub so if the catheter moves you can position it back at its appropriate location.

- Tumesce
- Place the patient in a Trendelenburg position (head down)
- This helps to drain blood from the vein
- Start near the access site, get a long view, and insert the tumescent needle in-plane directed to the vein/catheter.
- Needle placement for the tumescent doesn’t need to be exact: If it’s close to the vein, activate the pump and inject medication. Watch tumescent fill the perivenous space.
- Move the needle around to sections that aren’t filling with the goal of getting good coverage around the entire vein
- Usually you can keep directing the needle tip superiorly, moving around during injection to fill spaces until you hub the needle at the skin
- Once hubbed you won’t be able to get tumescent to spread much higher. So, remove it, reinsert higher up and repeat the whole process, walking your way up the vein to the junction
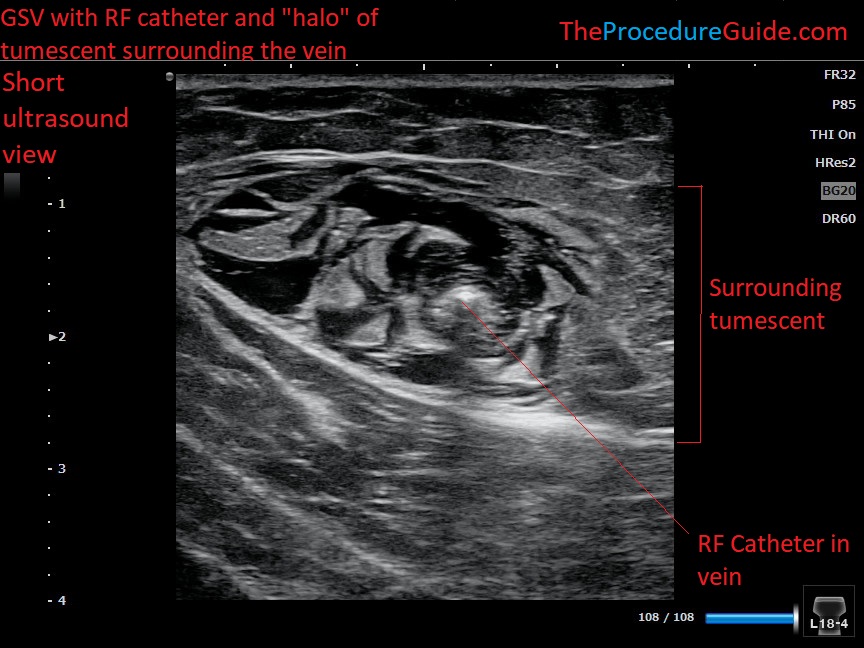
- Scan down in a short view along the entire vein and you can confirm that you don’t have any gaps in tumescent coverage by seeing a nice “halo” of coverage.
- Place the patient in a Trendelenburg position (head down)

- Ablate
- Confirm correct positioning of the catheter now that tumescent is completed.
- Start the first ablation cycle.
- After the ablation is completed, pull back the catheter. Pull back just short of the length of the active tip (for example, for a 7cm active tip, you’ll pull back 6.5cm).
- This provides for some overlap of ablation zones to prevent gaps
- Markings on the catheter can help with calculating length. The catheter might be marked so that you pull back by the segment markers, which are setup to provide the overlapping segmental ablations.
- Finish
- When getting to the tip of the sheath, use caution so that the ablation zone isn’t pulled into the catheter for the next ablation zone.
- Once the next pull of the catheter would enter the sheath, you can pull the sheath back so it isn’t covering the ablation zone and do one last ablation cycle.
- Remove the sheath and catheter together and apply pressure over the access site to stop bleeding.
- Clean up and apply a wrap/stockings.
Tips
- Steering and placement
- Venous anatomy is variable. Wires/sheaths/catheters may not follow the track that you want.
- Advance under ultrasound
- Use your ultrasound in a long view to see where the wire/catheter is following an incorrect path. Just visualizing it might help you to manipulate it into the vein that you want.
- Manipulate the soft tissue
- Using pressure/traction on the skin and underlying soft tissue you may be able to change the orientation of the veins/catheter
- Straightening or bending the leg may have a similar effect.
- This is mostly a game of trial and error to see what combination of maneuvers allows your catheter to go where you want.
- Change your access point
- Sometimes the catheter will get caught up at bifurcations that are close to the access site.
- Simply accessing the vein a little higher up can avoid the problem.
- Use discretion however since the bifurcation may be a refluxing branch and you want to close off supply to that branch, in which case you want to access distal to the branch
- Multiple access
- Sometimes it’s impossible to get the catheter to follow one straight path the entire treatment length.
- You can access above and below and ablate two segments of the vein in this case.
- RF Length
- Ablating to the proximal/mid calf (and no further) might help to reduce the risk of nerve damage in the distal leg.
- Tumescent
- Confirm the tip position relative to the junction prior to getting tumescent around the junction. The tumescent can obscure your view and make it difficult to visualize the area.
References
- Chronic venous insufficiency – a review of pathophysiology, diagnosis, and treatment
- General overview of clinical information
- High level, non-technique, review of the procedures used in treating venous insufficiency
- Endovenous thermal ablation for varicose veins: strengths and weaknesses
- General overview comparing different venous ablation techniques
- The care of patients with varicose veins and associated chronic venous diseases: Clinical practice guidelines of the Society for Vascular Surgery and the American Venous Forum

