
Table of Contents
Name of Procedure
- Sacroiliac Joint (SIJ) nerve block
- L4 and L5 dorsal ramus/medial branch and S1, S2, S3 lateral branch block
Sample Opnote
Goal
To administer local anesthetic to nerves that innervate the sacroiliac joint (SIJ).
Indications
Pain in the low back, gluteal, groin area that is caused by the sacroiliac joint. Commonly this is from osteoarthritis.
Contraindications
Anatomy
First, see our lumbar common spine anatomy overview to understand anatomy and fluoroscopy basics.
SIJ innervation comes from several nerves and there is variability. Some that are involved include:
- The L4 and L5 dorsal ramus
- S1-S3 (or S1-S4) dorsal ramus lateral branches
So, to understand the procedure we must simply understand the anatomy of those nerves.
A spinal nerve splits into a ventral and dorsal ramus. The dorsal ramus in turn has medial and lateral branches, which are the relevant structures for this procedure.

The source/path/naming/innervation of the medial branch nerves and their target injection sites can be confusing. You can see more details in our lumbar medial branch block guide, but some highlights are noted here:
- The medial branch nerves run over the junction of the transverse process (TP) and superior articulating process (SAP), at one level below where it originates.
- EXAMPLE: See the L3 medial branch circled in green: to block the medial branch from the L3 dorsal ramus, you target the TP/SAP junction at L4.

L4-L5 facet in red. L3 and L4 originating branches in green going to innervate that joint.
- This means that the L4 dorsal ramus/medial branch sits at the L5 TP/SAP.
- The L5 dorsal ramus/medial branch sits at the sacral ala.
- This leaves the lateral branches from S1-3 which sit variably lateral to the S1-S3 neuroforamen.
- Below in figure A you’ll see the X over the L5 and sacral ala targets. And #s 1-3 for S1-S3 targets.

L4 and L5 dorsal ramus and S1-S3 lateral branch block and radiofrequency ablation targets for sacroiliac joint pain. Source: https://www.ncbi.nlm.nih.gov/pmc/articles/PMC2666931/
Equipment/Skills/Setup
Core Equipment/Disposables: See our disposables/equipment article for “core” items that are common to all procedures.
Core Skills: See our guides to obtain images of the cervical, thoracic, or lumbar spine. Then steer a needle to direct it under the skin.
Special items and suggested setup for this procedure:
Landmarks and Patient Positioning
Position the patient in a basic prone position so that the bottom of the c-arm can go under the table below the sacrum and lower lumbar spine.
Technique
Overview
Once you know the targets as identified above this becomes a very simple procedure and is performed just like a lumbar medial branch block.
The targets are in close proximity so you can probably use one skin insertion site and hit all your targets.
- Pick a target just lateral to S1, anesthetize, and then insert your quincke needle to the S1 target (just straight lateral to the S1 foramen).

Fluoroscopic Guided Sacroiliac Joint lateral branch block – AP S1 left needle placement
- Inject your local anesthetic and then simply redirect/steer the needle to each of the remaining targets.
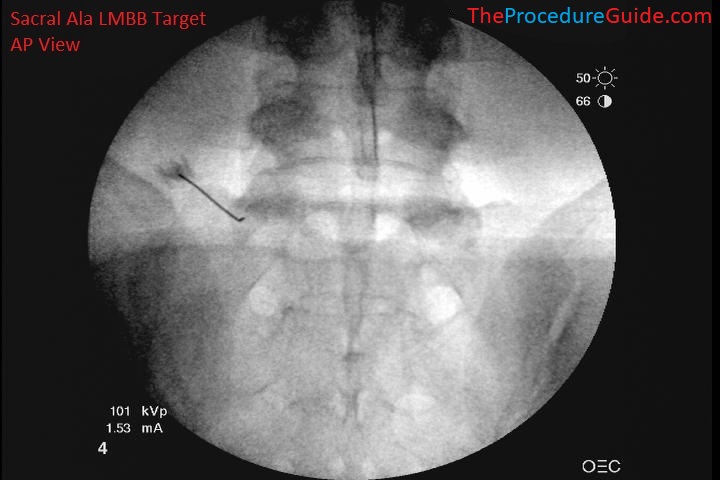
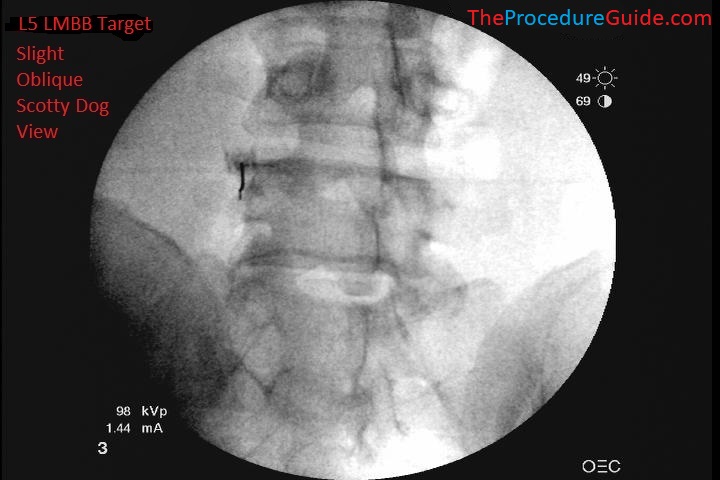
- Below you’ll see the remaining levels at S2, the sacral ala, and L5. Note that you might be able to reach all levels from one insertion point, but here a second insertion point was used higher up to reach L5 and the sacral ala.

Fluoroscopic Guided Sacroiliac Joint lateral branch block – AP S2 left needle placement Sacral ala lumbar medial branch block fluoroscopic AP view L5 lumbar medial branch block fluoroscopic oblique scotty dog view
Steps
- Obtain an oblique/scotty dog view of L4, which will be the first target. (L3 is shown below, but the same technique/principles apply)
- Note that the skin entry point is anywhere roughly about 1-1.5 vertebral body heights inferior to the target.
- Advance the needle superior and medial till contacting the bone at the inferior border of the L4 transverse process (L3 is shown here but the same applies at L4):
References
- Lateral branch blocks as a treatment for sacroiliac joint pain: A pilot study
- Small study of of people undergoing blocks.
- Randomized Placebo-Controlled Study Evaluating Lateral Branch Radiofrequency Denervation for Sacroiliac Joint Pain
- Good anatomy, technique review and diagram of cooled vs standard RF lesion.
- Comparison of Efficacy of Lateral Branch Pulsed Radiofrequency Denervation and Intraarticular Depot Methylprednisolone Injection for Sacroiliac Joint Pain
See references regarding other RF technique and lower lumbar anatomy