
This article is designed to review all the basics around spine anatomy that would be helpful for performing procedures. Any pain management inverventionalist/proceduralist will rely on this basic anatomy, understanding of fluoroscopy images and C-arm use. It is written with a few basic goals:
- Review basic vertebrae and spine anatomy
- Discuss that in the context of fluoroscopic images and C-Arm positioning for procedures
- Outline basic principles that can set a foundation for the various articles on this site
Table of Contents
Quick Guide

Basic Anatomy
Counting
The lumbar (and thoracic) spine have spinal nerves exiting below the corresponding vertebral bodies. Example: There is an L3-L4 neuroforamen between the L3 and L4 vertebrae. The L3 spinal nerve exists through this foramen, below the L3 vertebrae.
Note that there are always exceptions: individuals with slightly varied anatomy. See details and examples below.
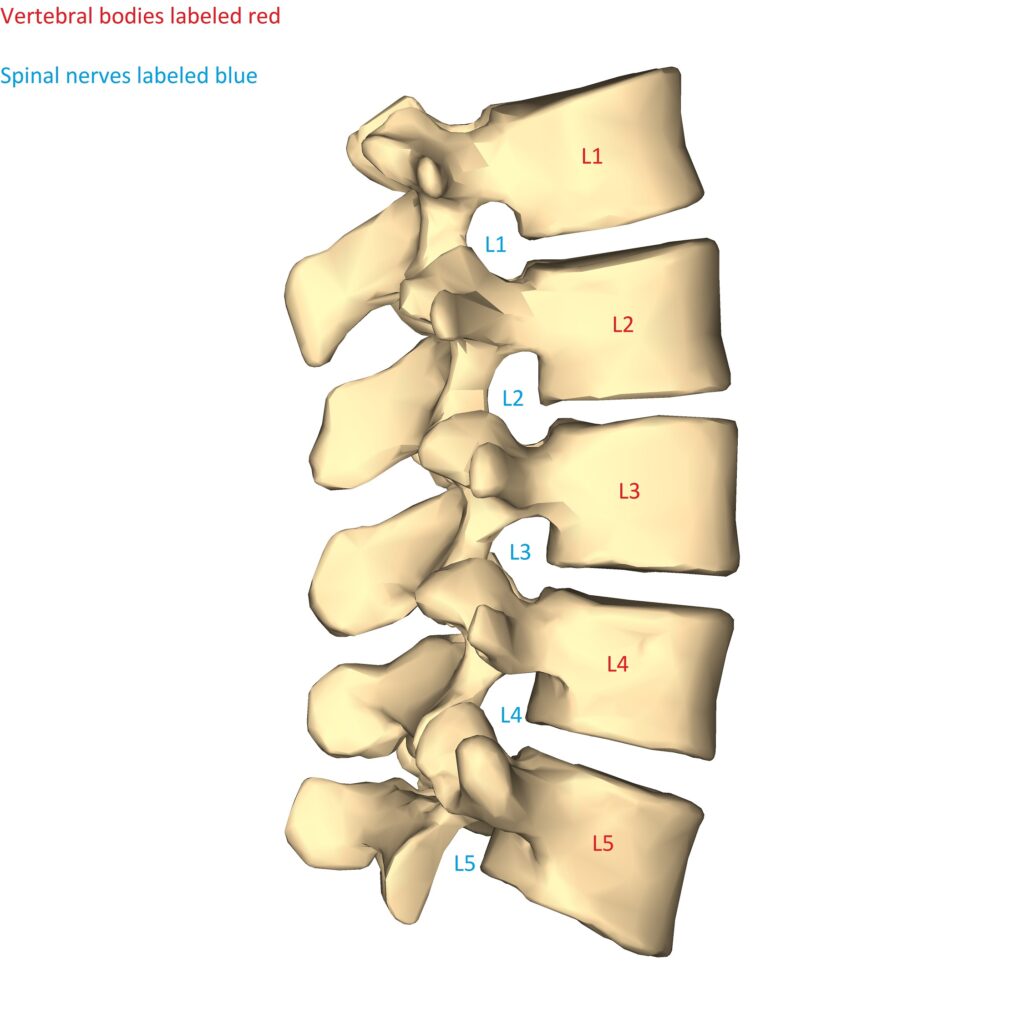
Lumbar spine diagram lateral. Bodies and spinal nerve numbering shown. [Modified of an original from Wikimedia by Anatmography (https://commons.wikimedia.org/wiki/File:Lumbar_vertebrae_-_close-up_-_lateral_view.png). Originally licensed under https://creativecommons.org/licenses/by-sa/2.1/jp/deed.en]
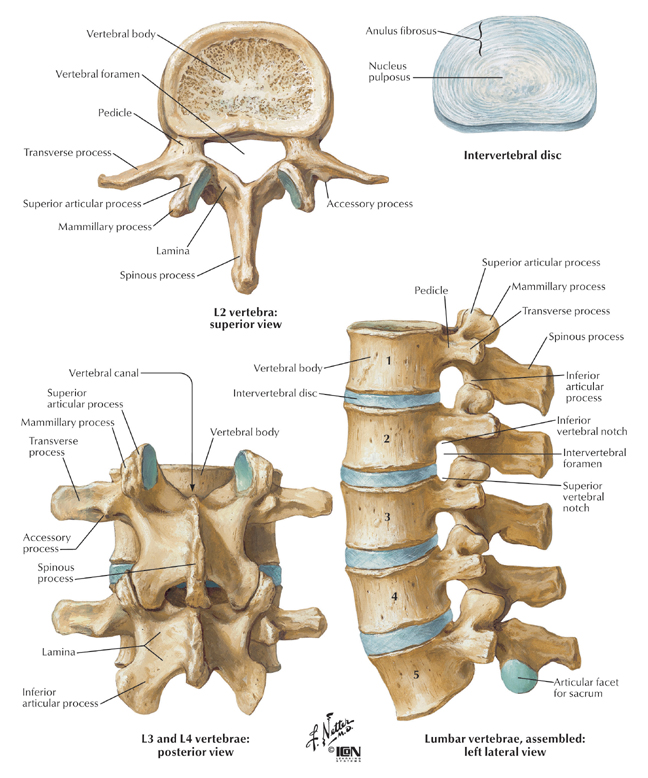
Vertebral Components
Most procedures revolve around knowing the basic structures of the vertebrae in the diagram and are referenced throughout this site:
- Transverse process (TP)
- Spinous process (SP)
- Superior articular process (SAP)
- Inferior articular process (IAP)
- Neuroforamen/Intervertebral foramen (NF)
General
Remember that the spine has natural curves (when viewing from lateral) and sometimes curves from scoliosis (when viewing from the front/back). So the C-arm alignment for an AP/lateral/oblique view will be different for each level and for each person.
Remember the bullet points listed below for each type of view and move the C-arm to meet these principles.
AP (Anterior-Posterior) fluoroscopy view
- The spinous processes should be midline.
- Flatten the endplates at the level that you’re working on.
- With significant scoliosis you can’t get all SPs midline, so you do so at the level that you’re working at.
EXAMPLE: Same image with/without colored outlines
Sacral ala lumbar medial branch block fluoroscopic AP view 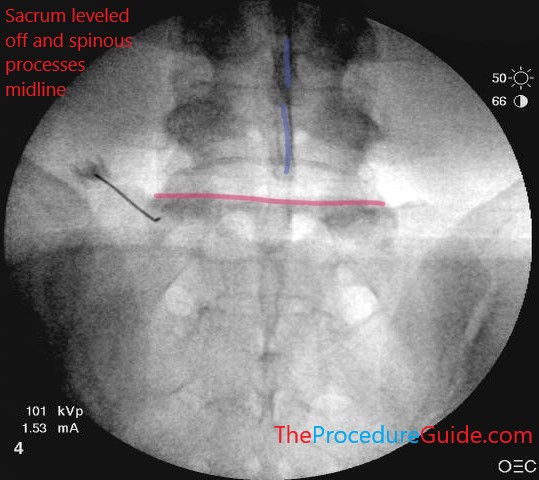
Note spinous process mostly aligned vertically and midline (blue). Target here is sacral ala, so the top of sacrum is leveled off (red)

EXAMPLE: In the same image from above, look at L5. The endplate is not flattened out (the green outlines the superior endplate). It isn’t a flat line and instead you see an opaque line that curves around. Instead of the seeing the oval shaped endplate from the side, it’s tilted up and you’re seeing the anterior and posterior sides of the endplate misaligned)
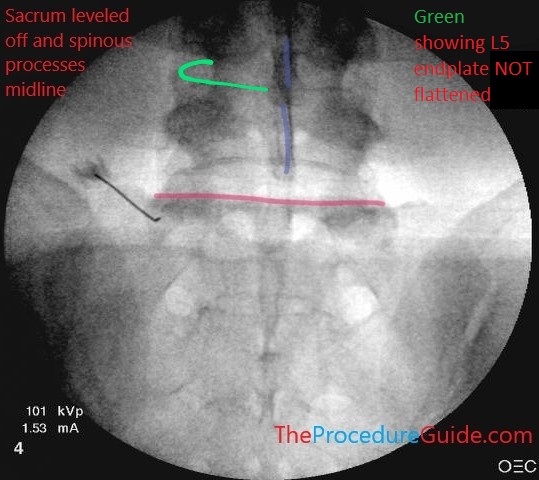
Note spinous process mostly aligned vertically and midline (blue). Target here is sacral ala with the needle so the top of sacrum is leveled off (red). Example L5 endplate is NOT flattened (green)
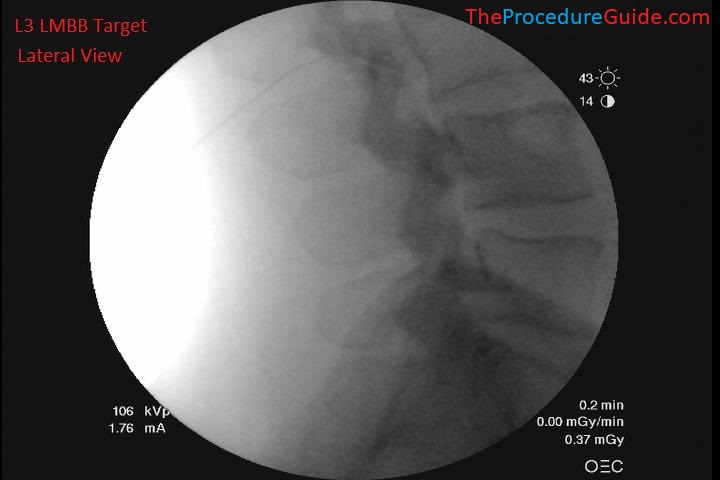
Lateral fluoroscopy view
- Again, endplates should be flat so the vertebral bodies appear like a box
- The foamina should be well outlined
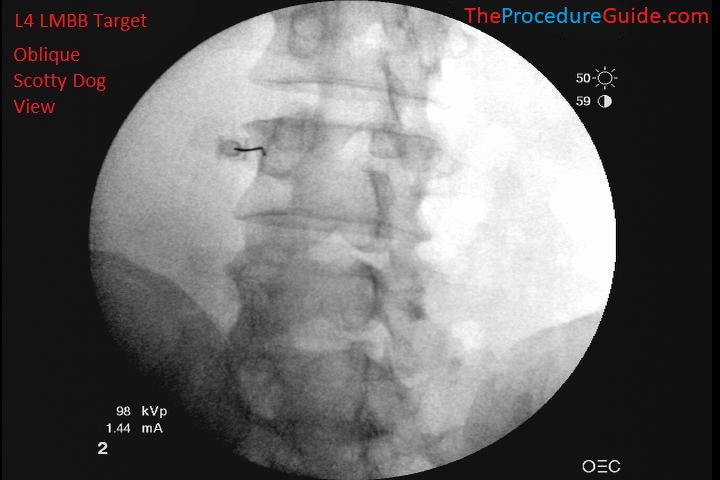
Oblique/scotty dog fluoroscopy view
- Attempt to look down the barrel of the facet joint at the level you’re working at. This means you see the facet joint straight on so it is lucent/transparent.
- Scotty dog (highlighted here in green)
- Nose = TP, ear = SAP, front foot = IAP, body = lamina
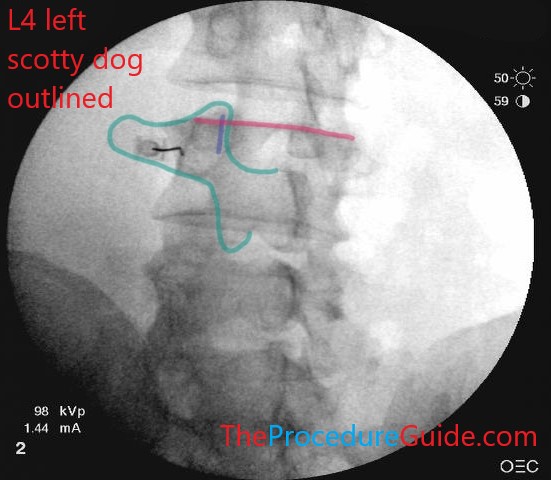
EXAMPLE 1: You want to place a needle at the junction of the TP and SAP at L4 on the left (also known as a left lumbar medial branch block at L4).
Needle at L4 junction of TP and SAP front half of the scotty dog outlined (green), the superior endplate of L4 is flat (red), the L3-L4 joint is “down the barrel” so it’s translucent (blue).
Oddball Situations
Some individuals have variations in anatomy, such as:
- 4 or 6 lumbar vertebrae
- “Sacralization” of the bottom lumbar vertebrae
- “Lumbarization” of the top of the sacrum
Look on imaging reports to see how the radiologist counted to ensure that your counting is consistent with reported findings. Here is an example of a patient with 4 distinct lumbar vertebrae and a “sacralized” L5.


Sacralized L5 lateral fluoroscopy 
Sacralized L5 AP fluoroscopy
References
- Guidelines to Imaging Landmarks for Interventional Spine Procedures: Fluoroscopy and CT Anatomy
- Thorough review of basic views in fluoroscopy.
- Overview of many procedures.
- Several excellent images, all organized in a very structured way: fluoro images along with 3D renderings and/or CT scans to understand the anatomy and imaging from different perspectives.
- Mathis JM, Golovac S, eds. Image-Guided Spine Interventions. 2nd ed. New York: Springer-Verlag; 2010
- Always a good “textbook” style reference.