
Table of Contents
Name of Procedure
- Diagnostic Lumbar Medial Branch Block (LMBB)
- Therapeutic Lumbar Medial Branch Block (LMBB)
💰 Medicare Data Explorer and Calculator
See payment rates and wRVUs from public CMS data. And use our calculator to model procedures and your practice.
Sample Opnote
The Quick Guide

The Quiz
Learn Interactively! Multiple choice below, or our free response chatbot in the bottom right or via facebook messenger
Practice Questions
If you're treating the L3-L4 and L4-L5 joint, at what levels will you do your block (ie, L1, L2, L3, etc) (assume the numbering refers to the vertebrae that you're blocking at)?
Show answer
Answer: L3, L4, L5
You will block the medial branch nerves at their targets on the L3, L4, and L5 vertebrae.
What's the best view to do most of your work in? oblique, AP, lateral?
Show answer
Answer: Oblique
An AP view works but an oblique view is probably ideal.
The medial branch nerve will sit at the junction of what bony structures?
Show answer
Answer: TP and SAP
The medial branch nerve runs from the spinal nerve down to the the junction of the transverse process (TP) and superior articulating process (SAP) at the level below where the spinal nerve came out.

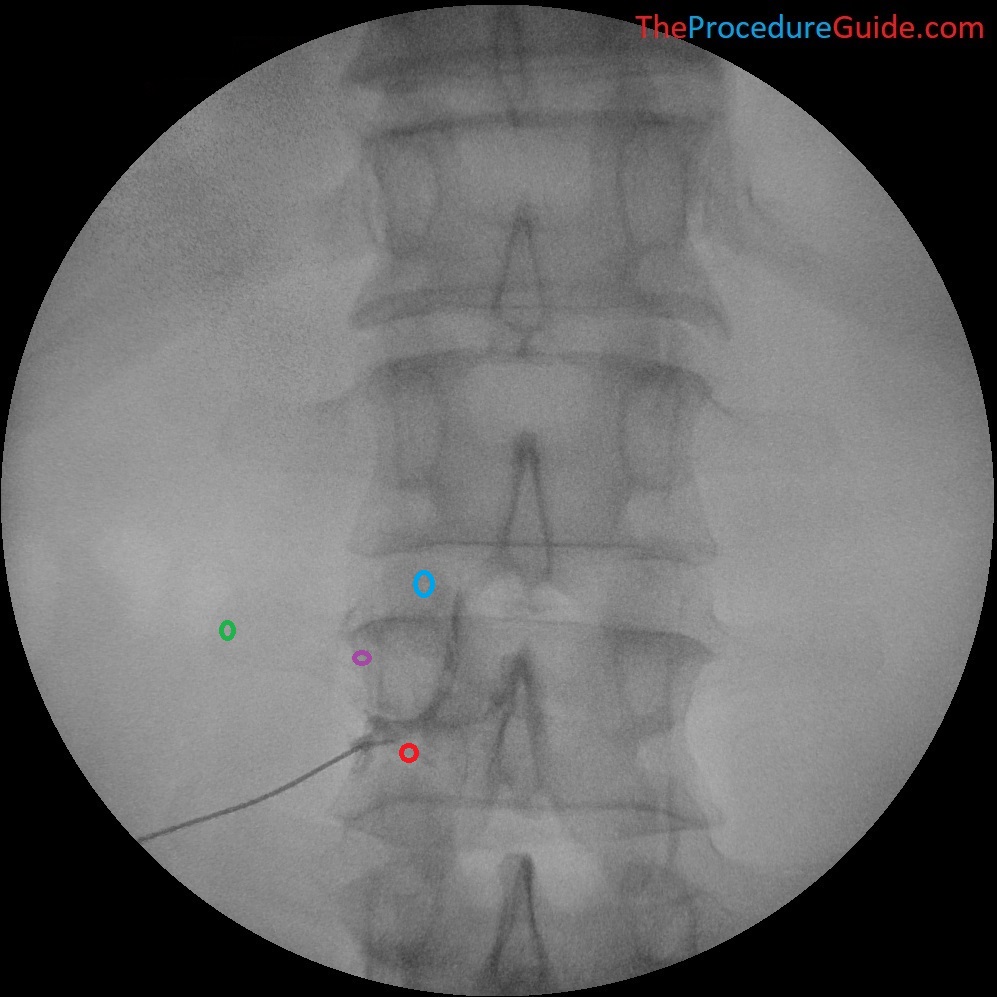
Which color is the appropriate target for your needle?
Show answer
Answer: Purple
The purple dot is your target. You'll be blocking at the junction of the TP and SAP
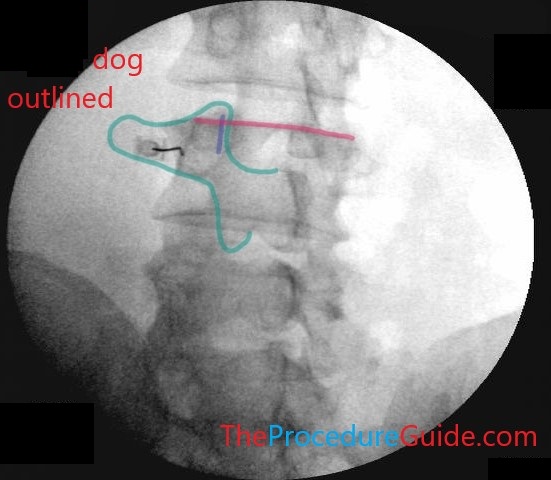
You're starting a new level to block, you have an oblique view already. Before you insert your needle, how do you know if you have an adequate fluoro image of the level that you're targeting?
Show answer
Answer: Flatten off the endplate
You want to level off the endplate of the level that you're working on (as seen in the pink line in this example)
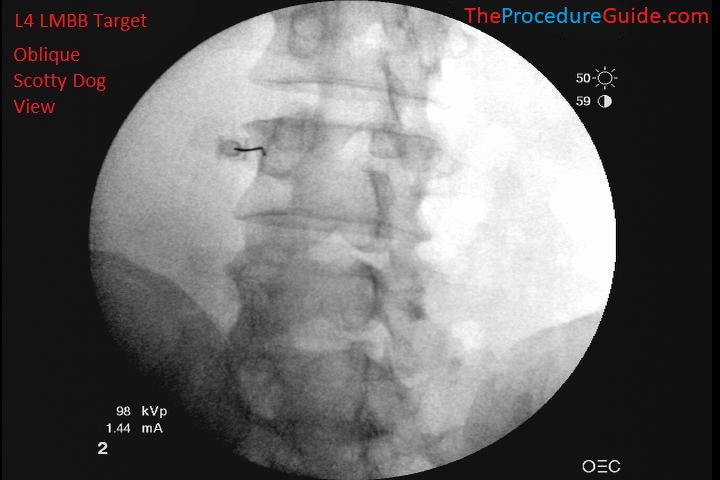
What level (vertebrae) is being targeted in this image?

Show answer
Answer: L4
This is just some practice in orienting yourself to fluoro images.
Say you just finished blocking at the L4 level/vertebrae and want to move to L5. Which way should you tilt the top of the c-arm?
Show answer
Answer: Cranially
See the lordosis in the lumbar spine and you'll see that as you move below L4 the angle will usually get sharper (for example this is like moving from the blue line to the green line). So, if you move the top of the c-arm towards the head then you'll get this angle.

If you're blocking at a level that has hardware (such as a posterior fusion), which change should you make in the c-arm orientation to help you?
Show answer
Answer: More oblique
A more oblique view (more lateral) might help you visualize the tip of the TP better by getting the hardware "out of the way".
Goal
To block and/or administer medications to the medial branch nerves that innervate the facet joints of the lumbar spine.
Indications
A diagnostic medial branch block might be performed to ameliorate pain from facet joints temporarily by using local anesthetic agents. The temporary block provides diagnostic value because a temporary relief in pain can help to determine if the treated facet joints are the source of the patient’s pain. This in turn can be used as part of a double comparative set of diagnostic blocks to move onto a radiofrequency ablation of the medial branch nerves.
A therapeutic medial branch block might be performed to ameliorate pathology around the medial branch nerves themselves, such as if a patient develops neuritis of the medial branch nerves after radiofrequency ablation/rhizotomy.
Contraindications
- Common contraindications
- Posterior fusion at the same levels as the target facet joints (ie, avoid L4-L5 facet treatment in a patient with a fusion at L4-L5) (…)
Anatomy
Overview
A “medial branch” technically refers to the medial branch of the dorsal ramus of a spinal nerve. This medial branch also innervates the multifidus muscle, which is of particular importance when performing a medial branch ablation.

The source/path/naming/innervation of the medial branch nerves and their target injection sites can be confusing so keep a few things in mind:
- Each facet joint is innervated by 2 medial branch nerves. In the lumbar spine, a joint is innervated by a branch from its top level and from the level above it. For example, an L4-L5 facet joint is innervated by a branch from the L3 and L4 spinal nerve.
L4-L5 facet in red. L3 and L4 originating branches in green going to innervate that joint.
- The medial branch nerves run over the junction of the transverse process (TP) and superior articulating process (SAP) on the posterior side of the spine, at ONE LEVEL BELOW where it originates.
- See the L3 branch circled in green: to block the medial branch from L3 you target the TP and SAP at L4.
- Note how that branch innervates the L3-L4 joint and continues down to innervate the L4-L5 joint (red). So a block at the L3 level affects two joints.
- Likewise for the branch from L4, you block at L5.
- Now, put together the originating branches and their target sites to determine how to block a specific facet joint:
- To block the medial branch nerves that innervate the L4-L5 facet joint, you would target the junction of the TP and SAP at L4 and again at L5.
- Note this common pattern extends to multiple levels. To block 3 joints (L2-L3, L3-L4, L4-L5), your target sites will be at L2, L3, L4, L5. Note that at L3 and L4, you are getting two half joints at once, which simplifies our procedure.
Naming Notes
The images below use numbering based on the vertebral BODY that is being treated. Ie, a needle on the L4 transverse process is referred to as a L4 MBB target, which is different than the way the nerves would be labeled. This is done to make it easy to follow along with which vertebral bodies are leveled off and targeted.
Equipment/Skills/Setup
Core Equipment/Disposables: See our disposables/equipment article for “core” items that are common to all procedures.
Core Skills: See our guides to obtain images of the cervical, thoracic, or lumbar spine. Then steer a needle to direct it under the skin.
Special items and suggested setup for this procedure:
- 22g x 5” quincke needle (a 3.5” needle can also be used in most patients but might not be long enough in some patients)
- 8cc local anesthetic (1% lidocaine or 0.5% bupivacaine) in 10cc syringe as primary injectate
- 3-5cc 1% lidocaine in 5cc syringe with 25g x 1.5″ hypodermic needle for subcutaneous anesthetic
Landmarks and Patient Positioning
Position the patient in a basic prone position so that the bottom of the c-arm can go under the table below the area of the spine that is being treated.
Technique
For the sake of this tutorial we will treat the L3-L4, L4-L5, L5-S1 facet joints on one side, which means we have targets at the junction of the SAP and TP at L3, L4, L5, and at the sacral ala.

Also, for the sake of this tutorial we reference levels by the VERTEBRAL BODY that we're working on. For example, the "L4" target shown in the first image is referring to the transverse process of the L4 vertebrae. This is different than than numbering of the nerves.
Technique 1 – Needle insertion over each target site
Steps:
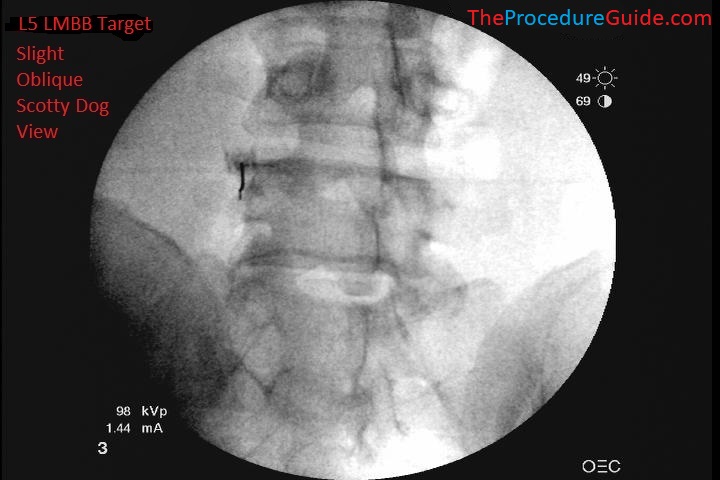
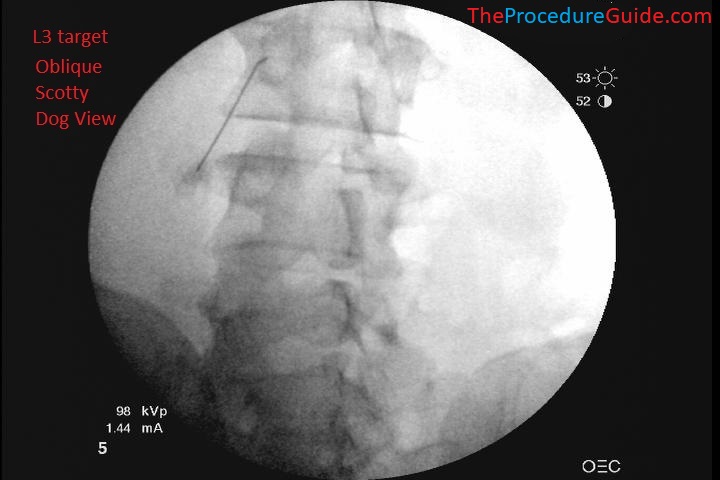
- Obtain an oblique/scotty dog view of L3 (L4 shown below), which will be the first target.
- Use your pointer to identify an insertion site just above the TAP/SAP junction of L3, anesthetize with local anesthetic, insert your quincke needle and advance till you hit bone at your target. (See techniques for picking a target/trajectory and techniques for steering needles so that you can steer your quincke needle from your entry point to your target).

See below: fluoro image and picture of a model with the quincke needle on the LMBB target that sits on the L4 transverse process.

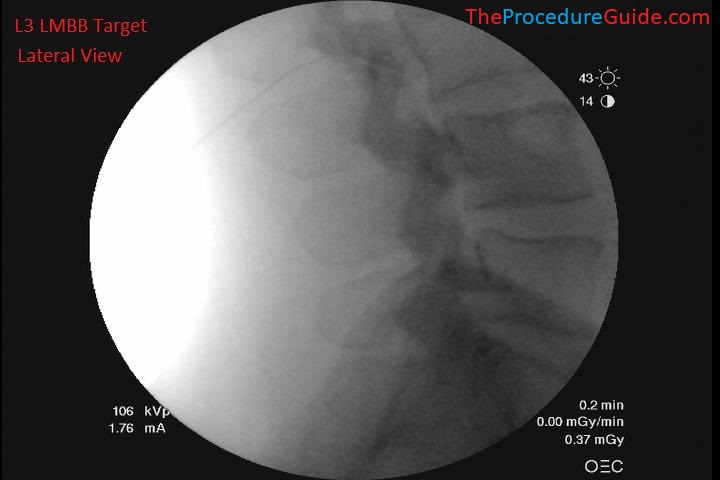
- Confirm your depth positioning on a lateral view
- Confirm that you do not appear to be beyond the transverse process or at the depth of a neuroforamina.
- Repeat steps 1-3 for each level being treated.
Technique 2 – Single needle insertion and subcutaneous repositioning to multiple target sites
Overview:
- The lumbar spine offers a unique situation in that the lordosis lines the targets up as if they were on the periphery of a circle.
- In Fig 1A you’ll see a lateral view of the lumbar spine. The top of the image is where the MBB targets lie.
- In Fig 1B, you’ll see a diagrammatic representation. The target sites sit along a partially concave line, rather that on a straight horizontal line.
- You can start at a single insertion site at the top of the diagram (common point of the green/blue/red arrows) and reach multiple targets on the black line.
- The benefit of this is one insertion site for the needle which requires less time and more patient comfort.
- This technique can be done even in areas of less lordosis but the lack of curvature may make it difficult to reach all sites adequately.
Steps:
- Obtain a scotty dog view of L4, which will be the first target.
- Fig 2A shows a scout image.
- Anesthetize and insert the needle through the skin just over the tip of the pointer needle (red arrow).
- Steer the needle to hit the L4 target
- Confirm your depth positioning on a lateral view. This diagram shows a sample lateral, but you’ll note this sample is actually at the L3 level.
- Confirm that you do not appear to be beyond the transverse process or at the depth of a neuroforamina
- Inject medication as described above after confirming negative aspiration.
- Reposition your C-arm to line up/target L5.
- Pull your needle back about 2-5cm (experience will determine how much).
- Then redirect and steer your needle to your new target at L5.
- Repeat the process as above.
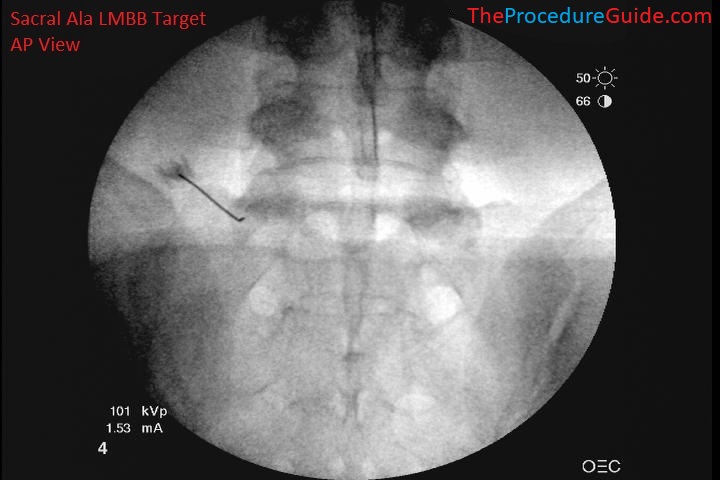
- Continue this technique to target the sacral ala and then again to target L3 last.
Tips
- As mentioned above, technique 2 might be feasible in areas with less lordosis but time/experience/patient habitus will help you determine feasibility
- Example: a large patient requires more needle travel. So if doing a series of high lumbar blocks [which have less lordosis] and you start your entry point above L2, it may be difficult to reach L4 or difficult to steer the needle. A second insertion site above that level might be easier to manage.
- Example: If starting at L2 and trying to reach L4 in a patient with hardware at L4, you may not have an adequate view of the TP/SAP at L4 due to the hardware, and may want to use a different insertion site.
References
Technique Related References
- Percutaneous Radio-Frequency Neurotomy for Chronic Cervical Zygapophyseal-Joint Pain
- Controlled study where a specific two needle technique was used for cervical RF and is described with limited images
- Cervical Medial Branch Radiofrequency Neurotomy in New Zealand
- Some discussion of a two needle technique for cervical RF and is described with limited images.
- Incidence of neuropathic pain after radiofrequency denervation of the third occipital nerve
- Detailed review of variability of third occipital nerve and technique used to ablate it along with some sample images.
General References
- The provocative lumbar facet joint
- Broad and long overview of many clinical aspects of facet anatomy, pathology, treatment studies
- Diagnostic and therapeutic spinal interventions
- Broad overview of medial branch blocks and radiofrequency ablation and discussion of other literature on the topic
- Single needle approach for multiple medial branch blocks: a new technique
- A prospective crossover comparison study of the single-needle and multiple-needle techniques for facet-joint medial branch block
- Radiofrequency lumbar facet denervation: a comparative study of the reproducibility of lesion size after 2 current radiofrequency techniques