
Table of Contents
Name of Procedure
- Cervical medial branch radiofrequency ablation (CRFA)
- Neurotomy, rhizotomy, “nerve burn”, RFA
💰 Medicare Data Explorer and Calculator
See payment rates and wRVUs from public CMS data. And use our calculator to model procedures and your practice.
Explore data for a Cervical Medial Branch Radiofrequency Ablation →
Sample Opnote
The Quick Guide
Goal
To ablate the medial branch nerves that innervate the facet joints of the cervical spine.
Indications
Cervical pain from facet arthritis. Usually non-radicular, over sclerotomal distributions from the affected facet joints.
Contraindications
- Common contraindications
- Posterior fusion at the same levels as the target facet joints (ie, avoid L4-L5 facet treatment in a patient with a fusion at L4-L5) (…)
Anatomy
Lumbar innervation is reviewed below (same basics for cervical). And then cervical specific anatomy is reviewed next.
Overview
A “medial branch” technically refers to the medial branch of the dorsal ramus of a spinal nerve. This medial branch also innervates the multifidus muscle, which is of particular importance when performing a medial branch ablation.

The source/path/naming/innervation of the medial branch nerves and their target injection sites can be confusing so keep a few things in mind:
- Each facet joint is innervated by 2 medial branch nerves. In the lumbar spine, a joint is innervated by a branch from its top level and from the level above it. For example, an L4-L5 facet joint is innervated by a branch from the L3 and L4 spinal nerve.

L4-L5 facet in red. L3 and L4 originating branches in green going to innervate that joint.
- The medial branch nerves run over the junction of the transverse process (TP) and superior articulating process (SAP) on the posterior side of the spine, at ONE LEVEL BELOW where it originates.
- See the L3 branch circled in green: to block the medial branch from L3 you target the TP and SAP at L4.
- Note how that branch innervates the L3-L4 joint and continues down to innervate the L4-L5 joint (red). So a block at the L3 level affects two joints.
- Likewise for the branch from L4, you block at L5.
- Now, put together the originating branches and their target sites to determine how to block a specific facet joint:
- To block the medial branch nerves that innervate the L4-L5 facet joint, you would target the junction of the TP and SAP at L4 and again at L5.
- Note this common pattern extends to multiple levels. To block 3 joints (L2-L3, L3-L4, L4-L5), your target sites will be at L2, L3, L4, L5. Note that at L3 and L4, you are getting two half joints at once, which simplifies our procedure.
Naming Notes
The images below use numbering based on the vertebral BODY that is being treated. Ie, a needle on the L4 transverse process is referred to as a L4 MBB target, which is different than the way the nerves would be labeled. This is done to make it easy to follow along with which vertebral bodies are leveled off and targeted.
Cervical Notes
- The shorthand for the cervical spine generally works also: To block the C3-C4 joint you would block nerves on the C3 and C4 vertebrae.
- One exception is that the C2-C3 joint is innervated only by the medial branch from C3, which is called the third occipital nerve and can be blocked around C2.
- In practice you’ll often block multiple facets like C2-C3 and C3-C4, which means you end up blocking C2, C3, C4 anyway.
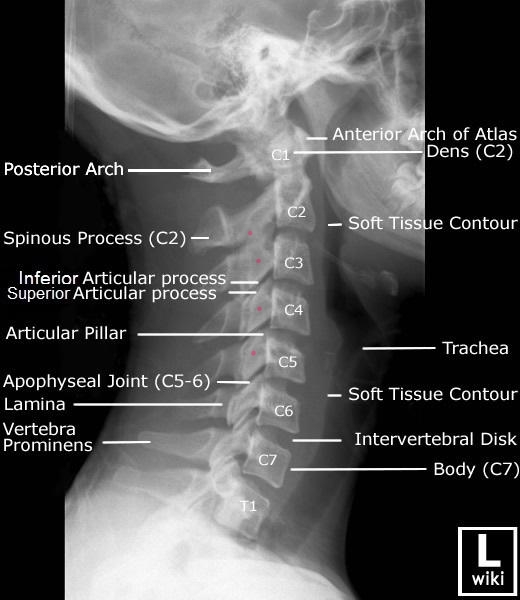
In the cervical spine, medial branch nerves run along the articular pillar, roughly near the midpoint. At the higher levels the branches may sit more towards the superior part of the pillar:

Equipment/Skills/Setup
Core Equipment/Disposables: See our disposables/equipment article for “core” items that are common to all procedures.
Core Skills: See our guides to obtain images of the cervical, thoracic, or lumbar spine. Then steer a needle to direct it under the skin.
Special items and suggested setup for this procedure:
- RF cannula and probe with RF machine. (2 cannulas and 1 probe will allow for placement of a second cannula, while the prior one is ablating)
- 3cc 1% lidocaine in 3cc syringe
- 10cc 1% lidocaine in 10cc syringe with 25g x 1.5″ hypodermic needle for subcutaneous anesthetic
Landmarks and Patient Positioning
Place the patient in a prone position with the face down in a face cradle and arms/shoulders down at the sides.
Cervical positioning is particularly difficult and important for a smooth procedure. Please see many important notes in our overview guide.
Technique
For the sake of this tutorial we will assume we are treating the C2-C3, C3-C4, C4-C5 facet joints on one side.
Here is your target and entry point [See our general guide about basics for using targets and entry points to start a procedure]:
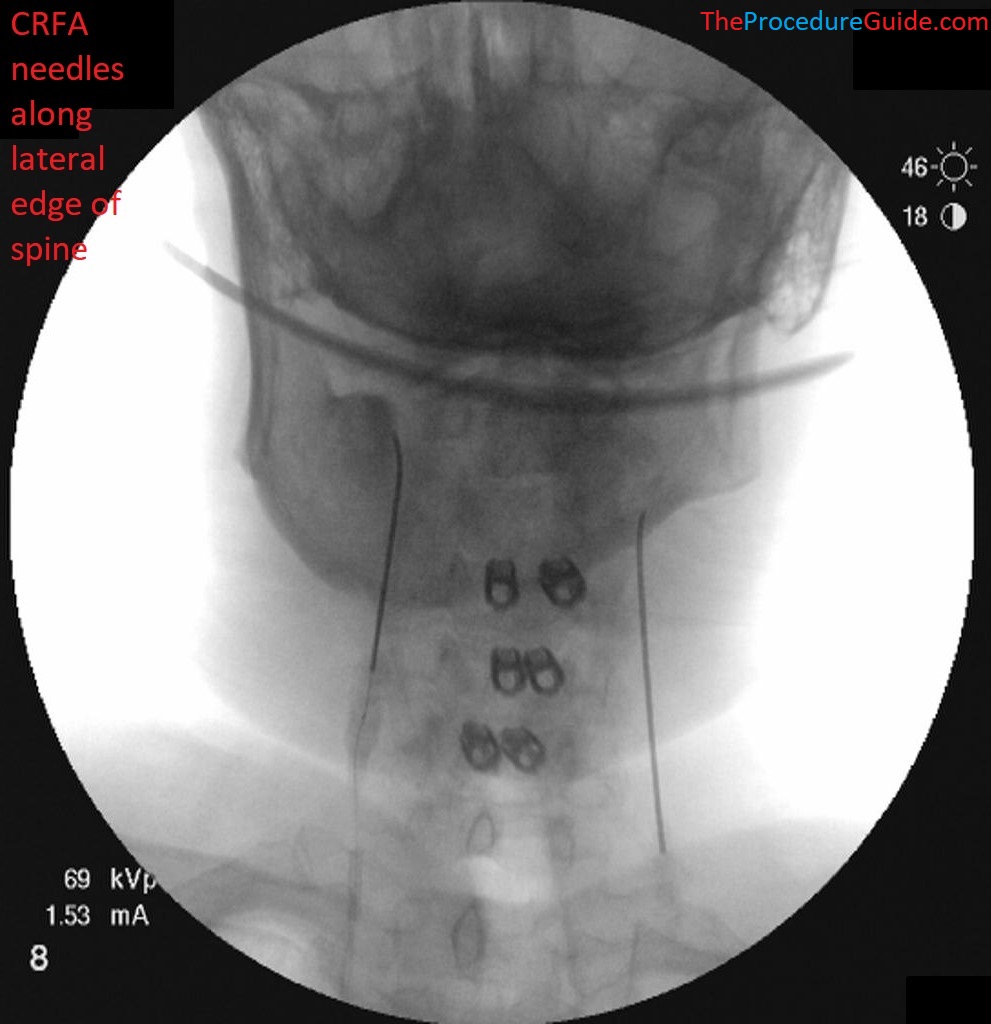
- Targets: In this case we kind of have 2 targets:
- First (via an AP view): You want to “land” your RF probe at the posterior and lateral border of the lateral mass of the vertebrae (see images).
- Second (via a lateral view): the needle will be walked to a final target at about the mid point of C2, C3, C4, C5 (marked below with red dots)
- Entry points: posterior neck, straight posterior to the targets (entering just lateral to the lateral border of the spine)
- We will plan to use 2 RF needles so we can work on one needle while the other one has RF running
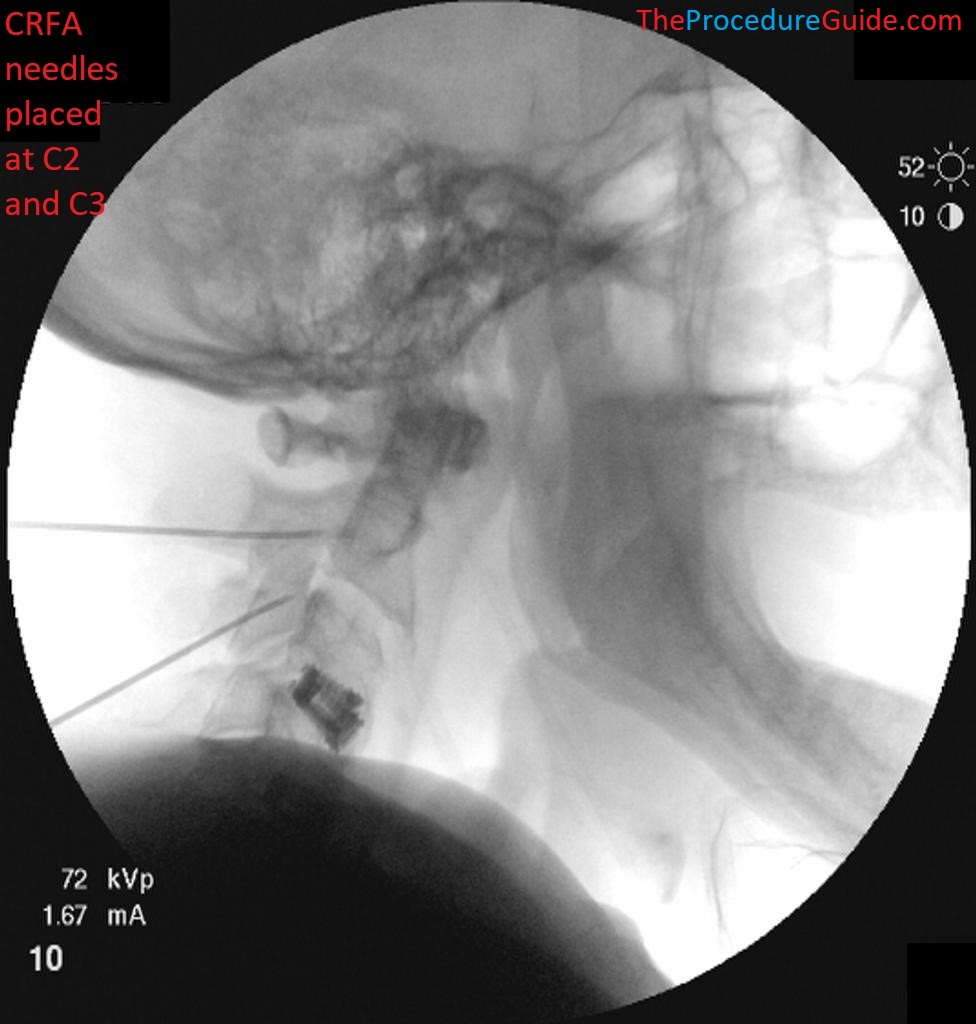
- We’ll use our first needle for C2 and C3 and the second needle for C3 and C4.
- You’ll want to place each needle roughly in the middle of two targets so that the needle can simply be redirected under the skin when it’s ready to hit the second target. For example, the first needle can start roughly between C2 and C3.
- This means only two skin punctures are needed to treat 4 levels.
- This gives a posterior to anterior trajectory, which allows the needles to lay “alongside” the bone rather than perpendicular to it.
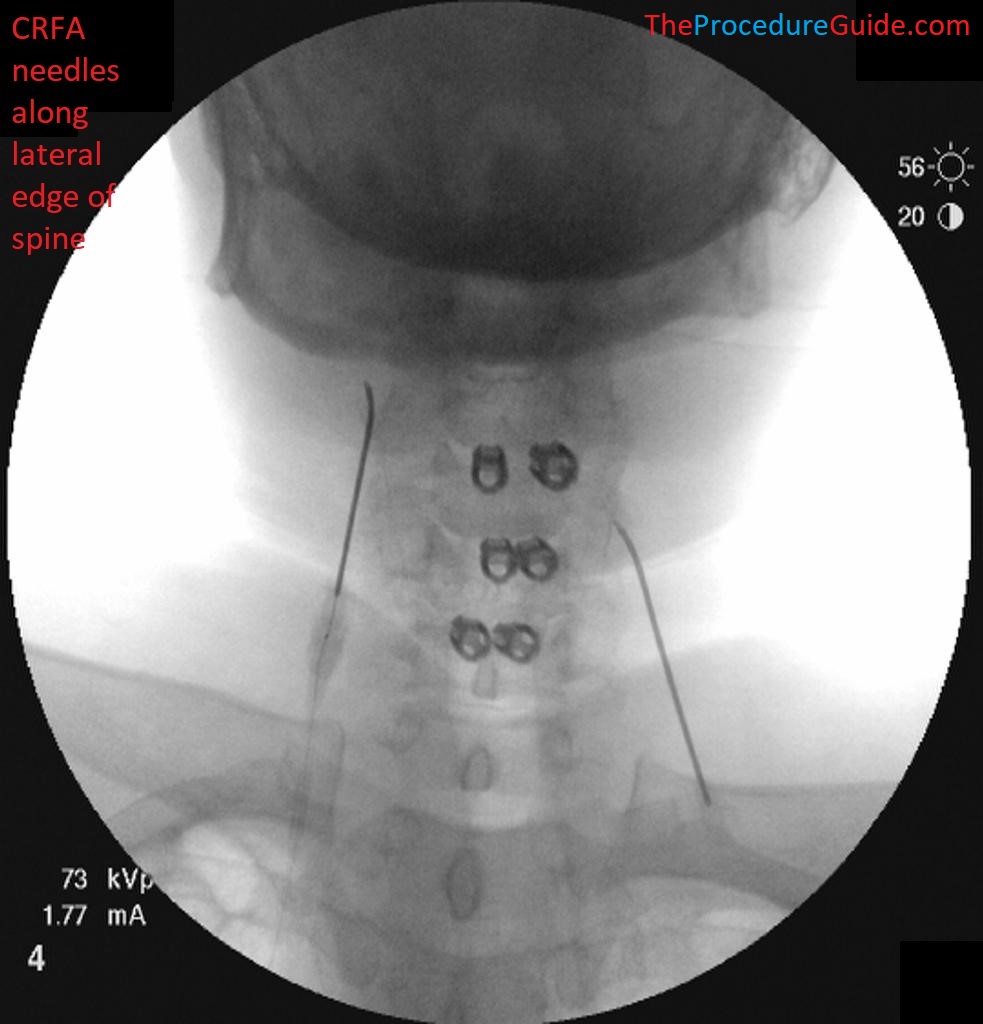
- Obtain an AP view
- Place your first needle targeting C2:
- Experience will teach you how far to proceed anteriorly and medially. You can use laterals to check, but usually you can get to this point with AP views only.
- From an AP view you don’t really need to know that you are exactly at C2. It’s mostly important that you know that you’re at the upper levels, are contacting bone at roughly the posterior border.
- Then simply walk off laterally to the spine a bit before the next step where you switch to a lateral view.
- Your needle will roughly look like one of these two needles:

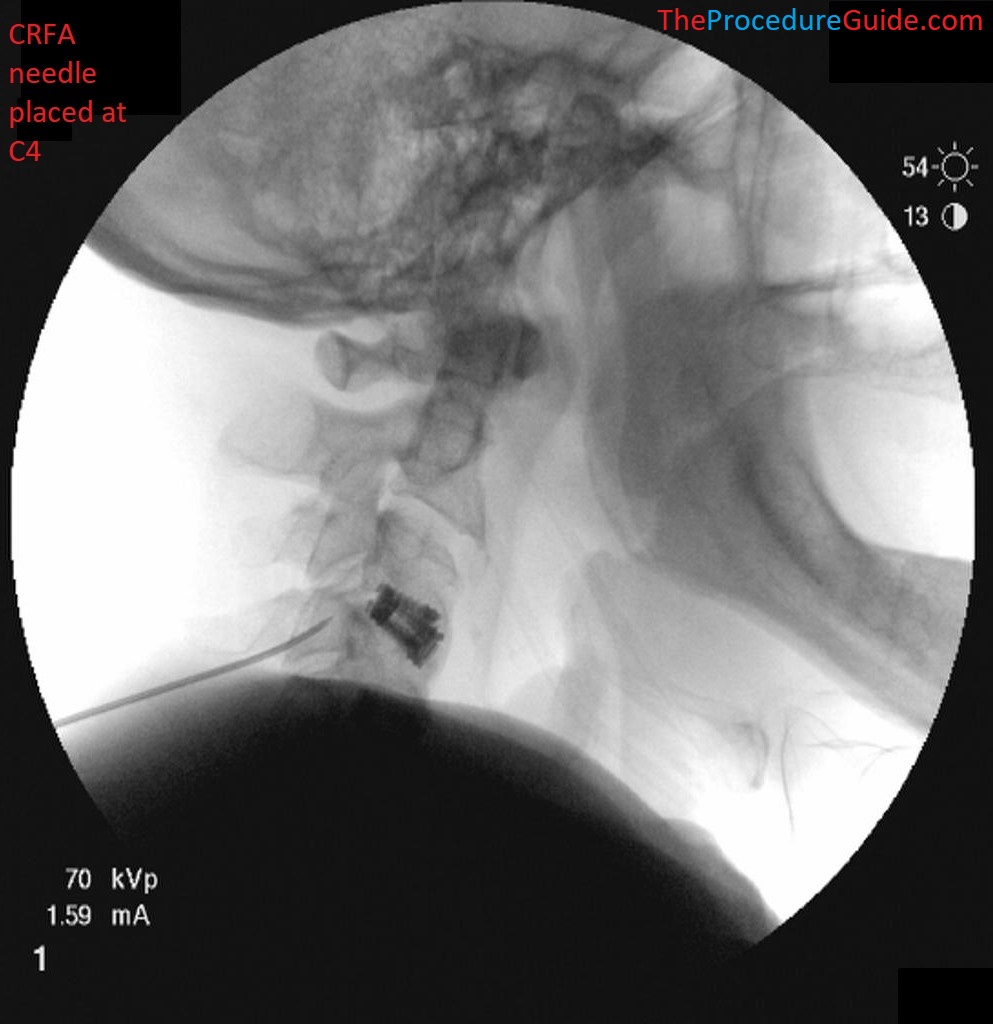
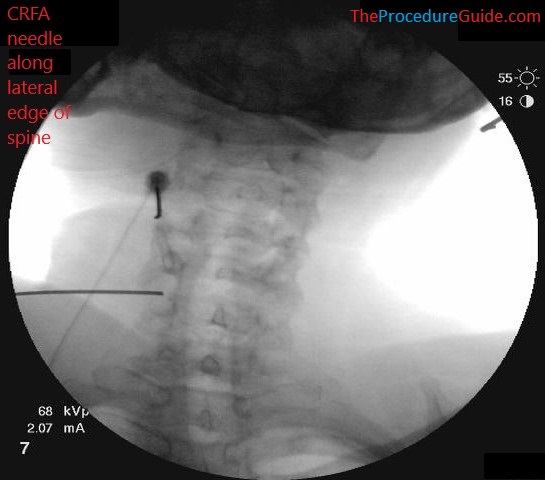
- Switch to a lateral view. The needle tip should be at the posterior border of the lateral mass.
- Note the orientation of your needle: you shouldn’t move any more medial than this trajectory. Moving laterally is safe because you’ll be lateral to the lateral border of the spine.
- Walk the needle off LATERALLY and advance anteriorly so the needle is moving “alongside” the lateral mass of the target level. You can also adjust superior/inferior to get to C2 specifically (as noted above from the AP view you may not be right on C2 to start)
- This keeps the needle roughly parallel with the bone so there is good coverage from the RF zone.
- Fluoro images can show you how far anterior to advance the needle.
- While advancing inject 2-3cc lidocaine to anesthetize the medial branch nerves for ablation.
- Insert the RF probe and test. If negative for stimulation of the nerve root, then treat with RF.
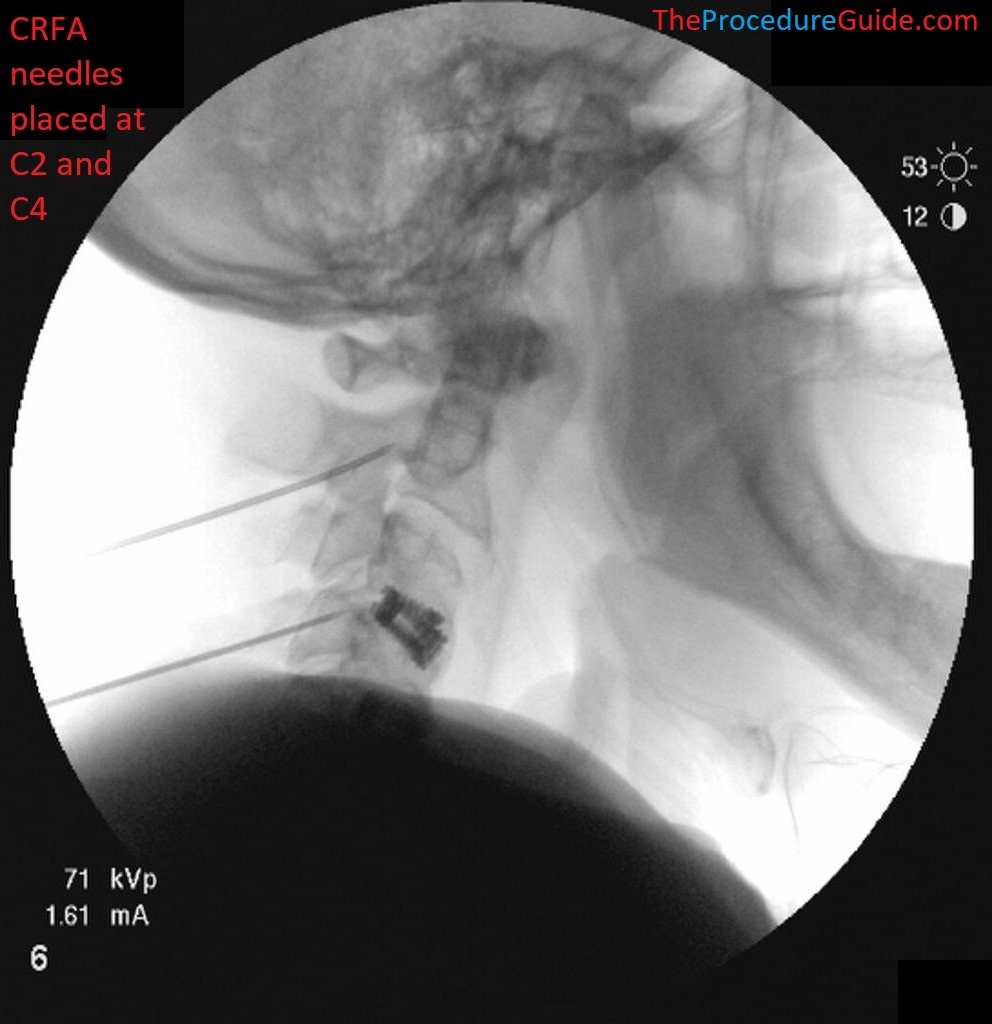
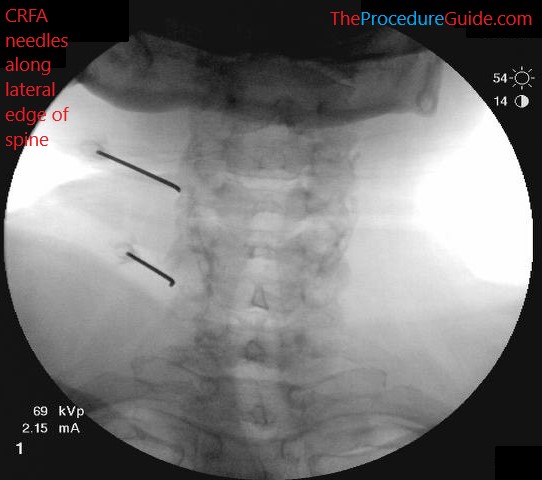
- In this example the top needle is at C2 and there is a second needle at C5:
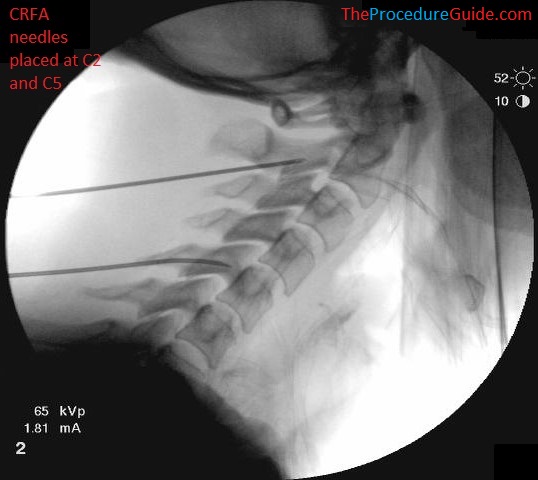
- While this is running you can go back to an AP view and repeat the steps above to place the second needle.
- In this example we started at C2, so the next one can be placed at C5 which will place it far enough away so that the first needle doesn’t physically get in the way.
- You try to get the second needle placed by the time the RF finishes. Then you can just move the probe to start the second RF cycle.
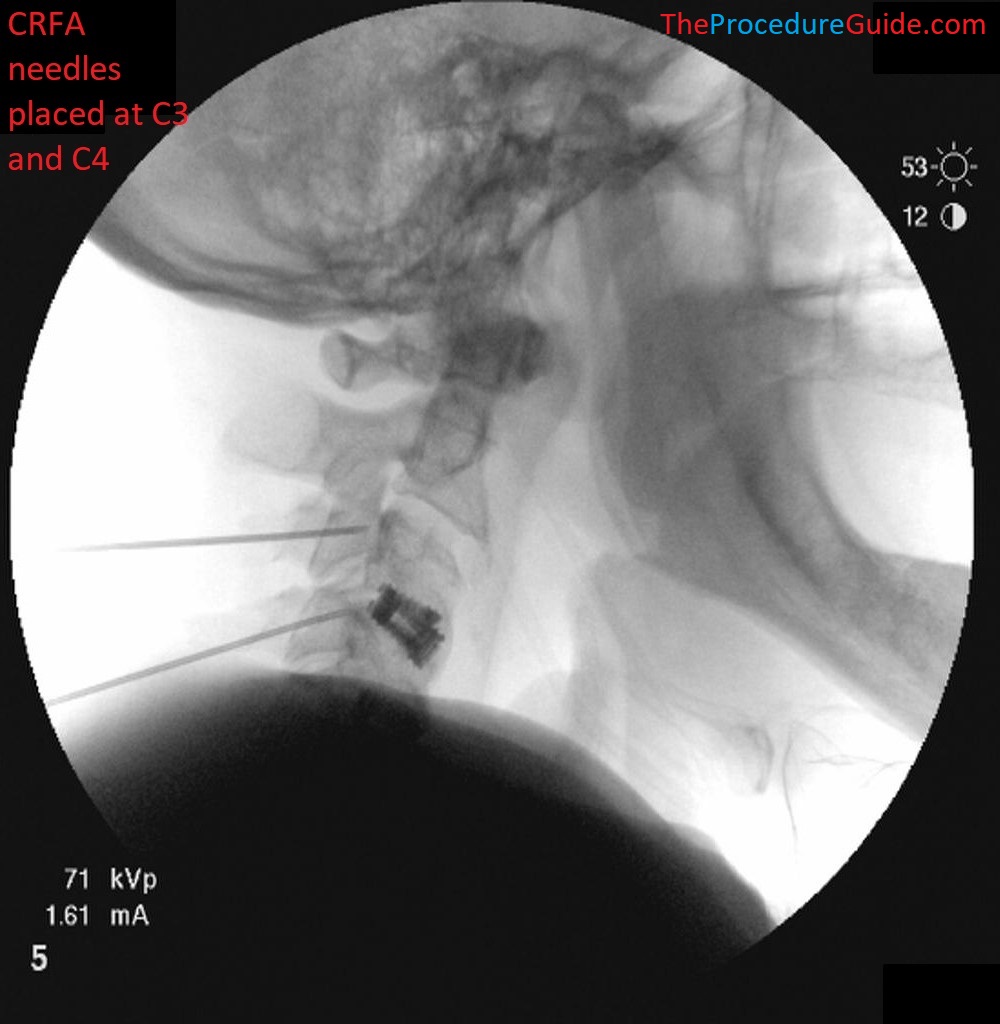
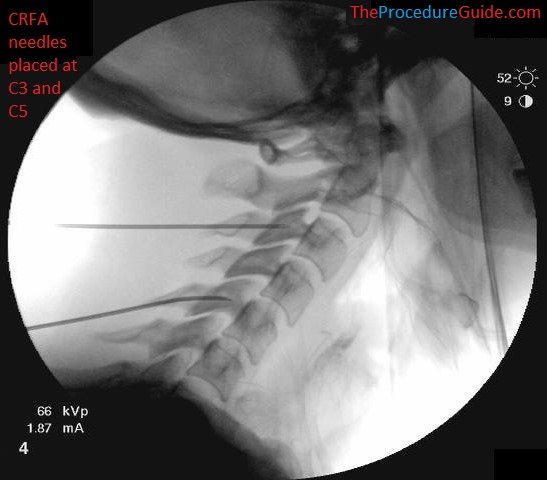
- You now simply redirect the first needle to C3 (under a lateral view) and continue the cycle until all levels are treated.
Example Fluoro Views
Lateral Fluoroscopy views

AP Fluoroscopy views


Tips
- This technique keeps your RF cycle as the rate limiting step. So while one level is being ablated, you are working to place the next needle and so you can complete a 4 level treatment in about 5 minutes.
References
Technique Related References
- Percutaneous Radio-Frequency Neurotomy for Chronic Cervical Zygapophyseal-Joint Pain
- Controlled study where a specific two needle technique was used for cervical RF and is described with limited images
- Cervical Medial Branch Radiofrequency Neurotomy in New Zealand
- Some discussion of a two needle technique for cervical RF and is described with limited images.
- Incidence of neuropathic pain after radiofrequency denervation of the third occipital nerve
- Detailed review of variability of third occipital nerve and technique used to ablate it along with some sample images.
General References
- The provocative lumbar facet joint
- Broad and long overview of many clinical aspects of facet anatomy, pathology, treatment studies
- Diagnostic and therapeutic spinal interventions
- Broad overview of medial branch blocks and radiofrequency ablation and discussion of other literature on the topic
- Single needle approach for multiple medial branch blocks: a new technique
- A prospective crossover comparison study of the single-needle and multiple-needle techniques for facet-joint medial branch block
- Radiofrequency lumbar facet denervation: a comparative study of the reproducibility of lesion size after 2 current radiofrequency techniques