
Table of Contents
Name of Procedure
- Celiac Plexus Block
- Greater/Lesser/Least Splanchnic Nerve Block
Sample Opnote
Goal
To administer medications to the splanchnic nerves just before the celiac plexus, such as local anesthetic or an ablative agent.
Indications
This can be done to provide short or long term pain relief that originates in various upper gastrointestinal structures (pancreas, liver, biliary tract, gallbladder, spleen, adrenal glands, kidneys, mesentery, stomach, and the small and large bowels proximal to the transverse colon)
Contraindications
Anatomy
Pain from upper abdominal structures passes via nerve fibers that run through the celiac plexus (along the anterior surface of the aorta), around the aorta posteriorly, and then to splanchnic nerves on their way to the sympathetic chain and central nervous system.
Understanding the anatomy of those structures explains the possible techniques that could be utilized.
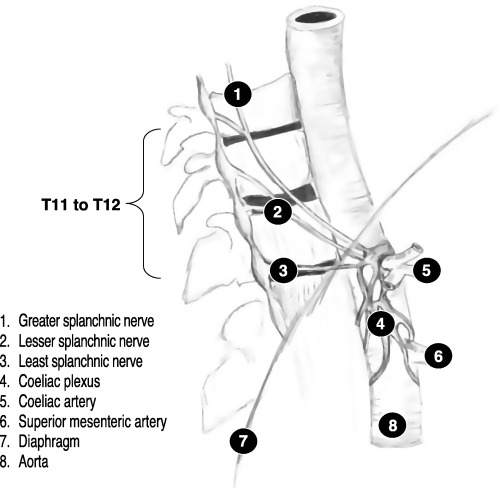

diagram celiac plexus and splanchnic nerves (copyright not indicated. listed on google images)
Let’s review it from the other direction as shown in the diagrams above.
- Fibers from the sympathetic chain from T5-T12 coalesce…
- They form the greater/lesser/least splanchnic nerves…
- These nerves run inferior. Around the level of T12-L1 they run anterior and pass through the diaphragm on their way to the celiac plexus (anterior surface of the aorta).
If you understand these as one continuous set of fibers you could break this down into two categories:
- Retrocrural fibers that are behind the diaphragm
- Antecrural fibers that are in front of the diaphragm
This means we can catch these fibers at a few places for the purpose of a block: around the anterior border of the T12-L1 vertebral bodies or even anterior to the aorta (hence various ways to name and perform this block).
Equipment/Skills/Setup
Core Equipment/Disposables: See our disposables/equipment article for “core” items that are common to all procedures.
Core Skills: See our guides to obtain images of the cervical, thoracic, or lumbar spine. Then steer a needle to direct it under the skin.
Special items and suggested setup for this lumbar sympathetic block technique:
- 2x 22g x 7″ quincke needle as your primary needles
- 3cc contrast in a 3cc syringe
- 10cc 0.25% bupivacaine in a 10cc syringe for injectate
- 5cc 1% lidocaine in a 5cc syringe attached to a 25g x 1.5″ hypodermic needle for subcutaneous local anesthetic
Landmarks and Patient Positioning
Position the patient in a basic prone position so that the bottom of the c-arm can go under the table below the area of the spine that is being treated (T12-L1).
Technique
As discussed above, the target fibers travel over a long path. For the purposes of this technique we’ll target just anterior to the L1 vertebral body. Although, other variations exist, such as:
- targeting higher at T12
- or targeting further posterior or anterior to where we describe
Here is your target and entry point [See our general guide about basics for using targets and entry points to start a procedure]:
- Initial Target: inferolateral corner of the L1 vertebral body
- Final Target: just anterior to the vertebral body (on lateral) and halfway between the lateral and midline of the vertebral body (on AP)
- Entry: Entry point is straight lateral to the Initial Target, by a few cm.
- Obtain a scotty-dog view on the side that you are starting on. From here, rotate to a more exaggerated oblique view.
- Anesthetize the skin and insert a 22g x 7″ quincke needle to contact your initial target.
- From there, “walk” off laterally till you can feel/see the needle advance slightly anterior. (In the below examples, the needles have just hit their initial targets)
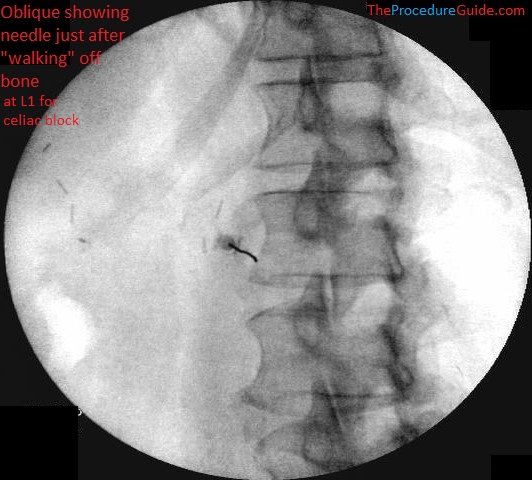
Celiac Plexus Block at L1 – left oblique fluorsocopy initial needle placement 
Celiac Plexus Block at L1 – right oblique initial needle placement
- Change to a lateral view
- Continue to advance the needle with a lateral to medial trajectory (Imagine that you’re trying to wrap the needle around the vertebral body to get to your final target).
- Keep advancing till the needle tip is just a few millimeters past the anterior border of the vertebral body.
- Once in position, aspirate to ensure that no blood returns
- Inject contrast under live fluoroscopy. This is to look for superior-inferior spread and rule out vascular uptake.
- Once you confirm appropriate spread, you can inject your primary medication (~5mL of 0.25% bupivacaine).
- Inject slowly and with with frequent aspiration.
- In the image below, both needles have already been placed and contrast spread is demonstrated.
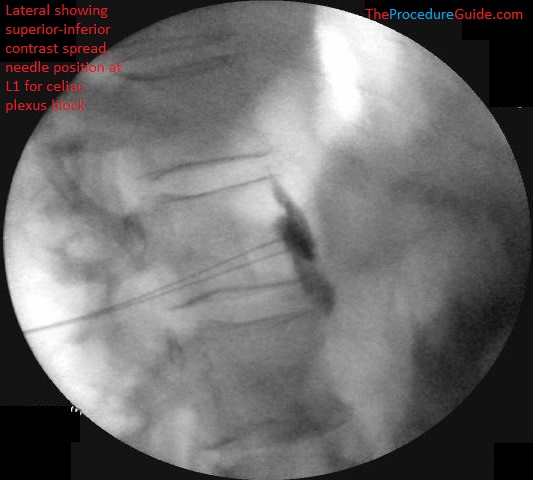
Celiac Plexus Block at L1 – lateral fluoroscopy bilateral final needle placement with contrast spread
- Check and AP view to confirm needle placement (below, both needles are shown):
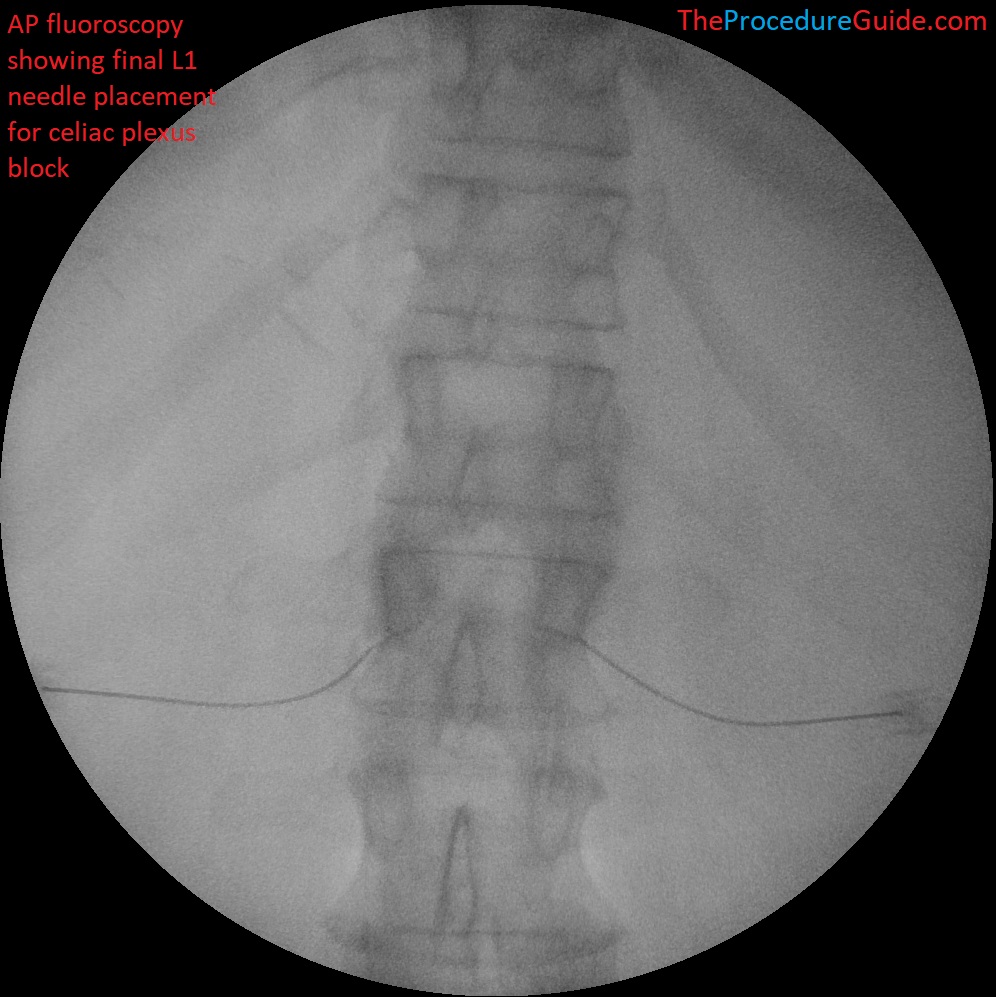
Celiac Plexus Block at L1 – AP fluoroscopy final needle placement
- Repeat exactly on the contralateral side.
Tips
- The description above has you place one needle completely, then the other.
- You can save time by placing a left needle in oblique till it walks off the vertebral body.
- Then, move to right oblique, do the same for the right needle.
- Then go to lateral and advance both needles to their final positions.
- Starting with a far lateral needle entry point helps by giving you a more lateral to medial needle direction. So that by the time the needle is sufficiently anterior, it will also be sufficiently medial.
- Once the needle is past the anterior border of the vertebral body, make small changes since you will be close to the aorta.
References
- Fluoroscopy-guided Neurolytic Splanchnic Nerve Block for Intractable Pain from Upper Abdominal Malignancies in Patients with Distorted Celiac Axis Anatomy: An Effective Alternative to Celiac Plexus Neurolysis – A Retrospective Study
- Review of one technique with some images
- Comparative Study of the Effects of the Retrocrural Celiac Plexus Block Versus Splanchnic Nerve Block, C-arm Guided, for Upper Gastrointestinal Tract Tumors on Pain Relief and the Quality of Life at a Six-month Follow Up
- Review of anatomy and a couple different techniques with some limited images
- Atlas of Pain Medicine Procedures – Chapter 44: Splanchnic Nerve Blocks
- Neurolytic celiac plexus block for pancreatic cancer pain: A review of literature
- Clinical and anatomical review. Different techniques described with some diagrams and images.
- Clinical trial: a randomized trial comparing fluoroscopy guided percutaneous technique vs. endoscopic ultrasound guided technique of coeliac plexus block for treatment of pain in chronic pancreatitis
- Describes and has images for an antecrural needle placement
- CT-guided Celiac Plexus Neurolysis: A Review of Anatomy, Indications, Technique, and Tips for Successful Treatment
- Good review of anatomy with diagrams and description/images of a CT guided trans-aortic approach which helps to further understand the relevant anatomy.