
Table of Contents
Name of Procedure
- Lumbar Epidural Anesthesia/Analgesia (LAE)
- Lumbar Epidural Catheter Insertion
- Thoracic Epidural Anesthesia/Analgesia (TAE)
- Thoracic Epidural Catheter Insertion
Goal
To insert a catheter into the epidural space for administration of medication such as local anesthetic and opioids.
Indications
- Provide analgesia in the perioperative setting (can act as the primary anesthetic or to augment general anesthesia and reduce general anesthetic requirements)
- Analgesia in the peripartum setting
Contraindications
- Severe coagulopathy
- Many other typical, or possible, contraindications are relative and depend on patient specific conditions. Such as:
- Infection
- Elevated intracranial pressure (in case of accidental dural puncture and CNS herniation)
- Some coagulopathies
See NYSORA’s Contraindications section for more discussion on specific situations.
Anatomy
Overview
- The spinal cord runs down the middle of the spinal canal
- The cord itself ends around L1-L2 and only the cauda equina continues
- Hence, below L1-L2 is a good place to stick a needle as it’s below the cord and less likely to cause injury.
- Immediately surrounding the cauda equina is the intrathecal space (subarachnoid space) which contains the CSF (cerebrospinal fluid)
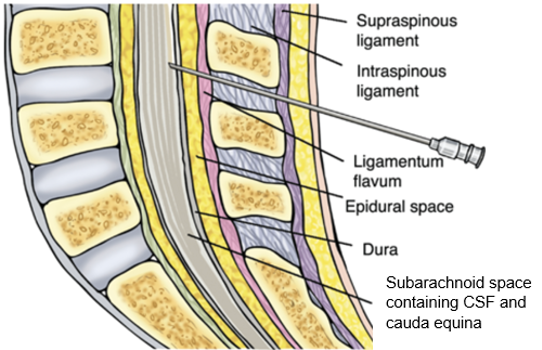
- Moving posteriorly/superficially through the layers you have the:
- Arachnoid mater
- Dura mater
- Epidural space
- Ligamentum flavum
- Interspinous space/ligament
- Supraspinous ligament
- Skin/subcutaneous fat
Sagittal plane, which shows a needle trajectory that would get access to the epidural or intrathecal space (in this picture the tip is in the intrathecal space):
Level Selection
There are two “levels” to consider:
- “Block level”
- The levels at which you need to achieve the desired local anesthetic block. Usually this is a range.
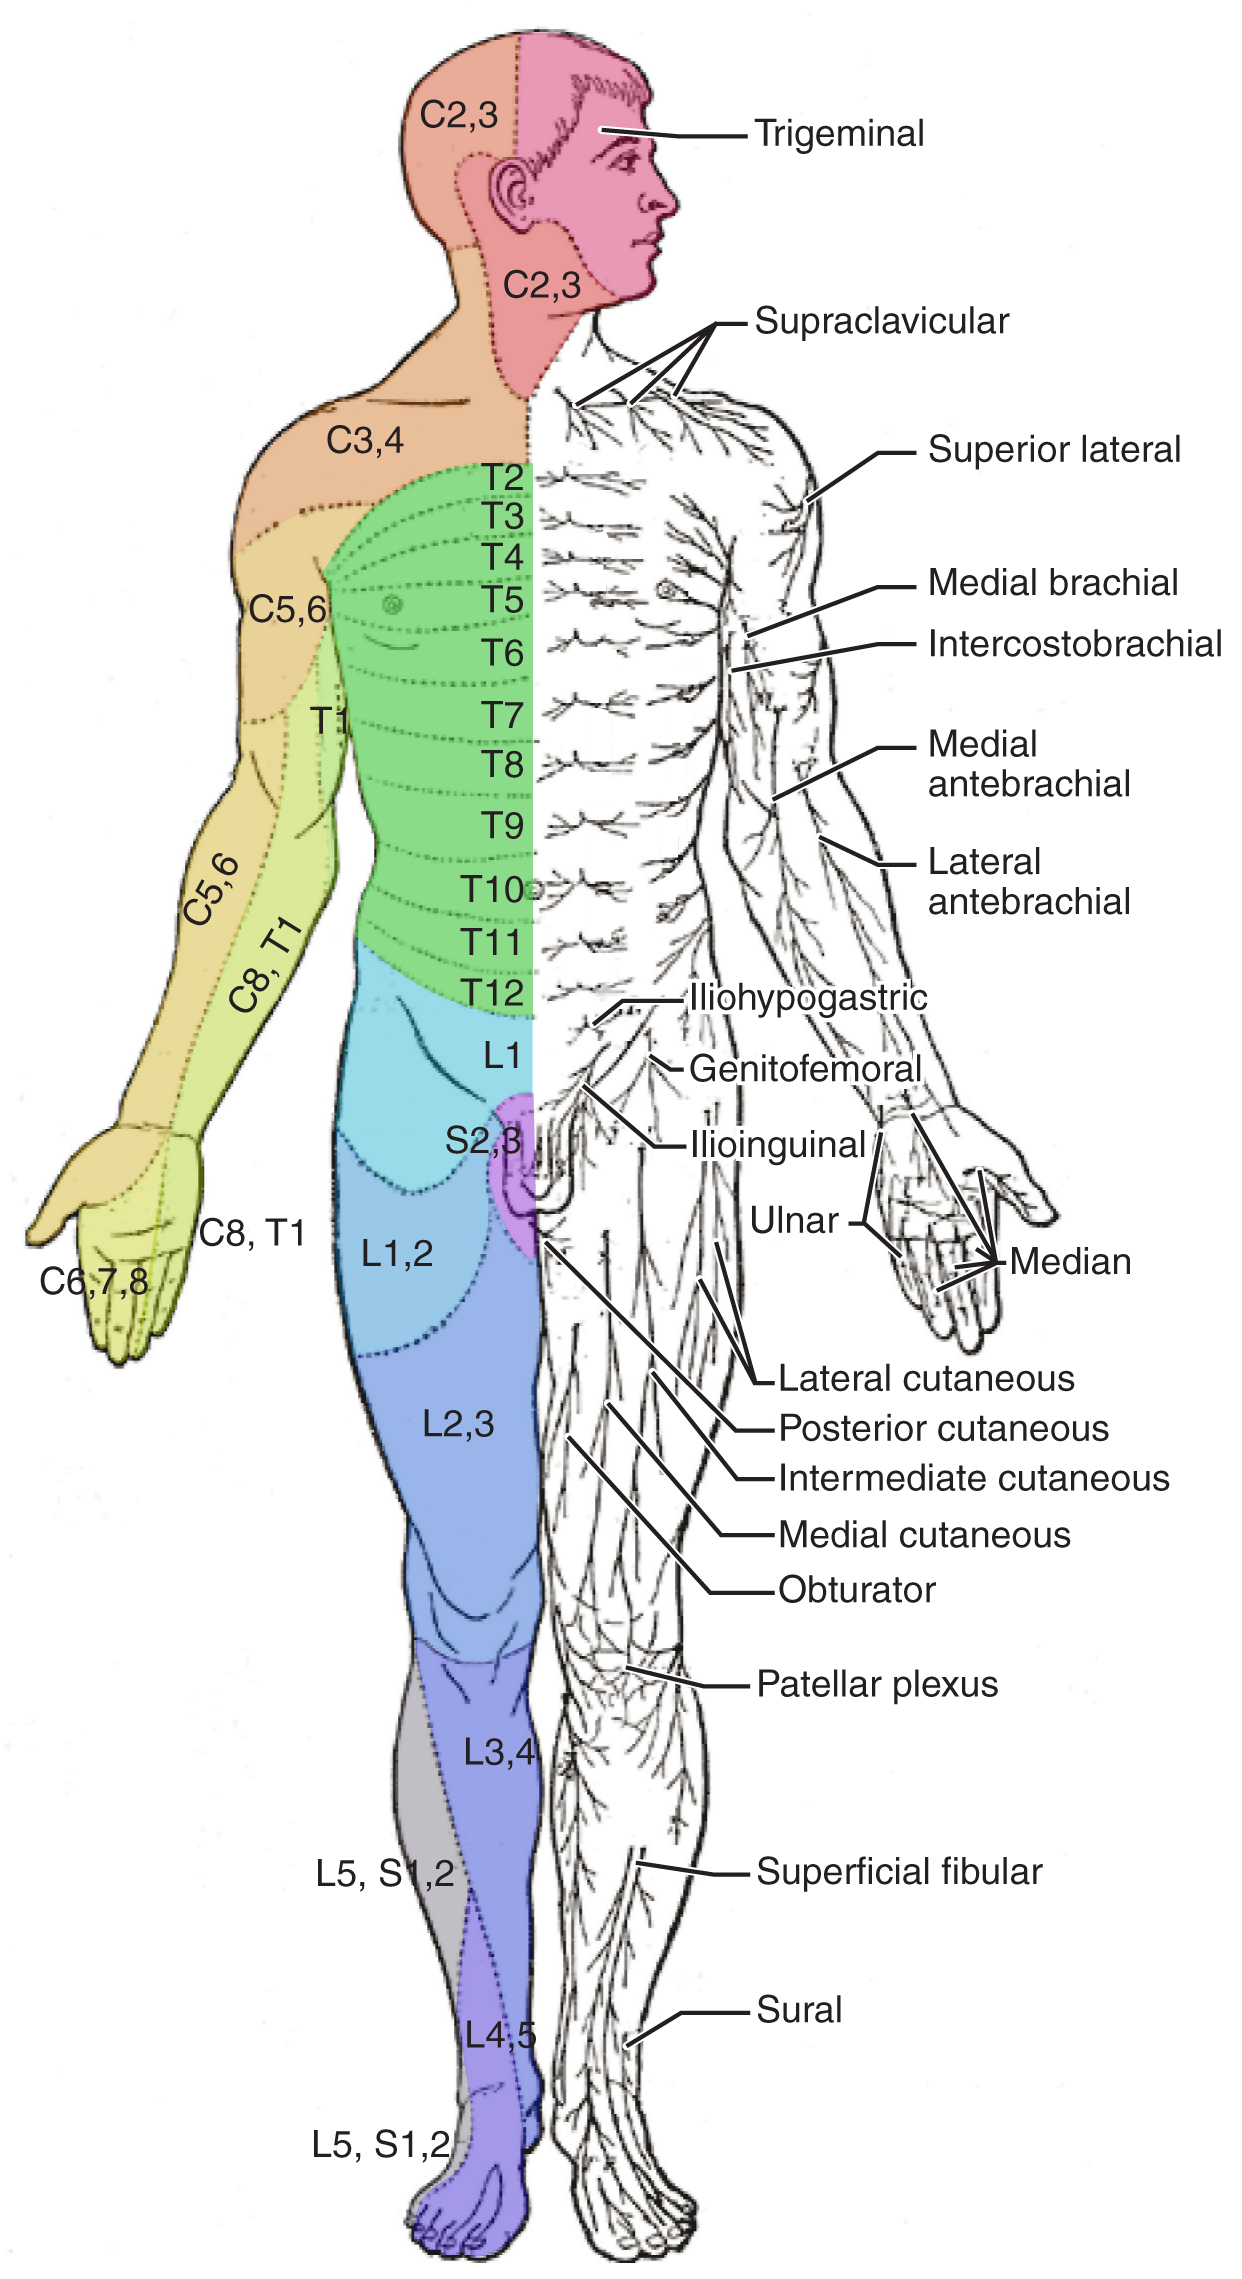
- Skin incisions are easy to predict based on dermatomes.
- Visceral and extremity pain may not be as straightforward. You can use a reference or there might be some institutional preference. See this excellent dermatomal level review from NYSORA (“Indications” Section).
EXAMPLE: An incision primarily around the umbilicus will cause pain centered around T10.
- “Entry level”
- The interlaminar space at which you’ll access the epidural space
- Usually this is 1-3 levels below your block level.
EXAMPLE: You want T8-T10 coverage. Enter around T10-T11 or T11-T12 with the epidural needle

From here, the catheter could advance up to about T9 and medication should spread to cover all your desired levels
Thoracic vs Lumbar
Note how the thoracic vertebrae are shaped differently than lumbar vertebrae:
- From an AP view: They have spinous processes that are more angled and overlap with each other.
- They potentially have more narrow interlaminar spaces.

Therefore a paramedian approach might be easier for thoracic epidural access: As shown in the right image, if you enter the interlaminar space from an oblique perspective, this is referred to as a paramedian approach.
It isn’t as pronounced on this model but especially at higher levels the paramedian approach might be much more open than a midline/interspinous approach.
Equipment/Skills/Setup
Often times you’ll have an epidural kit that will contain necessary supplies:
- Prep
- Betadine or chlorhexidine
- Sterile drapes
- Procedure
- 3-5mL of 1% lidocaine with a 25G or smaller hypodermic needle for subcutaneous local anesthetic
- Tuohy epidural needle with stylet inserted (Usually 17 or 18g. Usually 3.5” except for obese patients)
- Epidural Catheter
- Glass or plastic loss of resistance (LOR) syringe
- Tegaderm or similar clear adhesive to cover the insertion site.
- Extra tape (such as paper tape) to secure the epidural catheter
- Adapters:
- Luer lock cap for the tip of the catheters.
- Filter to attach to the catheter cap.
- Medications
- Preservative free normal saline for LOR
- Test dose (1:200,000 epinephrine. Usually mixed with lidocaine 1-2%)
Landmarks and Patient Positioning
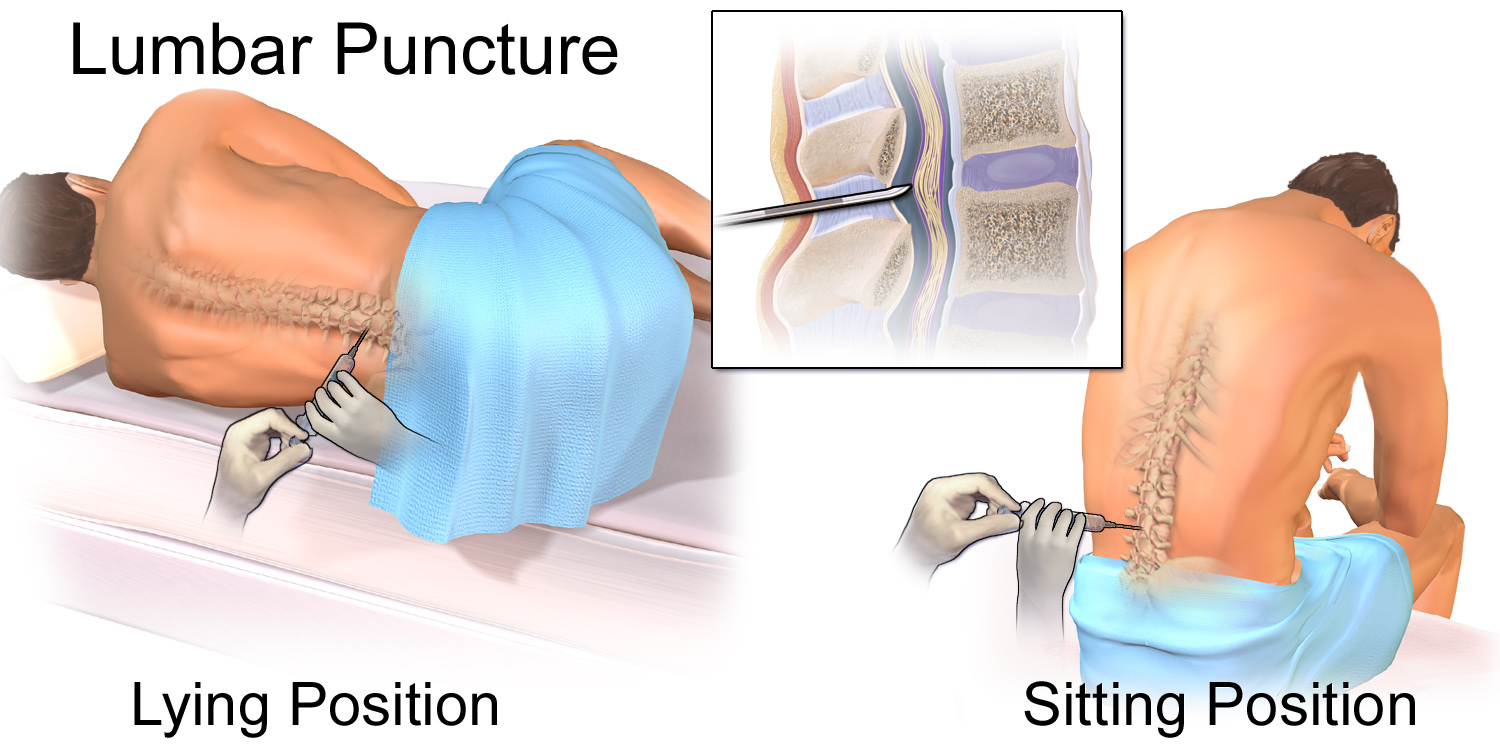
Positioning
The patient can be in a sitting or lateral position
- In either position the key is to have the patient arch their low back like a cat (you don’t want the patient to bend forward at the waist and away from you).
- This opens up the interspinous spaces allowing a larger path for your needle.
- A useful instruction is to put your finger on their low back and tell the patient to push back on your finger by arching their back.
Landmarks
The top of the iliac crest tends to be around L3-L4. As described under Anatomy, this level, or a lower level, is a good entry point as it is below the end of the spinal cord.
- Feel the top of the iliac crests
- Move medial to midline and find an interspinous space (see image above)
- Push up and down along midline and you’ll feel the bumpy protrusions, which are your spinous processes
- In between you’ll feel divots which are your interspinous spaces
- Within the divot, find the inferior most spot as an entry point to give you a good trajectory between the spinous processes.
Technique
Once the patient is in position:
Midline Approach
- Find the entry level:
- As noted above, you’ll pick the inferior most spot within an interspinous space.
- Infiltrate the subcutaneous layer and along your projected needle trajectory with local anesthetic.
- For average BMI patients you can hub a 1.5” hypodermic needle without getting near the epidural space.
- As noted above, any pass of a needle might hit bone and will help build your mental map of the patient’s anatomy.
- Insert your epidural needle
- If you aim anteriorly you should hit the superior border of the inferior spinous process.
- From here, walk superiorly and advance till you engage the needle in the interspinous ligament.
- Access the epidural space
- Use continuous or intermittent loss of resistance to identify the epidural space.
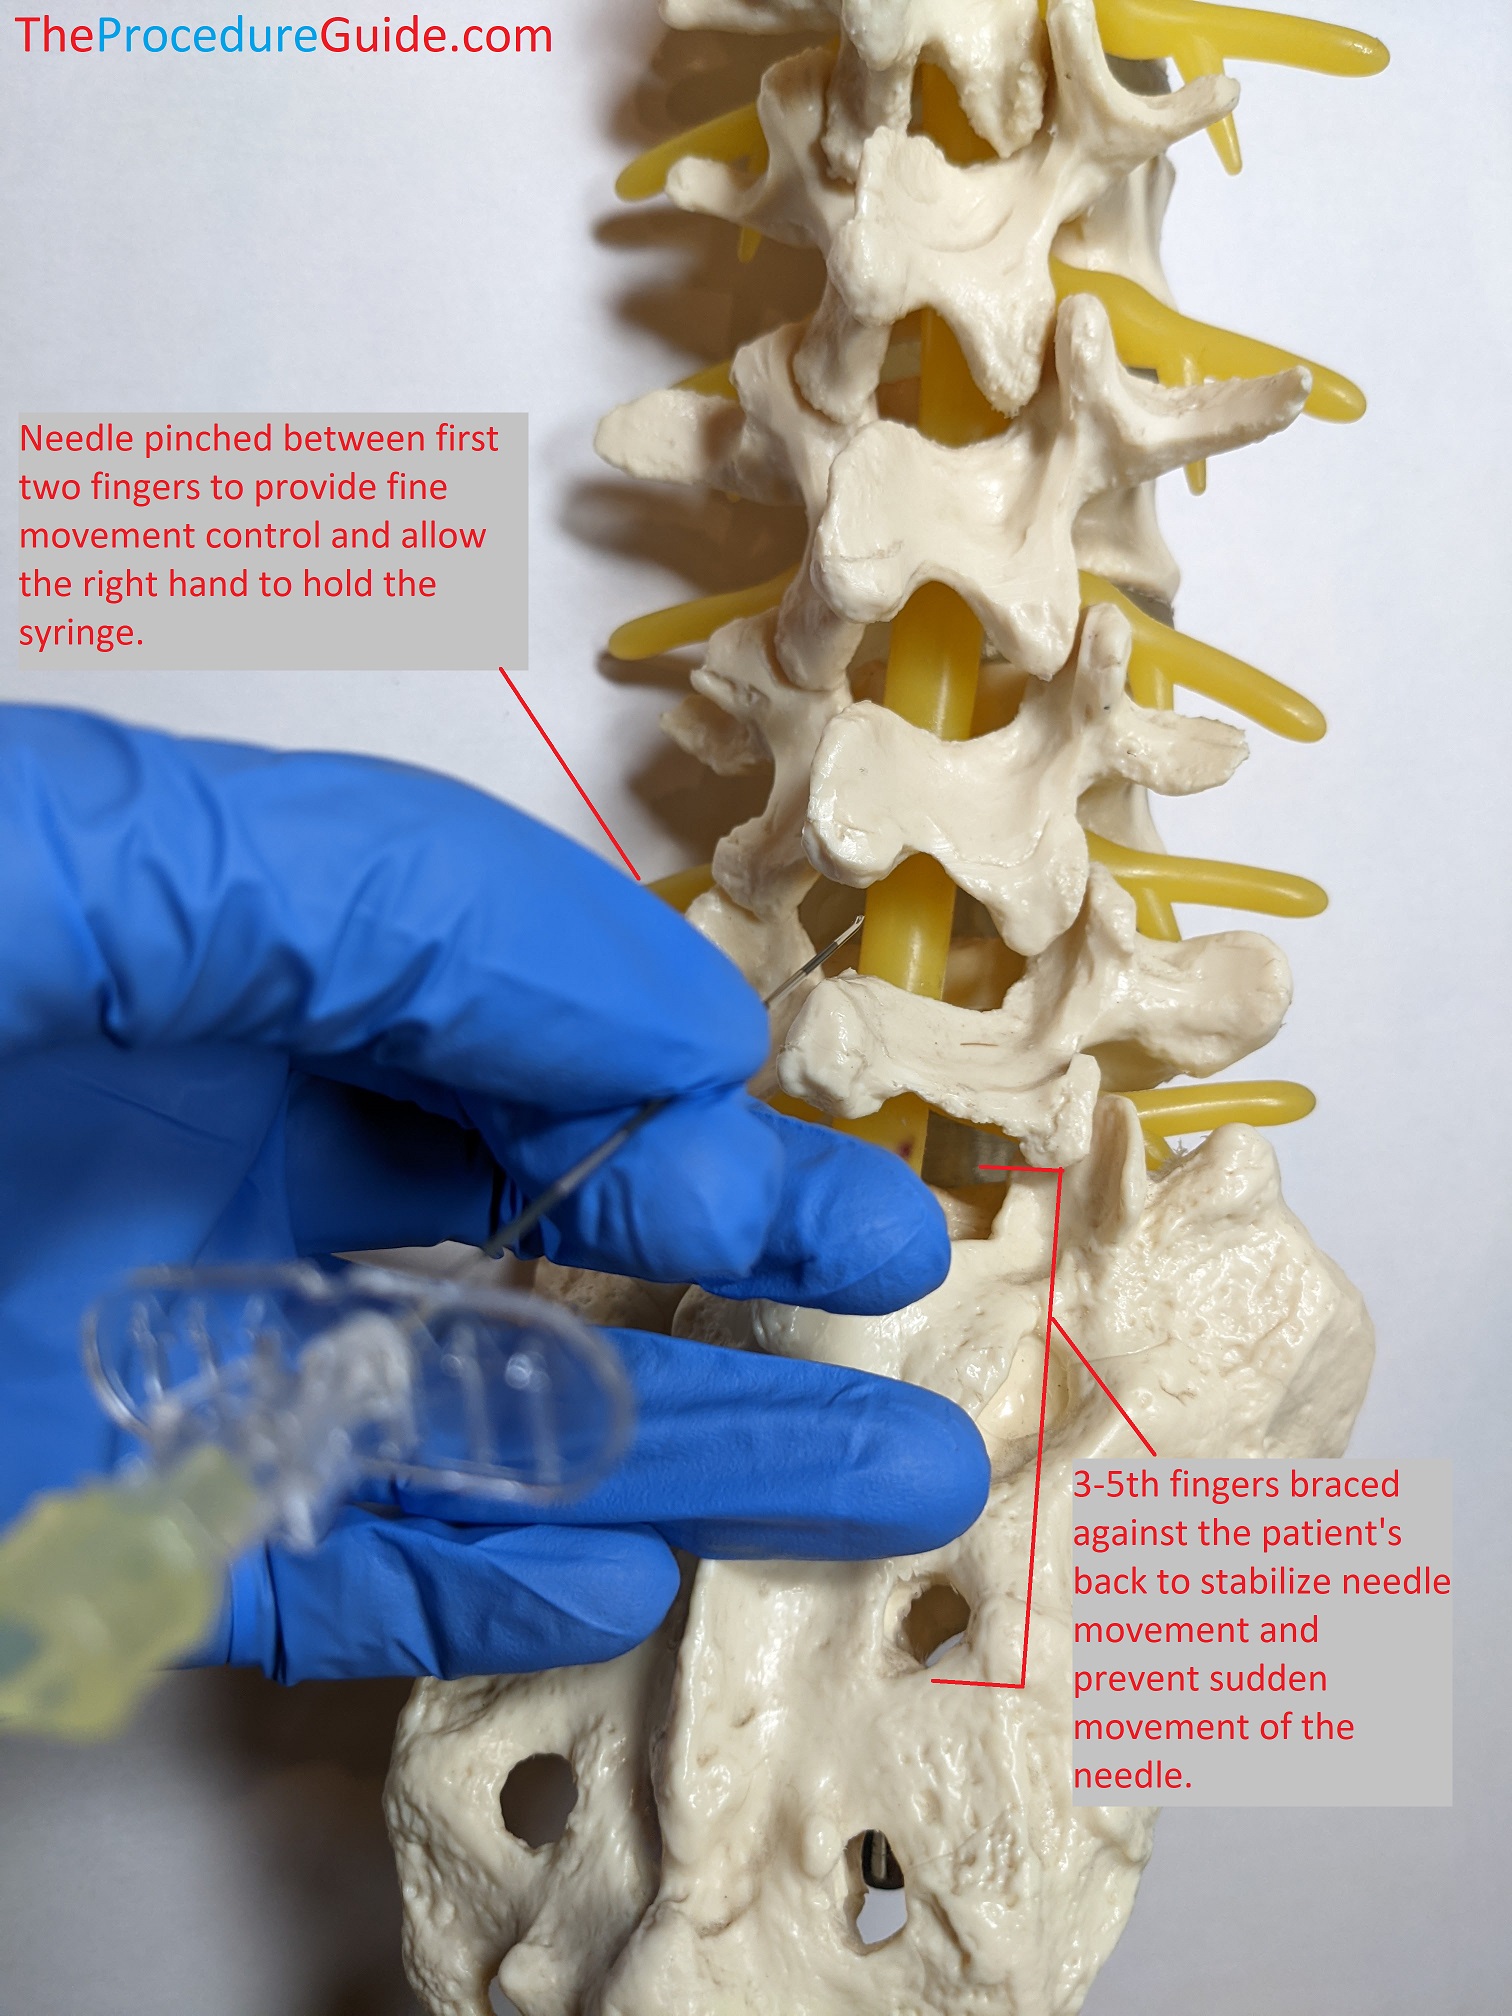
Experience will help determine how to hold the needle in a way that's comfortable. The following technique allows for small needle movement, continuous loss of resistance with the right hand, and secures the needle so if the patient moves backwards suddenly the needle + your left hand move in sync.
- Advance Catheter
- Remove the stylet. Watch for continuous flowing fluid:
- If clear, it may be CSF
- If consistently red, it may be from an epidural vein
- A small amount of initial clear fluid might just be saline from the LOR.
- Most catheters will be bent in one direction. Insert the catheter with that bend aiming superiorly.
- It should advance smoothly for the most part although minor points of resistance are normal.
- Remove the stylet. Watch for continuous flowing fluid:
- Calculate distances and the desired catheter position. You need a few #s:
- Distance to epidural space: (length of the needle, usually 9cm) – (# of markers visible outside the patient)
- Amount of catheter in the epidural space: (marker on catheter at the patient skin) – (distance to epidural space)
- Target to have roughly 3-5cm of catheter in the epidural space. You can set that up during initial placement of after the needle is out:
- If initially: Thread the catheter till it’s exactly your target distance into the epidural space.
- Then when removing the needle be sure not to pull the catheter at all.
- If after the needle is out: Advance the catheter well beyond 3-5cm into the epidural space, which is easy to estimate and doesn’t have to be exact.
- Now that the needle is out, simply pull the catheter back till the right amount is in the epidural space as noted above, by watching the markers on the catheter at the skin entry point
- There’s risk of paresthesia if advancing too far, but seems uncommon based on these authors’ personal experience.
- If initially: Thread the catheter till it’s exactly your target distance into the epidural space.
- Finish up
- Apply the catheter luer lock cap. Aspirate with a small syringe to confirm negative aspiration.
- Attach your filter adapter to the tip so it stays closed off/clean.
- Tape:
- You want to tape the catheter in a way that minimizes the chances that it gets pulled out, can be inspected, and remains clean:
- Place the catheter into a simple loose loop around the insertion site, and then apply a clear dressing (like a sterile tegaderm).
- You can remove the sterile drape now that the insertion site is closed.
- Drape the remaining catheter up the back and usually over the shoulder so it’s accessible and comfortable for the patient.
- Apply an easy to manage tape such as paper tape over the edges of the tegaderm and over the catheter to keep everything secure and in place.
- Apply the catheter luer lock cap. Aspirate with a small syringe to confirm negative aspiration.
- Test dose
- Sometime during the wrap up steps (ie, after the tegaderm is in place), you can administer your test dose: about 3 mL of 1.5% lidocaine with 15 μg of epinephrine.
- Full discussion of test doses and their validity are beyond this article’s scope. See a good overview in NYSORA’s “Test Dose” section.
Paramedian Approach
You follow most of the same steps as the midline approach with a few changes noted below.
- Find the entry point
- Start as above by finding an interspace.
- Palpate the lower spinous process and then find a point about 1cm lateral (on either side).
- This will be your entry point: anesthetize.
- Anesthetize and use your 25g needle to map out bone. Anesthetize on bone surface and along your projected trajectory (see image below).
- Insert your epidural needle
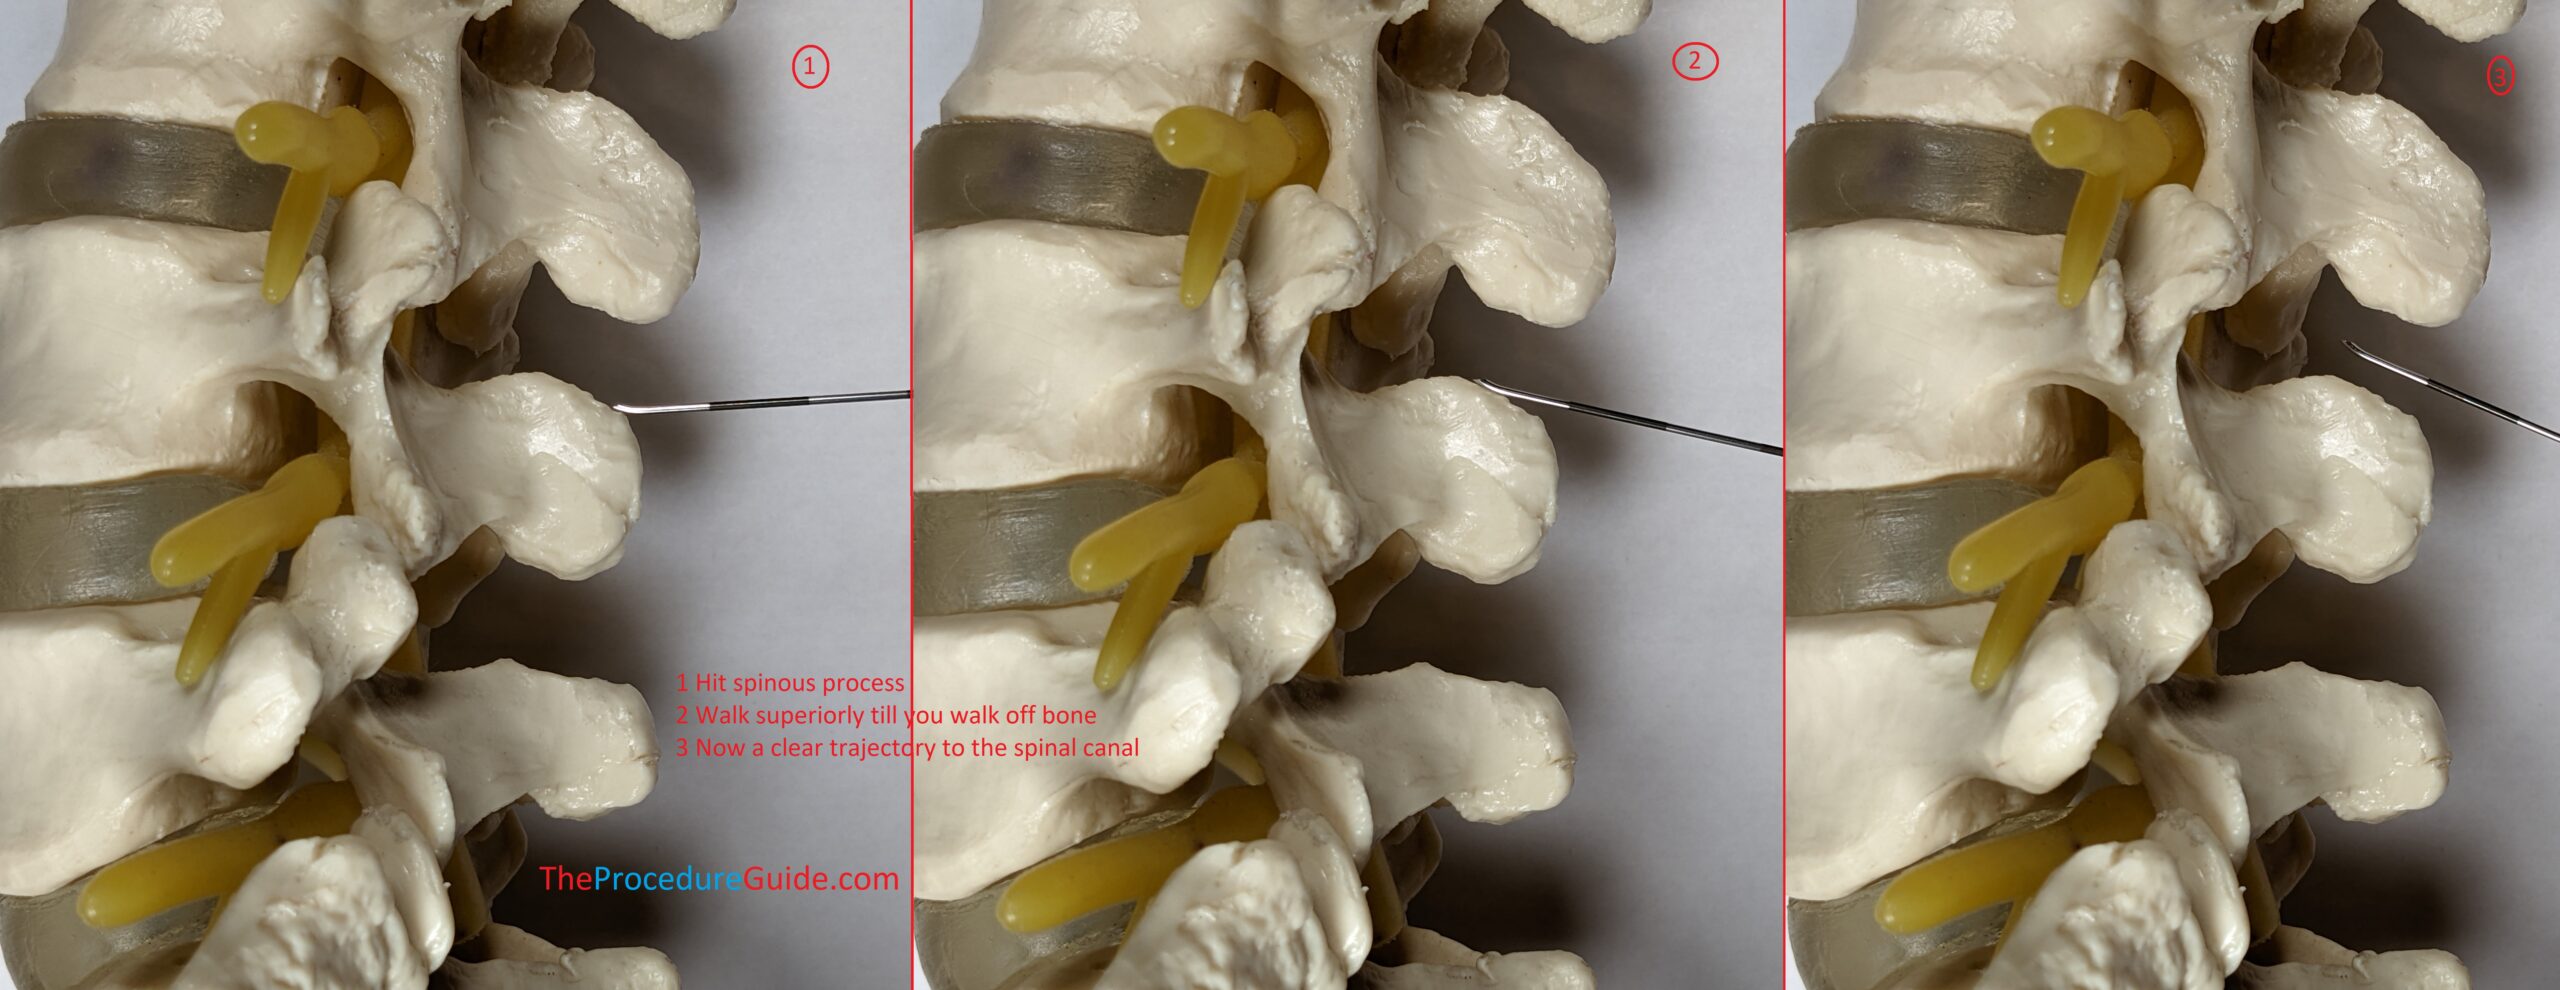
- It might be helpful to contact bone first and walk off to confirm your trajectory…
- If you aim anterior from your entry point you should hit lamina as a safe target (Image #1 below).
- From here you walk superior and medial. Once the needle slips off bone and feels like it engages ligament (Image #3) you should be close and can attach your LOR syringe.
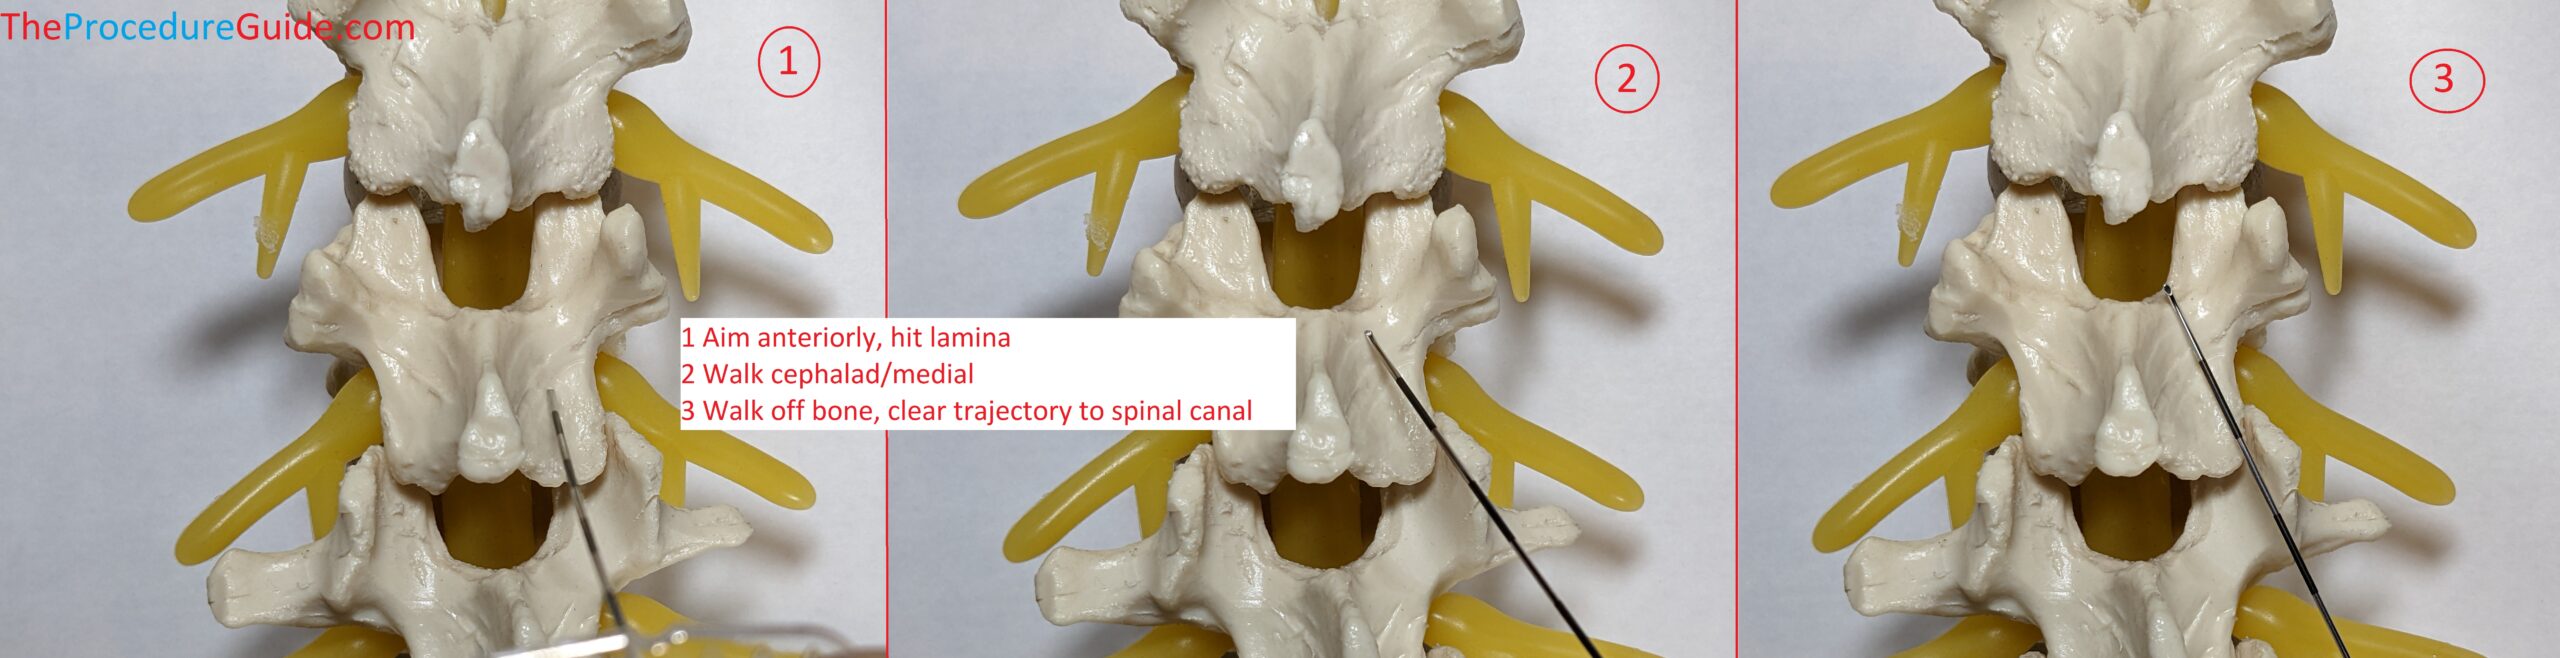
You want a trajectory that allows you to land your needle tip in the midline/posterior epidural space without being off to one side. This takes 3 dimensional thinking and experience
- Access the epidural space and finish
- The remaining steps are as described above.
Tips
- Procedure Setup
- Epidural catheters are often placed in patients that may already be uncomfortable pre-procedure. A standard sitting position might be difficult (e.g., laboring patient, postop patient with large abdominal incision)
- Setting up some of your tray prior to positioning might help minimize the time the patient has to be sitting. Or having another assistant position the patient simultaneously:
- Items out of package
- Test dose drawn up and flushed through filter, ready to attach to catheter
- Tape ready
- Etc.
- Finding an interspace
- Blind identification of vertebral levels based on surface anatomy is somewhat unreliable, but is still how most people do it. [NYSORA Overview]
- Despite this issue, you can oftentimes get close enough to get the catcher close to your target. And with enough medication volume you can often get good enough coverage.
- Trouble threading the catheter
- Although less likely, the needle could be obstructed. Place the stylet and remove it to clear the lumen
- Partial epidural access
- The tuohy needle opening may be only partially into the epidural space. This will cause the catheter to hit ligament while trying to exit the needle
- Advance the needle very slightly in this case
- “Tight” epidural space.
- You can dilate the epidural space with saline and see if that makes advancement easier.
- Lateral catheter placement
- The catheter can move off midline into the “gutter” just while threading it.
- Use physical cues to understand if your needle tip is midline or not:
- Appears to be midline?
- Is there any scoliosis?
- If you took a paramedian approach, does it look like your needle tip landed midline?
- Is the patient positioned oddly on the bed or twisted?
- Corrective measures:
- Adjust needle
- Pull the catheter back gently.
- Gently rotate the needle in the direction that you want to direct the catheter. (Remember that the opening on a tuohy needle is on one side of the needle so the catheter will exit and move in the direction of that initial opening.
- Attempt to thread the catheter again.
- Adjust placement
- Pull the needle out of the epidural space slightly
- Re-advance slightly in the desired direction and re-access the epidural space and try to thread again.
- Adjust level
- Trying at another level might be necessary
- Adjust needle
- Paresthesias
- Patients might indicate left or right paresthesias during catheter placement
- This not only can lead to nerve injury but indicates unilateral catheter placement.
- Use this as a guide to pull back your catheter and adjust as described above.
- Trouble with coverage:
- Unilateral or dermatome specific coverage probably means that your catheter has moved off to one side or even near one neuroforamen.
- You have a few options:
- Pull the catheter back slightly to bring the tip to midline. Then retry injecting a bolus of medication.
- Inject a larger volume of medication for broader coverage.
- Replacing the epidural entirely at a different level.
References
- Epidural Anesthesia and Analgesia – NYSORA
- Extremely thorough review of this topic (and related topics). Not as useful as a quick practical reference but very good for exploring almost any subtopic related to neuraxial anesthesia.
- Epidural Catheter – StatPearls – NCBI Bookshelf
- Another review of epidural catheter placement with some technique description but very few images.
- Epidural Catheter Analgesia | Anesthesia Key
- Review of the procedure with some anatomical images.