
Table of Contents
Name of Procedure
- Fluoroscopic/x-ray guided hip intraarticular joint injection (with or without steroid)
Sample Opnote
Goal
To inject a medication into the hip joint
Indications
Several potential indications, usually to treat pain from osteoarthritis
Contraindications
Anatomy
For the purposes of hip injections, anatomy is straightforward.
- For an intraarticular injection:
- The anterior or lateral border of the femoral neck provides a good target for the needle tip (blue dot)
- Ideally the contrast will spread around the neck such as near the junction of the head and neck (purple line)
- The hip/upper femur have several bursae so we are going to focus on ones just lateral to the greater trochanter.

diagram of hip joint with target for needle for intraarticular injection and desired contrast spread. Modified of original at: https://commons.wikimedia.org/wiki/File:Gray244.png
Equipment/Skills
Core Equipment/Disposables: See our disposables/equipment article for “core” items that are common to all procedures.
Additional specific supplies/setup:
- Bent 22g quincke needle
- 3cc syringe with about 2cc contrast
- 5cc syringe with desired injectate:
- bupivacaine/lidocaine
- steroid (dexamethasone/triamcinolone)
Landmarks and Patient Positioning
Position the patient in a basic supine position so that the bottom of the c-arm can go under the table below the hip.
Technique
For this guide we’ll outline a lateral to medial approach, although there are other approaches like straight anterior to posterior.
Find your entry point:
- Assume your needle is entering from the lateral part of the thigh and aiming medially: In an AP view you do not have a good sense of where your needle is in an anterior-posterior direction/frontal plane (ie, it’s depth):
- If you check a lateral, unless both legs are perfectly aligned, it might be hard to know your needle depth in the anterior/posterior direction.
- Also, a lateral usually isn’t necessary: Feel the lateral thigh to assess where the femur is. This tells you your entry point and trajectory in the frontal plane.
- This is a complicated way of saying: feel the leg for the greater trochanter (marked below). This red line is the frontal plane that you want to keep your needle in while you’re advancing medial to hit the femoral neck.
Start your procedure:
- Get an AP view so that you see the joint on one end of the image and a view of the lateral part of the leg/skin on the other end of the image, so as to see the needle’s full trajectory.
- In the image below, on the far left you see the entry point at the skin (usually superior to the greater trochanter) and trajectory of the needle (aiming medial and inferior slightly to come over the greater trochanter towards the femoral neck):
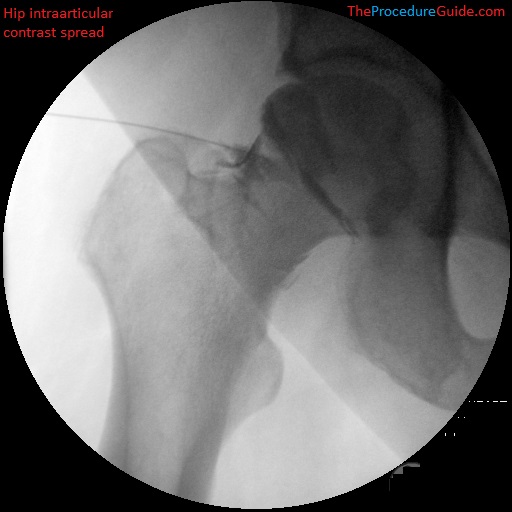
hip intraarticular injection under fluoroscopy with contrast
- Anesthetize and then steer your 22g quincke needle towards the joint (staying in that frontal/red plane noted above)
- Inject a small amount of contrast to confirm spread in the joint
- You can see the contrast circling the top of the femoral neck above.
- From here inject the desired medication based on the specific procedure that you’re doing.
Tips
- Alternative approaches like an anterior-posterior needle approach are simpler for images since you just go straight down to to the joint and don’t have to worry about other planes/views.
- However there is vasculature that you could hit with this trajectory.
References
- Ultrasound-Guided Hip Injections: A Comparative Study With Fluoroscopy-Guided Injections
- Describes an anterior approach with a couple xray images
- Fluoroscopically Guided Lateral Approach Hip Injection
- Thorough review of a lateral hip injection approach as described above along with some images.
- Hip Joint Injection
- Procedure “how to” article like this one, but for an anterior/posterior approach. Some images included.